JavaWeb学习笔记
JavaWeb学习笔记

显示/隐藏 目录
- JavaWeb学习笔记
- 目录
- 概念
- 数据库:mySql
- JDBC
- Maven
- myBatis
- Tomcat
- Servlet
- JSP(Java Server Pages)Java服务端页面
- MVC模式与三层架构
- 使用
三层架构重写登录注册案例 - Fastjson:JSON 数据和 Java 对象转换
- Cookie、Session会话跟踪技术
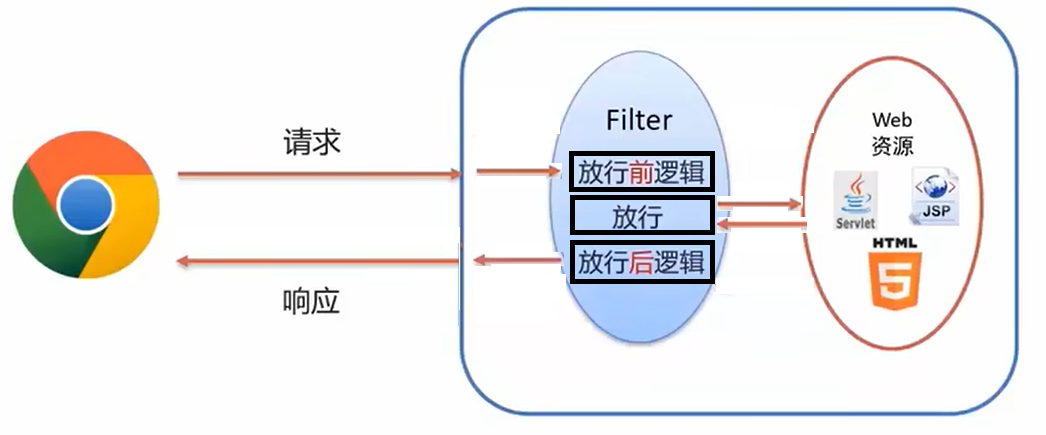
- Filter
- Listener
- 补充:文件上传
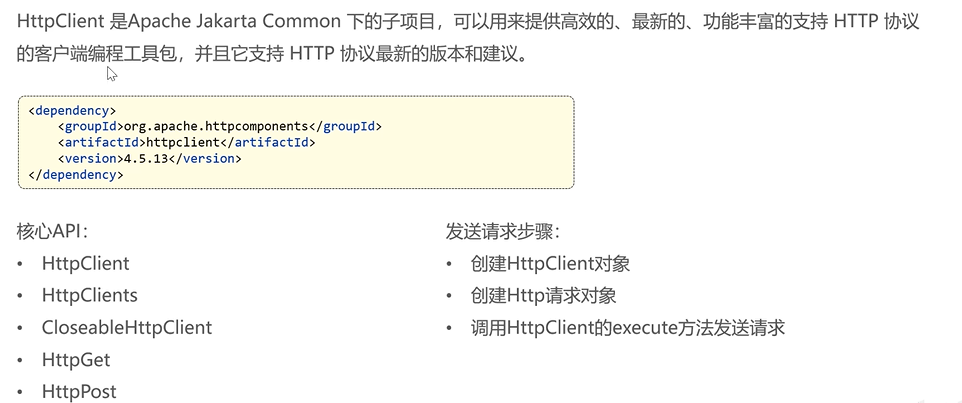
- 补充:HttpClient
概念
JavaWeb:用java技术解决Web互联网领域问题的技术栈
内容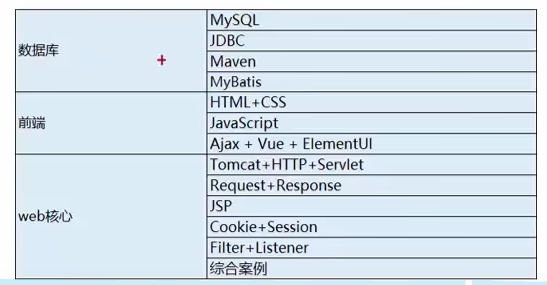
数据库:mySql
DBMS
Oracle: 收费的大型数据库,Oracle 公司的产品MySQL: 开源免费的中小型数据库。后来Sun公司收购了MySQL,而Sun公司又被Oracle 收购.MariaDB:开源免费中小型的数据库,SQL Server: MicroSoft公司收费的中型的数据库。C#、.net等语言常使用SQLite:嵌入式的微型数据库。如:作为Android内置数据库
mySql安装配置
下载解压版
mysql-5.7配置环境变量
JAVA_HOME = D:\Program Files\mysql-5.7.38-winx64
PATH += %MYSQL_HOME%\bin
编写配置文件
my.ini,放到根目录[mysql] default-character-set=utf8 [mysqld] skip-grant-tables # 跳过权限表认证,用于解决登录sql的报错:ERROR 1045 (28000): Access denied for user 'root'@'localhost' (using password: NO) port=3306 character-set-server=utf8 default-storage-engine=INNODB sql-mode="STRICT_TRANS_TABLES,NO_ZERO_IN_DATE,NO_ZERO_DATE,ERROR_FOR_DIVISION_BY_ZERO,NO_AUTO_CREATE_USER,NO_ENGINE_SUBSTITUTION"初始化数据库
#以管理员方式执行,效果为在mysql根目录生成data文件夹
mysqld --initialize-insecure
注册mysql为系统服务
mysqld -install #注册服务
mysqld -remove #删除服务
问题
若注册服务提示找不到文件,则修改注册表,将路径改为正确路径
启动mysql服务
# 方法1
net start mysql #启动服务
net stop mysql # 停止服务
# 方法2
services.msc # 通过windows的services图形界面启动
修改密码
mysqld --skip-grant-tables # --skip-grant-tables 的意思是跳过权限表认证。
mysqld -u root -p root  # 修改密码
登录
mysql -u root -p # 默认密码为空
mysql -u 用户名 -p 密码 -h 主机 -P 端口
SQL基础语法
规范
- 关键字不区分大小写,建议大写
注释
-- 这是单行注释,必须要有空格
/*
   这是多行注释
*/
MySql数据类型
分类
- 数值类型
- 日期时间类型
- 字符串类型
数值类型
| 数据类型 | 大小 | 描述 | 说明 |
|---|---|---|---|
| TINYINT | 1 byte | 小整数值 | |
| SMALLINT | 2 bytes | 大整数值 | |
| MEDIUMINT | 3 bytes | 大整数值 | |
| INT或INTEGER | 4 bytes | 大整数值 | |
| BIGINT | 8 bytes | 极大整数值 | |
| FLOAT | 4 bytes | 单精度浮点数值 | |
| DOUBLE | 8 bytes | 双精度浮点数值 | 字段名1 double(总长度,保留小数位数) 如分数[0.00-100.00]:分数 double(5,2) |
| DECIMAL | 小数值 |
日期时间类型
| 数据类型 | 大小 | 描述 | 说明 |
|---|---|---|---|
| DATE | 3 | 日期值 | |
| TIME | 3 | 时间值或持续时间 | |
| YEAR | 1 | 年份值 | |
| DATETIME | 8 | 混合日期和时间值 | |
| TIMESTAMP | 4 | 混合日期和时间值,时间戳 | 若该字段不给数值,则mysql会默认给一个当前时间 |
字符串类型
| 数据类型 | 大小 | 描述 | 说明 |
|---|---|---|---|
| CHAR | 0-255 bytes | 定长字符串 | "abc" 在 name char(10) 中占10个字符 浪费空间节约时间 空间换时间 |
| VARCHAR | 0-65535 bytes | 变长字符串 | "abc" 在 name varchar(10) 中占3个字符 浪费时间节约空间 时间换空间 |
| TINYBLOB | 0-255 bytes | 不超过255个字符的二进制字符串 | |
| TINYTEXT | 0-255 bytes | 短文本字符串 | |
| BLOB | 0-65535 bytes | 二进制形式的长文本数据 | |
| TEXT | 0-65535 bytes | 长文本数据 | |
| MEDIUMBLOB | 0-16 777215 bytes | 二进制形式的中等长度文本数据 | |
| MEDIUMTEXT | 0-16777 215 bytes | 中等长度文本数据 | |
| LONGBLOB | 0-4 294 967 295 bytes | 进制形式的极大文本数据 | |
| LONGTEXT | 0-4 294 967 295 bytes | 极大文本数据 |
SQL语句的分类
DDL(Data Definition Language)数据定义语言,用来定义数据库对象:数据库,表,列等DML(Data Manipulation Language)数据操作语言,用来对数据库中表的数据进行增删改DQL(Data Query Language)数据查询语言,用来查询数据库中表的记录(数据)DCL(Data Control Language)数据控制语言,用来定义数据库的访问权限和安全级别,及创建用户
DDL(Data Definition Language)数据定义语言
DDL——>操作数据库
查询数据库
查询数据库
show databases;
查询数据库测试
mysql> show databases;
+--------------------+
| Database           | # mysql自带的四个数据库:
+--------------------+
| information_schema | # 不在硬盘中,是一个视图,记录了mysql中的库、表
| mysql              | # 存储了权限等的信息
| performance_schema | # 存储了性能相关的信息
| sys                | # 存储了系统相关的信息
+--------------------+
4 rows in set (0.00 sec)
创建数据库
创建数据库
create database 数据库名;
创建数据库测试
mysql> create database db1;
Query OK, 1 row affected (0.09 sec)
创建数据库(若不存在)
create database if not exists 数据库名;
删除数据库
删除数据库
drop database 数据库名;
删除数据库测试
mysql> drop database db1;
Query OK, 0 rows affected (0.00 sec)
删除数据库(若存在)
drop database if not exists 数据库名;
使用(切换)数据库
使用数据库
use 数据库名;
使用数据库测试
mysql> use db1;
Database changed
查看当前使用的数据库
查看当前使用的数据库
select Database();
查看当前使用的数据库测试
mysql> select Database();
+------------+
| Database() |
+------------+
| db1        |
+------------+
1 row in set (0.00 sec)
DDL——>操作表
CRUB
- 创建(Create)
- 查询(Retrieve)
- 修改(Update)
- 删除(Delete)
创建表
创建表
create table 表名(
   字段名1 数据类型1,
   字段名2 数据类型2 -- 最后一行无逗号
);
创建表测试
mysql>
create table user(
   id int,
   username varchar(20),
   password varchar(32)
);
Query OK, 0 rows affected (0.65 sec)
mysql> desc user;
+----------+-------------+------+-----+---------+-------+
| Field    | Type        | Null | Key | Default | Extra |
+----------+-------------+------+-----+---------+-------+
| id       | int(11)     | YES  |     | NULL    |       |
| username | varchar(20) | YES  |     | NULL    |       |
| password | varchar(32) | YES  |     | NULL    |       |
+----------+-------------+------+-----+---------+-------+
3 rows in set (0.00 sec)
查询所有表
查询所有表
show tables;
查询所有表测试
mysql> show tables;
+---------------+
| Tables_in_db1 |
+---------------+
| user          |
+---------------+
1 row in set (0.00 sec)
查询表结构
查询表结构
desc 表名;
查询表结构测试
mysql> desc user;
+----------+-------------+------+-----+---------+-------+
| Field    | Type        | Null | Key | Default | Extra |
+----------+-------------+------+-----+---------+-------+
| id       | int(11)     | YES  |     | NULL    |       |
| username | varchar(20) | YES  |     | NULL    |       |
| password | varchar(32) | YES  |     | NULL    |       |
+----------+-------------+------+-----+---------+-------+
3 rows in set (0.01 sec)
删除表
删除表
drop table 表名;
删除表(判断是否存在)
drop table if exists 表名;
删除表(判断是否存在)测试
mysql>  show tables;
+---------------+
| Tables_in_db1 |
+---------------+
| student       |
| user          |
+---------------+
2 rows in set (0.00 sec)

mysql> drop table if exists user;
Query OK, 0 rows affected (0.24 sec)
mysql> show tables;
+---------------+
| Tables_in_db1 |
+---------------+
| student       |
+---------------+
1 row in set (0.00 sec)
修改表
修改表名
修改表名
alter table 旧表名 rename to 新表名;
修改表名测试
mysql> show tables;
+---------------+
| Tables_in_db1 |
+---------------+
| student       |
+---------------+
1 row in set (0.00 sec)

mysql> alter table student rename to student_new;
Query OK, 0 rows affected (0.43 sec)

mysql> show tables;
+---------------+
| Tables_in_db1 |
+---------------+
| student_new   |
+---------------+
1 row in set (0.00 sec)
添加列
添加列
alter table 表名 add 列名 数据类型;
添加列测试
mysql> desc student_new;
+----------+-------------+------+-----+---------+-------+
| Field    | Type        | Null | Key | Default | Extra |
+----------+-------------+------+-----+---------+-------+
| id       | int(11)     | YES  |     | NULL    |       |
| name     | char(10)    | YES  |     | NULL    |       |
| sex      | char(1)     | YES  |     | NULL    |       |
| birthday | date        | YES  |     | NULL    |       |
| score    | double(5,2) | YES  |     | NULL    |       |
| email    | varchar(64) | YES  |     | NULL    |       |
| telnum   | char(20)    | YES  |     | NULL    |       |
| status   | tinyint(4)  | YES  |     | NULL    |       |
+----------+-------------+------+-----+---------+-------+
8 rows in set (0.00 sec)

mysql> alter table student_new add new_attribute int; # 新增字段
Query OK, 0 rows affected (0.56 sec)
Records: 0  Duplicates: 0  Warnings: 0

mysql> desc student_new;
+---------------+-------------+------+-----+---------+-------+
| Field         | Type        | Null | Key | Default | Extra |
+---------------+-------------+------+-----+---------+-------+
| id            | int(11)     | YES  |     | NULL    |       |
| name          | char(10)    | YES  |     | NULL    |       |
| sex           | char(1)     | YES  |     | NULL    |       |
| birthday      | date        | YES  |     | NULL    |       |
| score         | double(5,2) | YES  |     | NULL    |       |
| email         | varchar(64) | YES  |     | NULL    |       |
| telnum        | char(20)    | YES  |     | NULL    |       |
| status        | tinyint(4)  | YES  |     | NULL    |       |
| new_attribute | int(11)     | YES  |     | NULL    |       | # 新增的字段
+---------------+-------------+------+-----+---------+-------+
9 rows in set (0.00 sec)
修改列的数据类型
修改列的数据类型
alter table 表名 modify 列名 新数据类型;
修改数据类型测试
mysql> desc student_new;
+---------------+-------------+------+-----+---------+-------+
| Field         | Type        | Null | Key | Default | Extra |
+---------------+-------------+------+-----+---------+-------+
| id            | int(11)     | YES  |     | NULL    |       |
| name          | char(10)    | YES  |     | NULL    |       |
| sex           | char(1)     | YES  |     | NULL    |       |
| birthday      | date        | YES  |     | NULL    |       |
| score         | double(5,2) | YES  |     | NULL    |       |
| email         | varchar(64) | YES  |     | NULL    |       |
| telnum        | char(20)    | YES  |     | NULL    |       |
| status        | tinyint(4)  | YES  |     | NULL    |       |
| new_attribute | int(11)     | YES  |     | NULL    |       | # new_attribute int(11)
+---------------+-------------+------+-----+---------+-------+
9 rows in set (0.00 sec)

mysql> alter table student_new modify new_attribute char(1);   # 修改字段的数据类型
Query OK, 0 rows affected (0.63 sec)
Records: 0  Duplicates: 0  Warnings: 0

mysql> desc student_new;
+---------------+-------------+------+-----+---------+-------+
| Field         | Type        | Null | Key | Default | Extra |
+---------------+-------------+------+-----+---------+-------+
| id            | int(11)     | YES  |     | NULL    |       |
| name          | char(10)    | YES  |     | NULL    |       |
| sex           | char(1)     | YES  |     | NULL    |       |
| birthday      | date        | YES  |     | NULL    |       |
| score         | double(5,2) | YES  |     | NULL    |       |
| email         | varchar(64) | YES  |     | NULL    |       |
| telnum        | char(20)    | YES  |     | NULL    |       |
| status        | tinyint(4)  | YES  |     | NULL    |       |
| new_attribute | char(1)     | YES  |     | NULL    |       | # new_attribute char(1)
+---------------+-------------+------+-----+---------+-------+
9 rows in set (0.00 sec)
修改列名和数据类型
修改列名和数据类型
alter table 表名 change 列名 新列名 新数据类型;
修改列名和数据类型测试
mysql> desc student_new;
+---------------+-------------+------+-----+---------+-------+
| Field         | Type        | Null | Key | Default | Extra |
+---------------+-------------+------+-----+---------+-------+
| id            | int(11)     | YES  |     | NULL    |       |
| name          | char(10)    | YES  |     | NULL    |       |
| sex           | char(1)     | YES  |     | NULL    |       |
| birthday      | date        | YES  |     | NULL    |       |
| score         | double(5,2) | YES  |     | NULL    |       |
| email         | varchar(64) | YES  |     | NULL    |       |
| telnum        | char(20)    | YES  |     | NULL    |       |
| status        | tinyint(4)  | YES  |     | NULL    |       |
| new_attribute | char(1)     | YES  |     | NULL    |       | # 待修改列名和类型
+---------------+-------------+------+-----+---------+-------+
9 rows in set (0.00 sec)
mysql> alter table student_new change new_attribute new_attr  int; # 修改字段的名字和数据类型
Query OK, 0 rows affected (0.72 sec)
Records: 0  Duplicates: 0  Warnings: 0

mysql> desc student_new;
+----------+-------------+------+-----+---------+-------+
| Field    | Type        | Null | Key | Default | Extra |
+----------+-------------+------+-----+---------+-------+
| id       | int(11)     | YES  |     | NULL    |       |
| name     | char(10)    | YES  |     | NULL    |       |
| sex      | char(1)     | YES  |     | NULL    |       |
| birthday | date        | YES  |     | NULL    |       |
| score    | double(5,2) | YES  |     | NULL    |       |
| email    | varchar(64) | YES  |     | NULL    |       |
| telnum   | char(20)    | YES  |     | NULL    |       |
| status   | tinyint(4)  | YES  |     | NULL    |       |
| new_attr | int(11)     | YES  |     | NULL    |       | # 修改列名和类型
+----------+-------------+------+-----+---------+-------+
9 rows in set (0.00 sec)
删除列
删除列
alter table 表名 drop 列名;
删除列测试
mysql> desc student_new;
+----------+-------------+------+-----+---------+-------+
| Field    | Type        | Null | Key | Default | Extra |
+----------+-------------+------+-----+---------+-------+
| id       | int(11)     | YES  |     | NULL    |       |
| name     | char(10)    | YES  |     | NULL    |       |
| sex      | char(1)     | YES  |     | NULL    |       |
| birthday | date        | YES  |     | NULL    |       |
| score    | double(5,2) | YES  |     | NULL    |       |
| email    | varchar(64) | YES  |     | NULL    |       |
| telnum   | char(20)    | YES  |     | NULL    |       |
| status   | tinyint(4)  | YES  |     | NULL    |       |
| new_attr | int(11)     | YES  |     | NULL    |       | # 待删除列
+----------+-------------+------+-----+---------+-------+
9 rows in set (0.00 sec)

mysql> alter table student_new drop new_attr;             # 删除字段
Query OK, 0 rows affected (0.74 sec)
Records: 0  Duplicates: 0  Warnings: 0

mysql> desc student_new;
+----------+-------------+------+-----+---------+-------+
| Field    | Type        | Null | Key | Default | Extra |
+----------+-------------+------+-----+---------+-------+
| id       | int(11)     | YES  |     | NULL    |       |
| name     | char(10)    | YES  |     | NULL    |       |
| sex      | char(1)     | YES  |     | NULL    |       |
| birthday | date        | YES  |     | NULL    |       |
| score    | double(5,2) | YES  |     | NULL    |       |
| email    | varchar(64) | YES  |     | NULL    |       |
| telnum   | char(20)    | YES  |     | NULL    |       |
| status   | tinyint(4)  | YES  |     | NULL    |       | # 删除了一个字段
+----------+-------------+------+-----+---------+-------+
8 rows in set (0.00 sec)
案例
案例1
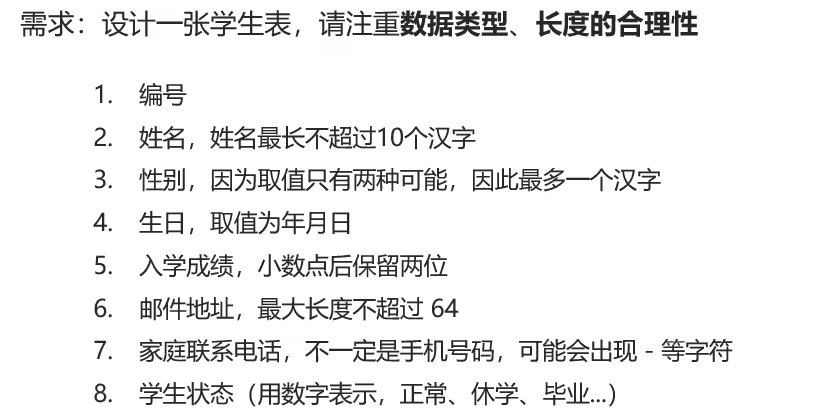
create table student(
   id int,
   name char(10),
   sex char(1),
   birthday date,
   score double(5,2),
   email varchar(64),
   telnum char(20),
   status tinyint
);
案例1执行结果
mysql> create table student(
   id int,
   name char(10),
   sex char(1),
   birthday date,
   score double(5,2),
   email varchar(64),
   telnum char(20),
   status tinyint
);
Query OK, 0 rows affected (0.34 sec)

mysql> desc student;
+----------+-------------+------+-----+---------+-------+
| Field    | Type        | Null | Key | Default | Extra |
+----------+-------------+------+-----+---------+-------+
| id       | int(11)     | YES  |     | NULL    |       |
| name     | char(10)    | YES  |     | NULL    |       |
| sex      | char(1)     | YES  |     | NULL    |       |
| birthday | date        | YES  |     | NULL    |       |
| score    | double(5,2) | YES  |     | NULL    |       |
| email    | varchar(64) | YES  |     | NULL    |       |
| telnum   | char(20)    | YES  |     | NULL    |       |
| status   | tinyint(4)  | YES  |     | NULL    |       |
+----------+-------------+------+-----+---------+-------+
8 rows in set (0.00 sec)
DML(Data Manipulation Language)数据操作语言
DML——>添加数据
添加数据到指定列
添加数据到指定列
insert into 表名(列名1,列名2,列名3,...) values(值1,值2,值3,...);
添加数据到指定列测试
use db1;
desc student;
insert into
student(id,name,sex,birthday,score,email,telnum,status)
values(0,"test1",'男',"2022-1-1",99.99,"244@qq.com","0519-110",1);
select * from student;
mysql> select * from student;
+------+-------+------+------------+-------+------------+----------+--------+------+
| id   | name  | sex  | birthday   | score | email      | telnum   | status | age  |
+------+-------+------+------------+-------+------------+----------+--------+------+
|    0 | test1 | 男   | 2022-01-01 | 99.99 | 244@qq.com | 0519-110 |      1 | NULL |
+------+-------+------+------------+-------+------------+----------+--------+------+
3 rows in set (0.00 sec)
给所有列添加数据
insert into 表名 values(值1,值2,值3,...); -- 不建议使用,值的顺序错误将导致赋值错误
批量添加数据
insert into 表名(列名1,列名2,列名3,...) values(值1,值2,值3,...),(值1,值2,值3,...),(值1,值2,值3,...),(值1,值2,值3,...),...;
insert into 表名 values(值1,值2,值3,...),(值1,值2,值3,...),(值1,值2,值3,...),(值1,值2,值3,...),...;
DML——>修改数据
修改表数据
update 表名 set 列名1=值1,列名2=值2,列名3=值3,... [where 条件];
DML——>删除表数据
删除表数据
delete from 表名 [where 条件];
delete from 表名 [where 属性名=属性值];
DQL(Data Query Language)数据查询语言
数据查询语法
select
   字段列表
from
   表名列表
where
   条件列表
group by
   分组列表
having
   分组后条件
order by
   排序字段
limit
   分页限定
;
DQL——>基础查询
查询多个字段
select 字段列表 from 表名列表;
select * from 表名列表; -- 一般公司里要求不用这种形式,因为不能一眼看出查询了哪些列
查询多个字段测试
mysql> select name,birthday,sex from student;
+-------+------------+------+
| name  | birthday   | sex  |
+-------+------------+------+
| test1 | 2022-01-01 | 男   |
| test1 | 2022-01-01 | 男   |
| test1 | 2022-01-01 | 男   |
+-------+------------+------+
3 rows in set (0.00 sec)
去除重复记录
select distinct 字段列表 from 表名; --根据字段列表的值去除重复记录
去除重复记录测试
select addr distinct addr from student;
起别名
select 字段1 as 新列名1,字段2 as 新列名2, from student;
select 字段1  新列名1,字段2  新列名2, from student; -- as 可以省略
起别名测试
select name as 姓名,age as 年龄,sex as 性别 from student;
select name 姓名,age 年龄,sex 性别 from student;
mysql> select name 姓名,age 年龄,sex 性别 from student;
+--------+--------+--------+
| 姓名   |  年龄   | 性别   |
+--------+--------+--------+
| test1  |   10   |   男   |
| test2  |   20   |   男   |
+--------+--------+--------+
2 rows in set (0.00 sec)
DQL——>条件查询
条件查询语法
select 字段列表 from 表名 where 条件列表;
| 符号 | 说明 |
|---|---|
> | |
< | |
>= | |
<= | |
= | 注意,只写一个等于 |
<> or != | |
between ... and ... | [a,b] |
in() | 多选一 |
like 占位符 | 模糊查询 _单字符任意匹配 %零或多字符任意匹配 |
is null | |
is not null | |
and or && | |
or or || | |
not or ! |
条件查询语法测试
-- 年龄等于20
select name,sex from student where age=20;

-- 年龄不等于20
select name,sex from student where age!=20;

-- 年龄大于20
select name,sex from student where age>20;

-- 年龄大于等于20
select name,sex from student where age>=20;

-- 年龄 等于20 或 等于30 或 等于40
select name,sex from student where age=20 or age=30 or age=40;
select name,sex from student where age in(20,30,40);    -- `in()` 的使用

-- 年龄 大于等于20 且 小于等于30
select name,sex from student where age>=20 && age<=30;
select name,sex from student where age>=20 and age<=30;
select name,sex from student where age between 20 and 30; -- `between... and...` 的使用

-- 出生日期在 1998-09-01 到 1999-09-01
select name,sex from student where birthday between `1998-09-01` and `1999-09-01`;

-- 英语成绩为null
select name,sex from student where english = null; -- 错误写法
select name,sex from student where english is null; -- 正确写法
select name,sex from student where english is not null;

-- 姓马的
select name,sex from student where name like "马%";

-- 第二个字是花
select name,sex from student where name like "_花%";

-- 名字中含有德字
select name,sex from student where name like "%德%";
DQL——>排序查询
select 字段列表 from 表名 order by 排序字段名称1 [排序方式1],排序字段名2 [排序方式2];

-- 排序方式
   -- ASC 升序(默认)
   -- DESC 降序
排序查询书写示例
-- 查询学生信息,按年龄升序排序
select * from student order by age asc;
select * from student order by age;

-- 查询学生信息 按数学成绩降序排序
select * from student order by math_score desc;

-- 查询学生信息 按数学成绩降序排序,如果数学成绩一致,则按英语成绩升序排序。
select * from student order by math_score desc,english_score asc;
DQL——>聚合查询
概念:将一列数据作为整体,进行运算。
聚合函数
| 函数名 | 功能 | 取值 |
|---|---|---|
| count(列名) | 统计数量 | 非空列名 或 * |
| max(列名) | 最大值 | |
| min(列名) | 最小值 | |
| sum(列名) | 求和 | |
| avg(列名) | 平均值 |
sql语法格式
select 聚合函数名(列名)[,可以继续写其他字段名] from 表;
排序查询书写示例
-- 统计班级人数
select count(id) from student;
select count(*) from student;

-- 查询数学最高分者的分数,名字,年龄
select name,age,max(math_score) from student;
DQL——>分组查询
分组查询
select 字段列表 from 表名 where 查询条件 group by 分组字段名 having 分组后过滤条件;
- 分组后,只能查询分组字段和聚合函数,查询其他字段能出结果但无意义
- 执行顺序:
where->聚合函数->having where和having区别:where是对分组前的数据进行限定,无法对聚合函数判断having是对分组后的数据进行过滤,能对聚合函数判断
分组查询书写示例
-- 查询全班男生女生各自的数学平均分
select sex,avg(math_score) from student group by sex;

-- 分组后,只能查询分组字段和聚合函数,查询其他字段能出结果但无意义
select name,sex,avg(math_score) from student group by sex;

-- 查询全班男生女生各自的数学平均分及各自人数
select sex,avg(math_score) as math_avg,count(id) as pcount from student group by sex;

-- 查询全班男生女生各自的数学平均分及各自人数,分数低于70分不参与分组
select sex,avg(math_score) as math_avg,count(id) as pcount from student where math_score > 70 group by sex;

-- 查询全班男生女生各自的数学平均分及各自人数,分数低于70分不参与分组,分组后,各分组的总人数>2
select
   sex,avg(math_score) as math_avg,
   count(id) as pcount from student
where
   math_score > 70
group by
   sex
having
   count(id) > 2;
DQL——>分页查询
分页查询语法
select 字段列表 from 表名 limit 起始索引 , 查询条目数;
注意点
- 起始索引:从0开始
- 计算公式:
起始索引 = (查询页-1) * 每页显示条目数 sql Server分页查询用toporacle分页查询用rownnumber
分页查询语法示例
-- 从0开始查询三条数据
select * from student limit 0 ,3 ;

-- 每页展示10条数据,查询第1页数据
select * from student limit 0 ,10 ;    `起始索引 = (查询页-1) * 每页显示条目数`
-- 每页展示10条数据,查询第2页数据
select * from student limit 10 ,10 ;
-- 每页展示10条数据,查询第3页数据
select * from student limit 20 ,10 ;
DCL(Data Control Language)数据控制语言
??
约束
概念
- 约束是作用于表中列的规则,用于限制加入数据的
- 约束可以保证数据的 正确性 完整性 有效性
主要的几种约束
| 约束名称 | 描述 | 关键字 |
|---|---|---|
| 非空约束 | 保证列中所有数据不能有null值 | NOT NULL |
| 唯一约束 | 保证列中所有数据各不相同,如果修饰的列是数值类型可以添加自增约束 | UNIQUE [AUTO_INCREMENT] |
| 主键约束 | 主键是一行数据的唯一标识,要求非空且唯一 | PRIMARY KEY [AUTO_INCREMENT] |
| 检查约束 | 保证列中的值满足某一条件 | CHECK |
| 默认约束 | 保存数据时,未指定值则采用默认值 | DEFAULT |
| 外键约束 | 外键用来让两个表的数据之间建立链接,保证数据的一致性和完整性 | FOREIGN KEY |
扩展约束
| 约束名称 | 描述 | 关键字 |
|---|---|---|
| 自增约束 | 当列为数值类型且有唯一约束,保存数据时,未指定值或给null时将自动自增 | AUTO_INCREMENT` |
非空约束
use db1;
drop table if exists student;

-- 在表创建时在列创建 not null 约束:
create table student(
   name char(10) not null -- 经测试,MySQL支持
);


-- 撤销 not null 约束
alter table student modify name char(10); -- 经测试,MySQL支持
-- 添加 not null 约束
alter table student modify name char(10) not null; -- 经测试,MySQL支持
唯一约束
use db1;
drop table if exists student;

-- 在表创建时在列创建 unique 约束:
create table student(
   stuid int unique -- 经测试,MySQL支持
);
-- 如果需要为多个列定义 PRIMARY KEY 约束
create table student(
   stuid int,
   UNIQUE (stuid) -- 经测试,MySQL支持
);

-- 撤销 unique 约束
ALTER TABLE student DROP INDEX stuid;   -- 经测试,MySQL支持
-- 添加 unique 约束
ALTER TABLE student ADD UNIQUE (stuid); -- 经测试,MySQL支持
use db1;
drop table if exists student;
-- 如果需要命名 PRIMARY KEY 约束,以及为多个列定义 PRIMARY KEY 约束
create table student(
   stuid int,
   CONSTRAINT c1 UNIQUE (stuid) -- 经测试,MySQL支持
);
-- 删除
ALTER TABLE student DROP CONSTRAINT c1; -- 经测试,MySQL不支持
ALTER TABLE student DROP INDEX c1; -- 经测试,MySQL支持
-- 添加
ALTER TABLE student ADD CONSTRAINT c1 UNIQUE (stuid); -- 经测试,MySQL支持
主键约束
语法
 -- 主键 `非空not null` 且 `唯一unique`
use db1;
drop table if exists student;


-- 在表创建时在列创建 PRIMARY KEY 约束:
create table student(
   id int primary key -- 经测试,MySQL支持
);
-- 如果需要为多个列定义 PRIMARY KEY 约束
create table student(
   id int,
   PRIMARY KEY (id) -- 经测试,MySQL支持 -- 可以用于定义复合主键  PRIMARY KEY (id,name)
);

-- 撤销 PRIMARY KEY 约束
ALTER TABLE student DROP PRIMARY KEY;-- 经测试,MySQL支持
-- 添加 PRIMARY KEY 约束
ALTER TABLE student ADD PRIMARY KEY (id);-- 经测试,MySQL支持
-- 如果需要命名 PRIMARY KEY 约束,以及为多个列定义 PRIMARY KEY 约束
create table student(
   id int,
   CONSTRAINT c1 PRIMARY KEY (id) -- 经测试,MySQL支持
);
-- 通过 CONSTRAINT 对约束命名 添加 PRIMARY KEY 约束
ALTER TABLE student ADD CONSTRAINT pk_studentID PRIMARY KEY (id);  -- 经测试,MySQL支持
-- 通过 CONSTRAINT 对约束命名 撤销 PRIMARY KEY 约束
ALTER TABLE student DROP CONSTRAINT pk_studentID; --  经测试,MySQL不支持这种写法
检查约束
use db1;
drop table if exists student;

-- 在表创建时在列创建 check 约束:
create table student(
   stuid int check(stuid>0) -- 经测试,MySQL支持
);
-- 如果需要为多个列定义 check 约束
create table student(
   stuid int,
   check(stuid>0) -- 经测试,MySQL支持
);

-- 撤销 check 约束
   ???
-- 添加 CHECK 约束
ALTER TABLE student ADD CHECK (stuid>0); -- 经测试,MySQL支持
use db1;
drop table if exists student;
-- 如果需要命名 PRIMARY KEY 约束,以及为多个列定义 PRIMARY KEY 约束
create table student(
   stuid int,
   CONSTRAINT c1 CHECK (stuid>0) -- 经测试,MySQL支持
);
-- 删除
ALTER TABLE student DROP CONSTRAINT c1; -- 经测试, MySQL 不支持
ALTER TABLE student DROP CHECK c1;-- 经测试, MySQL5.7 不支持
-- 添加
ALTER TABLE student ADD CONSTRAINT c1 CHECK ( stuid>0 ); -- 经测试,MySQL支持
默认约束
use db1;
drop table if exists student;

-- 在表创建时在列创建 default 约束:
create table student(
   stuid int default 0 -- 经测试,MySQL支持
);

-- 撤销 default 约束
ALTER TABLE student ALTER stuid DROP DEFAULT ; -- 经测试,MySQL支持
-- 添加 CHECK 约束
ALTER TABLE student ALTER stuid SET DEFAULT 0; -- 经测试,MySQL支持
外键约束
drop database if exists db1;
create database if not exists db1;
use db1;
drop table if exists student;
drop table if exists department;

create table department(
   id int primary key,
   name char(20) not null
);

create table student(
   id int primary key,
   depart_id int,
   constraint stu_dep foreign key(depart_id)  references department(id)
);

-- 添加 FOREIGN KEY 约束
ALTER TABLE student ADD FOREIGN KEY (depart_id) REFERENCES department(id); -- 经测试,MySQL支持
ALTER TABLE student ADD CONSTRAINT stu_dep FOREIGN KEY (depart_id) REFERENCES department(id); -- 经测试,MySQL支持
-- 撤销 FOREIGN KEY 约束
ALTER TABLE student DROP FOREIGN KEY stu_dep ; -- 经测试,MySQL支持
额
属性级(列名)的约束语法
-- 在定义表示添加约束
create table 表名(
   列名 数据类型 NOT NULL,
   列名 数据类型 UNIQUE AUTO_INCREMENT,
   列名 数据类型 PRIMARY KEY AUTO_INCREMENT,
   列名 数据类型 DEFAULT 0,
   列名 数据类型 FOREIGN KEY,
);

-- 添加非空约束
alter table 表名 modify 列名 数据类型 NOT NULL;
-- 删除非空约束
alter table 表名 modify 列名 数据类型;

-- 添加唯一约束
alter table 表名 modify 列名 数据类型 unique;
-- 删除唯一约束
alter table 表名 drop index 列名;

-- 添加主键约束
alter table 表名 add PRIMARY KEY(列名);
-- 删除主键约束
alter table 表名 drop PRIMARY KEY;

-- 添加默认约束
alter table 表名 alter 列名 set default 0;
-- 删除默认约束
alter table 表名 alter 列名 drop default;
属性级(列名)的约束语法测试
use db1;
drop table if exists employee;
create table employee(
    id int primary key auto_increment,     -- 主键
    name char(10) not null,                -- 非空
    joindate date not null,                -- 非空
    salary double(8,2) not null,           -- 非空
    bonus double(8,2) default 0            -- 默认约束
);
insert into employee(id,name,joindate,salary,bonus) values(1,"张三1",'2001-01-01',1000.00,0.00);
insert into employee(id,name,joindate,salary,bonus) values(null,"张三2",'2001-01-01',1000.00,0.00);
insert into employee(name,joindate,salary,bonus) values("张三3",'2001-01-01',1000.00,0.00);

select * from employee;
mysql> select * from employee;
+----+---------+------------+---------+-------+
| id | name    | joindate   | salary  | bonus |
+----+---------+------------+---------+-------+
|  1 | 张三1   | 2001-01-01 | 1000.00 |  0.00 |
|  2 | 张三2   | 2001-01-01 | 1000.00 |  0.00 |
|  3 | 张三3   | 2001-01-01 | 1000.00 |  0.00 |
+----+---------+------------+---------+-------+
3 rows in set (0.00 sec)
元祖级的约束语法
复合主键必须以这种方式定义
-- 在创建表时定义约束
create table 表名(
   列名1 数据类型1,
   列名2 数据类型2,
   列名3 数据类型3,
   列名4 数据类型4,
   列名5 数据类型5,

   primary key(列名1,列名2),

   constraint 完整性约束名别名 foreign key(外键列名) references 主表(主表列名),

   constraint 完整性约束名别名 约束名称
   -- 👆
   -- 在 sqlserver 中 constraint 仅支持 CHECK,DEFAULT,FOREIGN,PRIMARY,REFERENCES,UNIQUE
   -- 在 mysql 中 经测试,constraint 支持 unique ,primary key  foreign key,其他暂未测试
);

-- 添加约束
alter table 表名 add  constraint 完整性约束名别名 约束名称;
-- 删除约束
alter table 表名 drop 完整性约束名别名;

-- 添加外键约束
alter table 表名 add constraint 完整性约束名别名 foreign key(外键列名) references 主表(主表列名);
-- 删除外键约束
alter table 表名 drop foreign key 完整性约束名别名;
元祖级的约束语法测试
use db1;

drop table if exists department;
create table department(
    id int primary key auto_increment,     -- 主键
    name char(20)
);

drop table if exists employee;
create table employee(
    id int auto_increment,                 -- 主键
    name char(10) not null,                -- 非空
    joindate date not null,                -- 非空
    salary double(8,2) not null,           -- 非空
    bonus double(8,2) default 0,           -- 默认约束
    department int,                        -- 外键
   constraint c1 unique(name), -- 唯一
   constraint c2 primary key(id), -- 主键
   constraint c3 foreign key(department) references department(id) --引用完整性约束
);
mysql> desc employee;
--------------
desc employee
--------------

+------------+-------------+------+-----+---------+----------------+
| Field      | Type        | Null | Key | Default | Extra          |
+------------+-------------+------+-----+---------+----------------+
| id         | int(11)     | NO   | PRI | NULL    | auto_increment |
| name       | char(10)    | NO   | UNI | NULL    |                |
| joindate   | date        | NO   |     | NULL    |                |
| salary     | double(8,2) | NO   |     | NULL    |                |
| bonus      | double(8,2) | YES  |     | 0.00    |                |
| department | int(11)     | YES  | MUL | NULL    |                |
+------------+-------------+------+-----+---------+----------------+
6 rows in set (0.00 sec)
数据库设计
表关系分类
- 一对一:
- 将一个实体中常用字段和不常用字段拆分为两个表,用于提升查询性能
- 用户和用户详情信息表
- 一个用户有一个详情信息
- 一对多(多对一):
- 部门和员工
- 一个部门有多个员工,多个员工同属一个部门
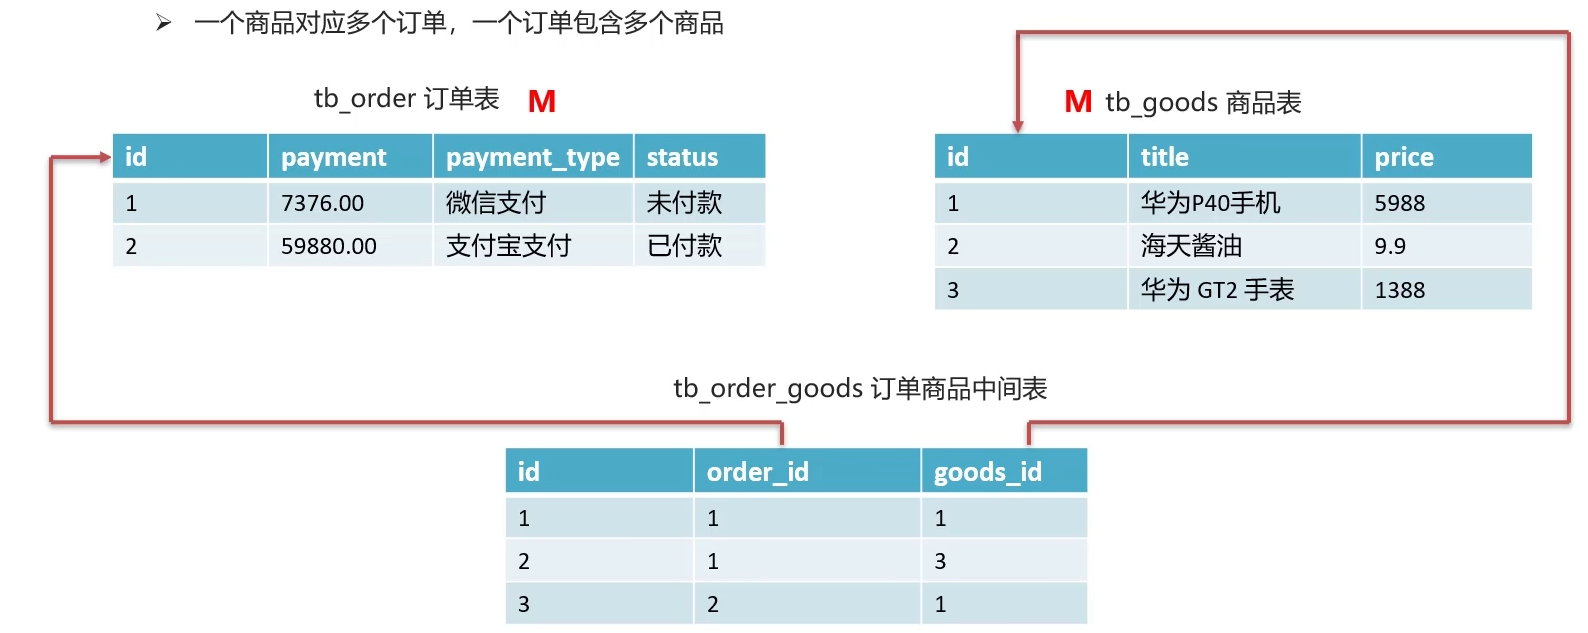
- 多对多
- 商品和订单
- 一个商品对应多个订单,一个订单有多个商品
一对一
实现方式 在任意一方建立外键,指向另一方的主键,并且设置外键为唯一UNIQUE

一对多
实现方式 在多的一方建立外键,指向一的一方的主键

多对多
实现方式 建立第三张中间表,中间表至少包含两个外键,分别关联两方的主键。
多表查询
多表查询
- 笛卡尔积:取A、B集合的组合
- 多表查询:从多张查询数据
- 连接查询
- 内连接:查询A、B交集数据
- 外连接:
- 左外连接:查询A表所有数据和交集部分数据
- 右外连接:查询B表所有数据和交集部分数据
- 子查询:查询中嵌套查询
- 连接查询
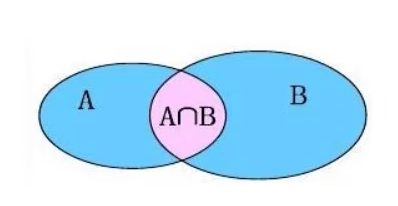
笛卡尔积
笛卡尔积:有A、B两集合,取A、B两集合所有的组合
若A表有4条数据,B表有8条数据,笛卡尔积就有32条数据。
select * from tableA,tableB;
内连接
-- 写法1:隐式内连接
select * from tableA,tableB where tableA.id = tableB.id;
select tableA.id,tableA.name,tableA.id,tableA.name from tableA,tableB where tableA.id = tableB.id; -- 防止字段名冲突
select A.id,A.name,B.id,B.name from tableA as A,tableB as B where A.id = B.id; -- 给表起别名

-- 写法2:显式内连接
select * from tableA inner join tableB on tableA.id = tableB.id;
select * from tableA join tableB on tableA.id = tableB.id; -- inner可省略
外连接
--- 左外连接:  tableA的所有数据 + tableA和tableB的交集数据
select * from tableA left outer join tableB on tableA.id = tableB.id;
select * from tableA left join tableB on tableA.id = tableB.id; -- outer 可省略

--- 右外连接: tableB的所有数据 + tableA和tableB的交集数据
select * from tableA right join tableB on tableA.id = tableB.id;
select * from tableA right join tableB on tableA.id = tableB.id; -- outer 可省略
子查询
概念: 查询中嵌套查询,称嵌套查询为子查询
分类:根据子查询的结果不同,作用不同
子查询结果为单行单列:(使用
=!=><等进行条件判断)select 字段列表 from 表 where 字段名 = (子查询); select 字段列表,(子查询) as 字段别名 from 表;子查询结果为单行多列:(使用
in等关键字进行条件判断)select 字段列表 from 表 where 字段名 in (子查询);子查询结果为多行多列,:(作为虚拟表)
select 字段列表 from (子查询) where 条件;
案例:子查询
数据准备
drop database if exists db2;
create database db2;
use db2;
DROP TABLE IF EXISTS emp;
DROP TABLE IF EXISTS dept;
DROP TABLE IF EXISTS job;
DROP TABLE IF EXISTS salarygrade;


-- 部门表
CREATE TABLE dept (
  id INT PRIMARY KEY PRIMARY KEY, -- 部门id
  dname VARCHAR(50), -- 部门名称
  loc VARCHAR(50) -- 部门所在地
);


-- 职务表,职务名称,职务描述
CREATE TABLE job (
  id INT PRIMARY KEY,
  jname VARCHAR(20),
  description VARCHAR(50)
);

-- 员工表
CREATE TABLE emp (
  id INT PRIMARY KEY, -- 员工id
  ename VARCHAR(50), -- 员工姓名
  job_id INT, -- 职务id
  mgr INT , -- 上级领导
  joindate DATE, -- 入职日期
  salary DECIMAL(7,2), -- 工资
  bonus DECIMAL(7,2), -- 奖金
  dept_id INT, -- 所在部门编号
  CONSTRAINT emp_jobid_ref_job_id_fk FOREIGN KEY (job_id) REFERENCES job (id),
  CONSTRAINT emp_deptid_ref_dept_id_fk FOREIGN KEY (dept_id) REFERENCES dept (id)
);
-- 工资等级表
CREATE TABLE salarygrade (
  grade INT PRIMARY KEY,   -- 级别
  losalary INT,  -- 最低工资
  hisalary INT -- 最高工资
);

-- 添加4个部门
INSERT INTO dept(id,dname,loc) VALUES
(10,'教研部','北京'),
(20,'学工部','上海'),
(30,'销售部','广州'),
(40,'财务部','深圳');

-- 添加4个职务
INSERT INTO job (id, jname, description) VALUES
(1, '董事长', '管理整个公司,接单'),
(2, '经理', '管理部门员工'),
(3, '销售员', '向客人推销产品'),
(4, '文员', '使用办公软件');


-- 添加员工
INSERT INTO emp(id,ename,job_id,mgr,joindate,salary,bonus,dept_id) VALUES
(1001,'孙悟空',4,1004,'2000-12-17','8000.00',NULL,20),
(1002,'卢俊义',3,1006,'2001-02-20','16000.00','3000.00',30),
(1003,'林冲',3,1006,'2001-02-22','12500.00','5000.00',30),
(1004,'唐僧',2,1009,'2001-04-02','29750.00',NULL,20),
(1005,'李逵',4,1006,'2001-09-28','12500.00','14000.00',30),
(1006,'宋江',2,1009,'2001-05-01','28500.00',NULL,30),
(1007,'刘备',2,1009,'2001-09-01','24500.00',NULL,10),
(1008,'猪八戒',4,1004,'2007-04-19','30000.00',NULL,20),
(1009,'罗贯中',1,NULL,'2001-11-17','50000.00',NULL,10),
(1010,'吴用',3,1006,'2001-09-08','15000.00','0.00',30),
(1011,'沙僧',4,1004,'2007-05-23','11000.00',NULL,20),
(1012,'李逵',4,1006,'2001-12-03','9500.00',NULL,30),
(1013,'小白龙',4,1004,'2001-12-03','30000.00',NULL,20),
(1014,'关羽',4,1007,'2002-01-23','13000.00',NULL,10);


-- 添加5个工资等级
INSERT INTO salarygrade(grade,losalary,hisalary) VALUES
(1,7000,12000),
(2,12010,14000),
(3,14010,20000),
(4,20010,30000),
(5,30010,99990);
题目 1.查询所有员工信息。查询员工编号,员工姓名,工资,职务名称,职务描述
-- ----写法一:隐式内连接
use db2;
select
   emp.id,
   emp.ename,
   emp.salary,
   job.jname,
   job.description
from
   emp,job
where
   emp.job_id = job.id;

-- ----写法二:显式内连接
use db2;
select
   emp.id,
   emp.ename,
   emp.salary,
   job.jname,
   job.description
from
   emp
inner join
   job
on
   emp.job_id = job.id;
结果
| id | ename | salary | jname | description |
|---|---|---|---|---|
| 1009 | 罗贯? | 50000 | 董事? | 管理整个公司,接? |
| 1004 | 唐僧 | 29750 | 经理 | 管理部门员工 |
| 1006 | 宋江 | 28500 | 经理 | 管理部门员工 |
| 1007 | 刘备 | 24500 | 经理 | 管理部门员工 |
| 1002 | 卢俊? | 16000 | 销售员 | 向客人推销产品 |
| 1003 | 林冲 | 12500 | 销售员 | 向客人推销产品 |
| 1010 | 吴用 | 15000 | 销售员 | 向客人推销产品 |
| 1001 | 孙悟? | 8000 | 文员 | 使用办公软件 |
| 1005 | 李? | 12500 | 文员 | 使用办公软件 |
| 1008 | 猪八? | 30000 | 文员 | 使用办公软件 |
| 1011 | 沙僧 | 11000 | 文员 | 使用办公软件 |
| 1012 | 李? | 9500 | 文员 | 使用办公软件 |
| 1013 | 小白? | 30000 | 文员 | 使用办公软件 |
| 1014 | 关羽 | 13000 | 文员 | 使用办公软件 |
题目 2.查询员工编号,员工姓名,工资,职务名称,职务描述,部门名称,部门位置
-- ----写法一:隐式内连接
use db2;
select
   emp.id,
   emp.ename,
   emp.salary,
   job.jname,
   job.description,
   dept.dname,
   dept.loc
from
   emp,job,dept
where
   emp.job_id = job.id and emp.dept_id = dept.id;

-- ----写法二:显式内连接
use db2;
select
   emp.id,
   emp.ename,
   emp.salary,
   job.jname,
   job.description,
   dept.dname,
   dept.loc
from
   emp
inner join job on emp.job_id = job.id
inner join dept on emp.dept_id = dept.id;
结果
| id | ename | salary | jname | description | dname | loc |
|---|---|---|---|---|---|---|
| 1009 | 罗贯? | 50000 | 董事? | 管理整个公司,接? | 教研? | 北京 |
| 1007 | 刘备 | 24500 | 经理 | 管理部门员工 | 教研? | 北京 |
| 1014 | 关羽 | 13000 | 文员 | 使用办公软件 | 教研? | 北京 |
| 1004 | 唐僧 | 29750 | 经理 | 管理部门员工 | 学工? | 上海 |
| 1001 | 孙悟? | 8000 | 文员 | 使用办公软件 | 学工? | 上海 |
| 1008 | 猪八? | 30000 | 文员 | 使用办公软件 | 学工? | 上海 |
| 1011 | 沙僧 | 11000 | 文员 | 使用办公软件 | 学工? | 上海 |
| 1013 | 小白? | 30000 | 文员 | 使用办公软件 | 学工? | 上海 |
| 1006 | 宋江 | 28500 | 经理 | 管理部门员工 | 销售部 | 广州 |
| 1002 | 卢俊? | 16000 | 销售员 | 向客人推销产品 | 销售部 | 广州 |
| 1003 | 林冲 | 12500 | 销售员 | 向客人推销产品 | 销售部 | 广州 |
| 1010 | 吴用 | 15000 | 销售员 | 向客人推销产品 | 销售部 | 广州 |
| 1005 | 李? | 12500 | 文员 | 使用办公软件 | 销售部 | 广州 |
| 1012 | 李? | 9500 | 文员 | 使用办公软件 | 销售部 | 广州 |
题目 3.查询员工姓名,工资,工资等级
-- 写法1:子查询
use db2;
select
   emp.ename,
   emp.salary,
   (select grade from salarygrade where emp.salary between salarygrade.losalary and salarygrade.hisalary ) as salarygrade
from
   emp;

-- 写法2:隐式内连接
use db2;
select
   emp.ename,
   emp.salary,
   salarygrade.grade
from
   emp,
   salarygrade
where
   emp.salary between  salarygrade.losalary and salarygrade.hisalary
;
-- 写法3:显式内连接
use db2;
select
   emp.ename,
   emp.salary,
   salarygrade.grade
from
   emp
inner join
   salarygrade
on
   emp.salary between  salarygrade.losalary and salarygrade.hisalary
;
| ename | salary | grade |
|---|---|---|
| 孙悟? | 8000 | 1 |
| 卢俊? | 16000 | 3 |
| 林冲 | 12500 | 2 |
| 唐僧 | 29750 | 4 |
| 李? | 12500 | 2 |
| 宋江 | 28500 | 4 |
| 刘备 | 24500 | 4 |
| 猪八? | 30000 | 4 |
| 罗贯? | 50000 | 5 |
| 吴用 | 15000 | 3 |
| 沙僧 | 11000 | 1 |
| 李? | 9500 | 1 |
| 小白? | 30000 | 4 |
| 关羽 | 13000 | 2 |
题目 4.查询员工姓名,工资,职务名称,职务描述,部门名称,部门位置,工资等级
-- 写法1:显式内连接
use db2;
select
   emp.ename,
   emp.salary,
   job.jname,
   job.description,
   dept.dname,
   dept.loc,
   salarygrade.grade
from
   emp
inner join job on emp.job_id = job.id
inner join dept on emp.dept_id = dept.id
inner join salarygrade on emp.salary between salarygrade.losalary and salarygrade.hisalary
;

-- 写法2:子查询
use db2;
select
   emp.ename,
   emp.salary,
   emp.dept_id,
   (select grade from salarygrade where emp.salary between salarygrade.losalary and salarygrade.hisalary ) as salarygrade ,
   (select job.jname from job where emp.job_id = job.id) as jname,
   (select job.description from job where emp.job_id = job.id) as jdescription,
   (select dept.dname from dept where emp.dept_id = dept.id) as dname,
   (select dept.loc from dept where emp.dept_id = dept.id) as dloc
from
   emp
;
查询结果
| ename | salary | jname | description | dname | loc | grade |
|---|---|---|---|---|---|---|
| 孙悟? | 8000 | 文员 | 使用办公软件 | 学工? | 上海 | 1 |
| 卢俊? | 16000 | 销售员 | 向客人推销产品 | 销售部 | 广州 | 3 |
| 林冲 | 12500 | 销售员 | 向客人推销产品 | 销售部 | 广州 | 2 |
| 唐僧 | 29750 | 经理 | 管理部门员工 | 学工? | 上海 | 4 |
| 李? | 12500 | 文员 | 使用办公软件 | 销售部 | 广州 | 2 |
| 宋江 | 28500 | 经理 | 管理部门员工 | 销售部 | 广州 | 4 |
| 刘备 | 24500 | 经理 | 管理部门员工 | 教研? | 北京 | 4 |
| 猪八? | 30000 | 文员 | 使用办公软件 | 学工? | 上海 | 4 |
| 罗贯? | 50000 | 董事? | 管理整个公司,接? | 教研? | 北京 | 5 |
| 吴用 | 15000 | 销售员 | 向客人推销产品 | 销售部 | 广州 | 3 |
| 沙僧 | 11000 | 文员 | 使用办公软件 | 学工? | 上海 | 1 |
| 李? | 9500 | 文员 | 使用办公软件 | 销售部 | 广州 | 1 |
| 小白? | 30000 | 文员 | 使用办公软件 | 学工? | 上海 | 4 |
| 关羽 | 13000 | 文员 | 使用办公软件 | 教研? | 北京 | 2 |
题目 5.查询出部门编号、部门名称、部门位置、部门人数
-- 方法1: 子查询
use db2;
select
   dept.id as 部门编号 ,
   dept.dname as 部门名称 ,
   dept.loc as 部门位置 ,
   (select count(emp.id) from emp where dept.id = emp.dept_id) as 部门人数
from
   dept
;
| 部门编号 | 部门名称 | 部门位置 | 部门人数 |
|---|---|---|---|
| 10 | 教研? | 北京 | 3 |
| 20 | 学工? | 上海 | 5 |
| 30 | 销售部 | 广州 | 6 |
| 40 | 财务? | 深圳 | 0 |
事务
概念
- 简单理解,事务是一组操作命令,当一组中的一条操作执行出错,则这一组的操作将全部被撤销(回滚)。
- 事务(Transaction)是一种机制一个操作序列,包含了一组数据库操作命令
- 事务把所有命令作为整体一起提交操作请求,这一组数据库命令要么同时成功,要么同时失败。
- 事务是一个不可分割的工作逻辑单元。
特性ACID
- 原子性(Atomicity):事务是不可分割的最小操作单位,要么同时成功,要么同时失败
- 一致性(Consistency):事务完成时,必须使所有的数据都保持一致状态
- 隔离性(lsolation) :多个事务之间,操作的可见性
- 持久性(Durability):事务一旦提交或回滚,它对数据库中的数据的改变就是永久的
语法
-- 开启事务
start transaction;
-- 开启事务
begin;
普通sql语句1
普通sql语句2
普通sql语句3
普通sql语句......

-- 提交事务
commit;
--回滚事务
rollback;
mysql默认提交事务规则
select @@autocommit; -- 输出1表示事务默认自动提交
sql语句; -- 该语句将自动提交

set @@autocommit = 0; -- 修改事务默认提交方式
select @@autocommit; -- 输出0表示需要手动提交

sql语句; -- 该语句将不会自动提交
commit; -- 手动提交
JDBC
概念
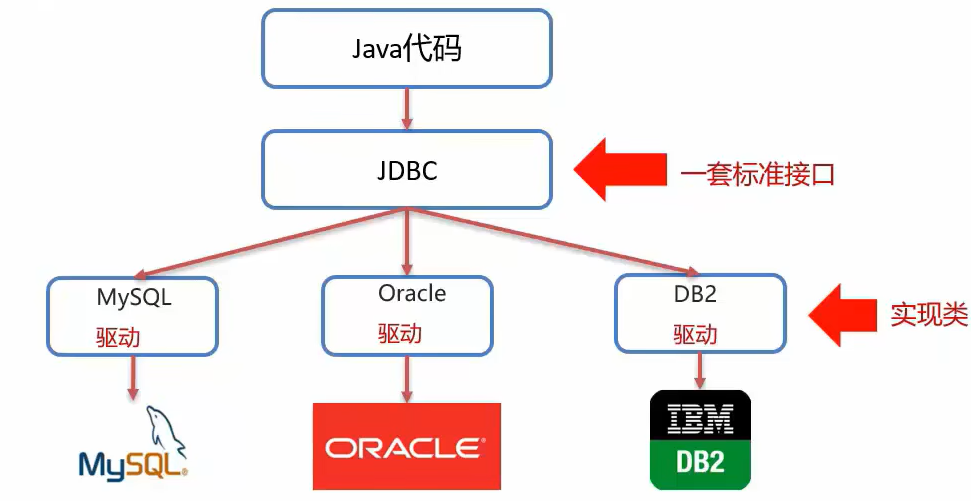
- 全称:JDBC(Java DataBase Connectivity)Java数据库连接
- 操作关系型数据库的一套API,也就是一个接口类
- 各个数据库厂商会去实现这套接口,提供数据库驱动jar包
- 通过JDBC接口可以不改变sql语句,操作不同的数据库:mysql oracle DB2
测试JDBC:基本写法
show databases;
drop database if exists db1;
create database db1;
use db1;
create table student(
   id int primary key,
   age int
);
insert into student(id,age) values(0,10);
update student set age=15 where id = 0;
package test_jdbc;

import java.sql.Connection;
import java.sql.DriverManager;
import java.sql.Statement;

public class Main {
    public static void main(String[] args) throws Exception {
        // 0. 引入mysql-connector-j-8.0.31.jar包
        // 1. 注册驱动
        Class.forName("com.mysql.cj.jdbc.Driver");// 新版本将自动注册,其实不用写
        // 2. 获取连接
        String url = "jdbc:mysql://localhost:3306/db1";
        String username = "root";
        String password = "123456";
        Connection connection = DriverManager.getConnection(url, username, password);
        // 3.定义sql语句
        String sql = "update student set age=15 where id = 0;";
        // 4.获取sql执行器对象Statement
        Statement statement = connection.createStatement();
        // 5.执行sql语句
        int updataCount = statement.executeUpdate(sql);
        // 6.处理结果
        System.out.println(updataCount);
        // 7.释放资源
        statement.close();
        connection.close();
    }
}
DriverManager工具类
DriverManager(驱动管理类)作用:
- 注册驱动 (mysql5之后的驱动包将自动注册)
- 注册驱动的过程:
Class.forName("com.mysql.cj.jdbc.Driver");将Driver类的字节码加载到内存中,Driver()类中的静态代码块被执行:
- DriverManager对象通过其自身的静态方法
DriverManager.registerDriver()接收到new Driver()的实例对象
- 注册驱动的过程:
- 获取数据库连接
DriverManager.getConnection(url,user,password);url格式:jdbc:mysql://ip或域名:端口/数据库名称?参数名1=参数值1&参数名2=参数值2- 简写:
localhost:3306可简写为jdbc:mysql:///数据库名称?参数名1=参数值1&参数名2=参数值2- 在xml中的转义字符:
&-->&
- 参数配置:
useSSL=false关闭不使用SSL安全连接时的提示useServerPrepStemts=true开启sql语句预编译功能,防止sql注入
- 简写:
String url = "jdbc:mysql://localhost:3306/db1";//完整写法
String url = "jdbc:mysql:///db1";//简写
String url = "jdbc:mysql:///db1?useSSL=false";//关闭不使用SSL安全连接时的提示
String username = "root";
String password = "123456";
Connection connection = DriverManager.getConnection(url, username, password);
Connection数据库连接对象
作用
获取sql执行器
Statement、PreparedStatement、CallableStatement对象//获取普通sql执行器对象 Statement statement = connection.createStatement();//获取预编译sql执行器对象:防止sql注入 PreparedStatement pstatement = connection.prepareStatement(sql);//执行存储过程的对象 CallableStatement cstatement = connection.prepareCall(sql);事务处理
//开启事务:mysql为自动提交事务,设置为自动提交为false便是开启事务管理
connection.setAutoCommit(boolean autoCommit);
//提交事务 connection.commit();//回滚事务 connection.rollback();事务处理示例
try{
   connection.setAutoCommit(false);//开启事务

   Statement statement = connection.createStatement();

   statement.executeUpdate(sql语句1);
   statement.executeUpdate(sql语句2);
   statement.executeUpdate(sql语句3);

   connection.commit();//提交事务
}catch(Exception e){
   connection.rollback();//捕获到任何异常便回滚数据
   connection.setAutoCommit(false);//关闭事务(如果需要)
}
Statement sql执行器对象
作用
执行sql语句
// 执行 DML DDL语句
//    * 返回值:
//       * DML语句执行成功后影响的行数
//       * DDL语句执行成功也可能返回0
int executeUpdate(sql);
// 执行DQL语句 // * 返回值:ResultSet 类型的结果集合对象,表示查询结果 ResultSet executeQuery(sql);
PreparedStatement 预编译sql执行器对象:防止sql注入
概念
PreparedStatement继承自Statement对象
作用
- 预编译SQL语句并执行:预防sql注入
优点
- 防sql注入
- 高性能
防sql注入原理:
- 对敏感字符和关键字进行了转义
高性能执行原理
- sql语句提交给mysql服务器要完成一系列操作:
- sql语句的语法检查
- 将sql语句编译成可执行函数
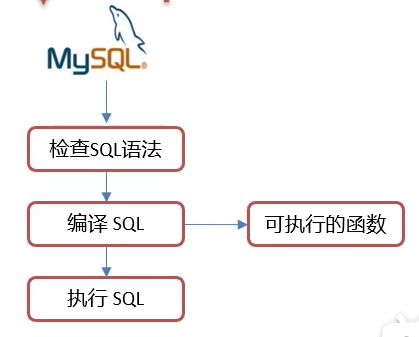
PreparedStatement(sql模板字符串)调用时,会把sql模板语句发送给sql服务器进行预编译,且多次调用只会预编译一次。- 程序在后续传入参数值时,不需要在进行预编译操作。直接执行sql的可执行函数
sql注入
- 通过一定的手段,向程序输入预先编辑好的sql语句,以达到执行sql代码,完成一定的操作,对服务器进行攻击的目的。
- 如:
- 若后端判断验证用户合法的sql是
select * from users where username = '输入的用户名' and password = '输入的密码'; - 则在密码框输入
'or '1'='1 - sql的语句就变为了
select * from users where username = '输入的用户名' and password = '' or '1'='1'; 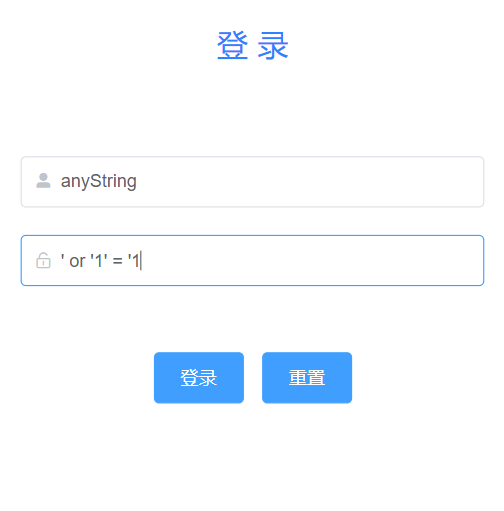
- 若后端判断验证用户合法的sql是
使用
- 使用?作为占位符,预编译sql语句
String url = "jdbc:mysql://localhost:3306/db1?useServerPrepStemts=true"; // 启用预编译功能,不启用也行,但使用prepareStatement() 不会导致执行效率变高
String username = "root";
String password = "123456";

Connection connection = DriverManager.getConnection(url, username, password);

String username = "admin";
String password = "admin";
// 使用?作为占位符,传入prepareStatement() 函数
String sql = "select * from user where username = ? and password = ? ";
PreparedStatement pstatement = connection.prepareStatement(sql);// 预编译sql语句,多次执行不会导致mysql服务器多次预编译,只会编译一次
pstatement.setString(1,username);//给第1个?设置值
pstatement.setString(2,password);//给第2个?设置值
ResultSet result =  pstatement.executeQuery();//执行sql语句(不要传递参数)

while(result.next()){
   String id = result.getString("id");
   String name = result.getString("name");
   System.out.println(id);
   System.out.println(name);
}


result.close(); // 释放资源
statement.close(); // 释放资源
connection.close(); // 释放资源
ResultSet 结果集合对象
作用
0. 该实例对象的内容是sql的查询结果
获取查询结果
// 遍历行
//    * 游标指针:查询结果是一个二维表,游标指针初始指向表头所在行(数据行的上一行)
//    * next()函数:该函数会使得游标指针指向下一行
//    * 返回值: 布尔值,当前行是否是有效行(是否有数据)
boolean next();
// 获取某列的数据 // * 参数 // * int 列编号 从1开始编号 // * String 列名 // * 返回值 // * xxx数据类型的数据 xxx getXxx(参数); String getString("UserName"); String getString(1);
使用案例
Connection connection = DriverManager.getConnection(url, username, password);
Statement statement = connection.createStatement();
ResultSet result =  statement.executeQuery(sql);

while(result.next()){
   String id = result.getString("id");
   String name = result.getString("name");
   System.out.println(id);
   System.out.println(name);
}
result.close(); // 释放资源
statement.close(); // 释放资源
connection.close(); // 释放资源
数据库连接池
数据库连接池简介
- 概念类似于线程池,数据连接的建立要耗费时间和计算资源,预先建立一定数量的数据库连接,按需分配,
- 数据库连接池是个容器,负责分配、管理数据库连接(Connection)
数据库连接池的标准接口及常用实现类
接口:
DataSource//接口方法: Connection getConnection();//获取池内的连接实现类:
DBCPC3P0Druid
Druid德鲁伊数据库连接池
Druid德鲁伊
- 阿里巴巴开源数据库连接池
- 功能强大、性能优秀
Druid基本使用
package test_for_druid;
import java.io.FileInputStream;
import java.sql.Connection;
import java.util.Properties;

import javax.sql.DataSource;

//1.导入jar包
import com.alibaba.druid.pool.DruidDataSourceFactory;
//2.编写配置文件


public class Main {
    public static void main(String[] args)throws Exception {
        //3.加载配置文件
        Properties config = new Properties();
        //
        // System.out.println(System.getProperty("user.dir"));//查看当前所在目录
        config.load(new FileInputStream("./src/test_for_druid/druid.properties"));
        System.out.println(config.toString());

        //4.获取连接池对象
        DataSource dataSource =  DruidDataSourceFactory.createDataSource(config);

        //5.从连接池中获取连接对象
        Connection connection = dataSource.getConnection();

        System.out.println(connection);
    }
}
Druid配置文件
# jdbc驱动类名
driverClassName=com.mysql.jdbc.Driver
url=jdbc:mysql:///db5?useSSL=false&useServerPrepStmts=true
username=root
password=root
# 初始连接数
initialSize=5
# 最大连接数
maxActive=10
# 最大等待时间
maxWait=3000
JDBC练习
查询数据
数据准备
drop database if exists db5;
create database db5;
use db5;
create table tb_brand(
   -- id
   id int primary key auto_increment,
   -- 品牌名
   brand_name varchar(20),
   -- 公司名
   company_name varchar(20),
   -- 排序优先级
   ordered int,
   -- 描述
   description varchar(100),
   -- 状态:1 启用 0 禁用
   status int
);
insert into
    tb_brand(brand_name,company_name,ordered,description,status)
    values
        ("三只松鼠","三只松鼠股份有限公司",5,'好吃不上火',0),
        ("华为","华为技术有限公司",1,'华为致力于把数字技术带入每个人、每个家庭、每个组织,构建万物互联的智能世界',1),
        ("小米","小米科技有限公司",4,'Are you ok?',1);

SELECT * from tb_brand;
查询表中所有数据案例
package test_for_druid;

import java.io.FileInputStream;
import java.sql.Connection;
import java.sql.PreparedStatement;
import java.sql.ResultSet;
import java.util.LinkedList;
import java.util.List;
import java.util.Properties;

import javax.sql.DataSource;

//1.导入jar包
import com.alibaba.druid.pool.DruidDataSourceFactory;
//2.编写配置文件

public class Main {
    public static void main(String[] args)throws Exception {
        //3.加载配置文件
        Properties config = new Properties();
        //
        // System.out.println(System.getProperty("user.dir"));//查看当前所在目录
        config.load(new FileInputStream("./src/test_for_druid/druid.properties"));
        System.out.println(config.toString());

        //4.获取连接池对象
        DataSource dataSource =  DruidDataSourceFactory.createDataSource(config);

        //5.从连接池中获取连接对象
        Connection connection = dataSource.getConnection();

        // 定义sql语句
        String sql = "select * from tb_brand";
        // 获取sql预编译对象
        PreparedStatement preparedStatement =  connection.prepareStatement(sql);
        //执行查询
        ResultSet resultSet = preparedStatement.executeQuery();
        List<Banner> banners = new LinkedList<>();
        //遍历结果并存入数组
        while(resultSet.next()){
            banners.add(new Banner(
                resultSet.getInt("id"),
                resultSet.getString("brand_name"),
                resultSet.getString("company_name"),
                resultSet.getInt("ordered"),
                resultSet.getString("description"),
                resultSet.getInt("status")
                ));
        }
        System.out.println(banners);
        //释放资源
        preparedStatement.close();
        connection.close();
    }
}
class Banner{
    // id
    private Integer id;
    // 品牌名
    private String brand_name;
    // 公司名
    private String company_name;
    // 排序优先级
    private Integer ordered;
    // 描述
    private String description;
    // 状态:1 启用 0 禁用
    private Integer status;
    public Banner(Integer id, String brand_name, String company_name, Integer ordered, String description,
            Integer status) {
        this.id = id;
        this.brand_name = brand_name;
        this.company_name = company_name;
        this.ordered = ordered;
        this.description = description;
        this.status = status;
    }
    @Override
    public String toString() {
        return "\nBanner [id=" + id + ", brand_name=" + brand_name + ", company_name=" + company_name + ", ordered="
                + ordered + ", description=" + description + ", status=" + status + "]";
    }
}
插入数据
package test_for_druid;

import java.io.FileInputStream;
import java.sql.Connection;
import java.sql.PreparedStatement;
import java.sql.ResultSet;
import java.util.LinkedList;
import java.util.List;
import java.util.Properties;

import javax.sql.DataSource;

//1.导入jar包
import com.alibaba.druid.pool.DruidDataSourceFactory;
//2.编写配置文件

public class Main {
    public static void main(String[] args)throws Exception {
        //3.加载配置文件
        Properties config = new Properties();
        //
        // System.out.println(System.getProperty("user.dir"));//查看当前所在目录
        config.load(new FileInputStream("./src/test_for_druid/druid.properties"));
        System.out.println(config.toString());

        //4.获取连接池对象
        DataSource dataSource =  DruidDataSourceFactory.createDataSource(config);

        //5.从连接池中获取连接对象
        Connection connection = dataSource.getConnection();

        // Banner 获取数据
        Banner banner = new Banner("生命有限", "生命有限公司", 2, "当了程序员,寿命减十年", 0);
        // 定义sql语句
        String sql = "insert tb_brand(brand_name,company_name,ordered,description,status) values(?,?,?,?,?)";
        // 获取sql预编译对象
        PreparedStatement preparedStatement =  connection.prepareStatement(sql);
        // 设置值
        preparedStatement.setString(1, banner.getBrand_name());
        preparedStatement.setString(2, banner.getCompany_name());
        preparedStatement.setInt(3, banner.getOrdered());
        preparedStatement.setString(4, banner.getDescription());
        preparedStatement.setInt(5, banner.getStatus());
        //执行查询
        int result = preparedStatement.executeUpdate();
        if(result>0)
            System.out.println("更新成功");
        else
            System.out.println("更新失败");
        //释放资源
        preparedStatement.close();
        connection.close();
    }
}
class Banner{
    // id
    private Integer id;
    // 品牌名
    private String brand_name;
    // 公司名
    private String company_name;
    // 排序优先级
    private Integer ordered;
    // 描述
    private String description;
    // 状态:1 启用 0 禁用
    private Integer status;
    public Banner(Integer id, String brand_name, String company_name, Integer ordered, String description,
            Integer status) {
        this.id = id;
        this.brand_name = brand_name;
        this.company_name = company_name;
        this.ordered = ordered;
        this.description = description;
        this.status = status;
    }
    public Banner(String brand_name, String company_name, Integer ordered, String description,
            Integer status) {
        this.brand_name = brand_name;
        this.company_name = company_name;
        this.ordered = ordered;
        this.description = description;
        this.status = status;
    }
    @Override
    public String toString() {
        return "\nBanner [id=" + id + ", brand_name=" + brand_name + ", company_name=" + company_name + ", ordered="
                + ordered + ", description=" + description + ", status=" + status + "]";
    }
    public Integer getId() {
        return id;
    }
    public String getBrand_name() {
        return brand_name;
    }
    public String getCompany_name() {
        return company_name;
    }
    public Integer getOrdered() {
        return ordered;
    }
    public String getDescription() {
        return description;
    }
    public Integer getStatus() {
        return status;
    }

}
更新数据
package test_for_druid;

import java.io.FileInputStream;
import java.sql.Connection;
import java.sql.PreparedStatement;
import java.sql.ResultSet;
import java.util.LinkedList;
import java.util.List;
import java.util.Properties;

import javax.sql.DataSource;

//1.导入jar包
import com.alibaba.druid.pool.DruidDataSourceFactory;
//2.编写配置文件

public class Main {
    public static void main(String[] args)throws Exception {
        //3.加载配置文件
        Properties config = new Properties();
        //
        // System.out.println(System.getProperty("user.dir"));//查看当前所在目录
        config.load(new FileInputStream("./src/test_for_druid/druid.properties"));
        System.out.println(config.toString());

        //4.获取连接池对象
        DataSource dataSource =  DruidDataSourceFactory.createDataSource(config);

        //5.从连接池中获取连接对象
        Connection connection = dataSource.getConnection();

        // Banner 获取数据
        Banner banner = new Banner(4,"生命有限", "生命有限公司", 9999, "当了程序员,寿命减十年......", 0);
        // 定义sql语句
        String sql = "update tb_brand set brand_name=?, company_name=?, ordered=?, description=?, status=? where id =?";
        // 获取sql预编译对象
        PreparedStatement preparedStatement =  connection.prepareStatement(sql);
        // 设置值
        preparedStatement.setString(1, banner.getBrand_name());
        preparedStatement.setString(2, banner.getCompany_name());
        preparedStatement.setInt(3, banner.getOrdered());
        preparedStatement.setString(4, banner.getDescription());
        preparedStatement.setInt(5, banner.getStatus());
        preparedStatement.setInt(6, banner.getId());

        //执行查询
        int result = preparedStatement.executeUpdate();
        if(result>0)
            System.out.println("更新成功");
        else
            System.out.println("更新失败");

        //释放资源
        preparedStatement.close();
        connection.close();
    }
}
class Banner{
    // id
    private Integer id;
    // 品牌名
    private String brand_name;
    // 公司名
    private String company_name;
    // 排序优先级
    private Integer ordered;
    // 描述
    private String description;
    // 状态:1 启用 0 禁用
    private Integer status;
    public Banner(Integer id, String brand_name, String company_name, Integer ordered, String description,
            Integer status) {
        this.id = id;
        this.brand_name = brand_name;
        this.company_name = company_name;
        this.ordered = ordered;
        this.description = description;
        this.status = status;
    }
    public Banner(String brand_name, String company_name, Integer ordered, String description,
            Integer status) {
        this.brand_name = brand_name;
        this.company_name = company_name;
        this.ordered = ordered;
        this.description = description;
        this.status = status;
    }
    @Override
    public String toString() {
        return "\nBanner [id=" + id + ", brand_name=" + brand_name + ", company_name=" + company_name + ", ordered="
                + ordered + ", description=" + description + ", status=" + status + "]";
    }
    public Integer getId() {
        return id;
    }
    public String getBrand_name() {
        return brand_name;
    }
    public String getCompany_name() {
        return company_name;
    }
    public Integer getOrdered() {
        return ordered;
    }
    public String getDescription() {
        return description;
    }
    public Integer getStatus() {
        return status;
    }

}
删除数据
package test_for_druid;

import java.io.FileInputStream;
import java.sql.Connection;
import java.sql.PreparedStatement;
import java.sql.ResultSet;
import java.util.LinkedList;
import java.util.List;
import java.util.Properties;

import javax.sql.DataSource;

//1.导入jar包
import com.alibaba.druid.pool.DruidDataSourceFactory;
//2.编写配置文件

public class Main {
    public static void main(String[] args)throws Exception {
        //3.加载配置文件
        Properties config = new Properties();
        //
        // System.out.println(System.getProperty("user.dir"));//查看当前所在目录
        config.load(new FileInputStream("./src/test_for_druid/druid.properties"));
        System.out.println(config.toString());

        //4.获取连接池对象
        DataSource dataSource =  DruidDataSourceFactory.createDataSource(config);

        //5.从连接池中获取连接对象
        Connection connection = dataSource.getConnection();

        // Banner 获取数据
        int id = 4;
        // 定义sql语句
        String sql = "delete from tb_brand where id = ?";
        // 获取sql预编译对象
        PreparedStatement preparedStatement =  connection.prepareStatement(sql);
        // 设置值
        preparedStatement.setInt(1,id);

        //执行查询
        int result = preparedStatement.executeUpdate();
        if(result>0)
            System.out.println("更新成功");
        else
            System.out.println("更新失败");
        //释放资源
        preparedStatement.close();
        connection.close();
    }
}
class Banner{
    // id
    private Integer id;
    // 品牌名
    private String brand_name;
    // 公司名
    private String company_name;
    // 排序优先级
    private Integer ordered;
    // 描述
    private String description;
    // 状态:1 启用 0 禁用
    private Integer status;
    public Banner(Integer id, String brand_name, String company_name, Integer ordered, String description,
            Integer status) {
        this.id = id;
        this.brand_name = brand_name;
        this.company_name = company_name;
        this.ordered = ordered;
        this.description = description;
        this.status = status;
    }
    public Banner(String brand_name, String company_name, Integer ordered, String description,
            Integer status) {
        this.brand_name = brand_name;
        this.company_name = company_name;
        this.ordered = ordered;
        this.description = description;
        this.status = status;
    }
    @Override
    public String toString() {
        return "\nBanner [id=" + id + ", brand_name=" + brand_name + ", company_name=" + company_name + ", ordered="
                + ordered + ", description=" + description + ", status=" + status + "]";
    }
    public Integer getId() {
        return id;
    }
    public String getBrand_name() {
        return brand_name;
    }
    public String getCompany_name() {
        return company_name;
    }
    public Integer getOrdered() {
        return ordered;
    }
    public String getDescription() {
        return description;
    }
    public Integer getStatus() {
        return status;
    }
}
Maven
Maven是专门用于管理和构建Java项目的工具,基于项目对象模型(POM)的概念,它的主要功能有:
- 提供了一套标准化的项目结构,通过Maven使得不同IDE创建的项目结构一致
- 提供了一套标准化的构建流程(编译,测试,打包,发布......)
- 提供了一套依赖管理机制
标准化的项目结构
标准化的构建流程
依赖管理机制
maven模型
- POM
- dependency
- Plugin
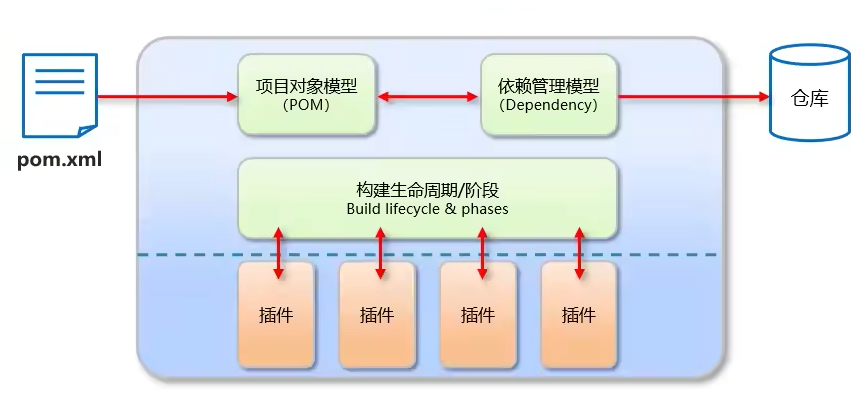
Maven仓库
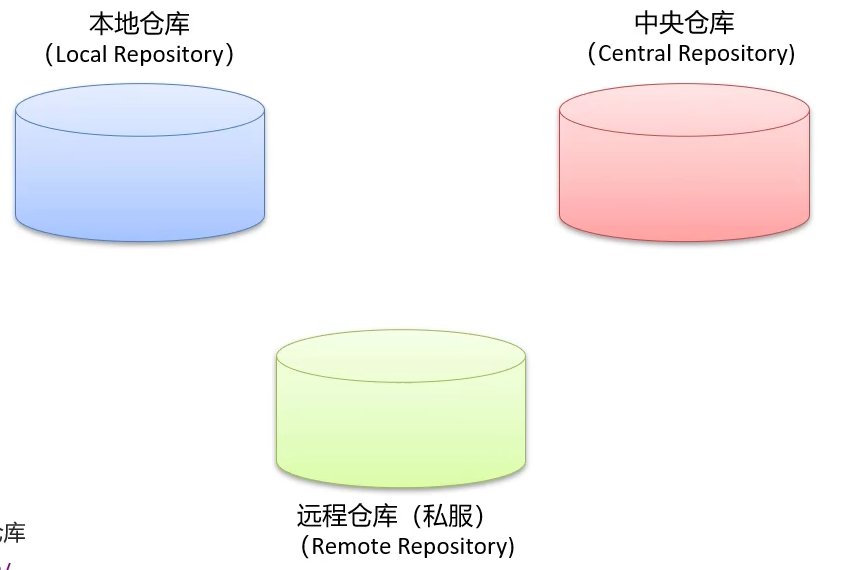
- 本地仓库:自己计算机上的一个目录
- 中央仓库:由Maven团队维护的全球唯─的仓库
- 远程仓库(私服):由公司团队搭建的私有仓库
- jar包的查找顺序
- 一般引入顺序
- 项目中使用坐标引入对应依赖jar包,
- 首先会查找本地仓库中是否有对应的jar包:
- 如果有,则在项目直接引用;
- 如果没有,则去中央仓库中下载对应的jar包到本地仓库然后引用。
- 搭建远程仓库(私服)后,jar包的查找顺序
- 本地仓库→远程仓库→中央仓库
- 一般引入顺序
安装配置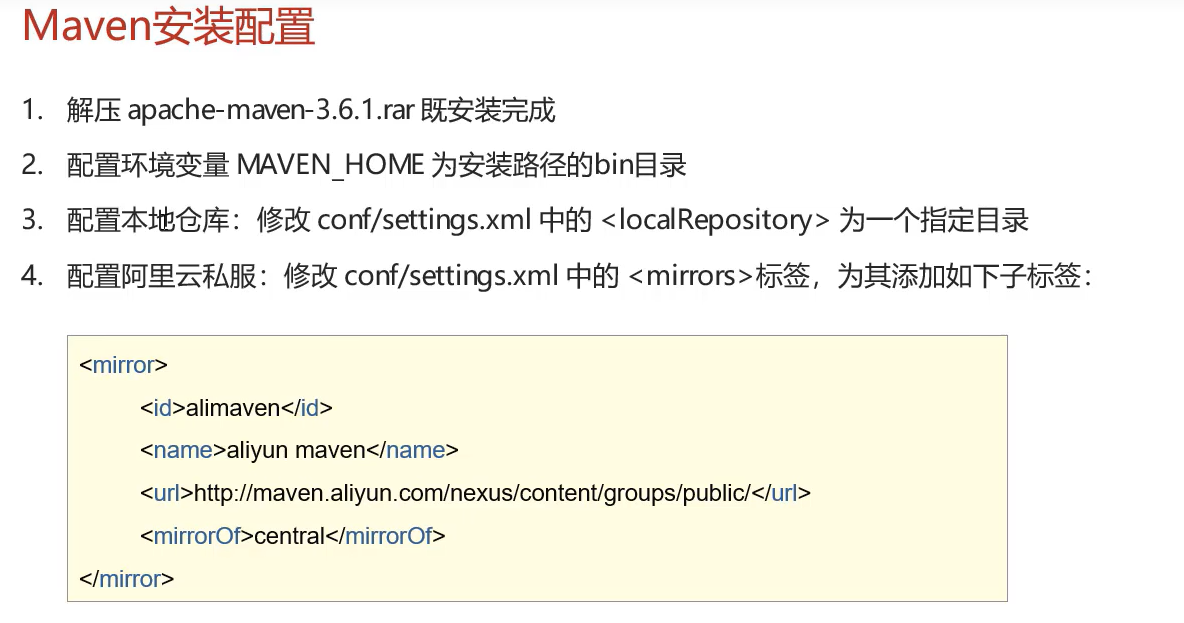
配置本地仓库所在路径apache-maven-3.6.3\conf\settings.xml
<localRepository>D:\Program Files\maven\repository</localRepository>
配置镜像apache-maven-3.6.3\conf\settings.xml
  <mirrors>
     <mirror>
      <id>aliyunmaven</id>
      <mirrorOf>*</mirrorOf>
      <name>阿里云公共仓库</name>
      <url>https://maven.aliyun.com/repository/public</url>
    </mirror>
  </mirrors>
坐标
- Maven 中的坐标是资源的唯一标识
- 使用坐标来定义项目或引入项目中需要的依赖
- Maven 坐标主要组成
groupld: 定义当前Maven项目隶属组织名称(通常是域名反写,例如: com.itheima)artifactld: 定义当前Maven项目名称(通常是模块名称,例如order-service、goods-service)version: 定义当前项目版本号
定义项目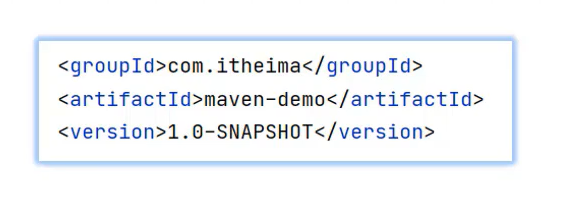
定义引入项目中需要的依赖项目
常用命令
# Maven常用命令
cd project_root
mvn compile # 编译
mvn clean # 清理
mvn test # 测试
mvn package # 打包
mvn install # 安装
生命周期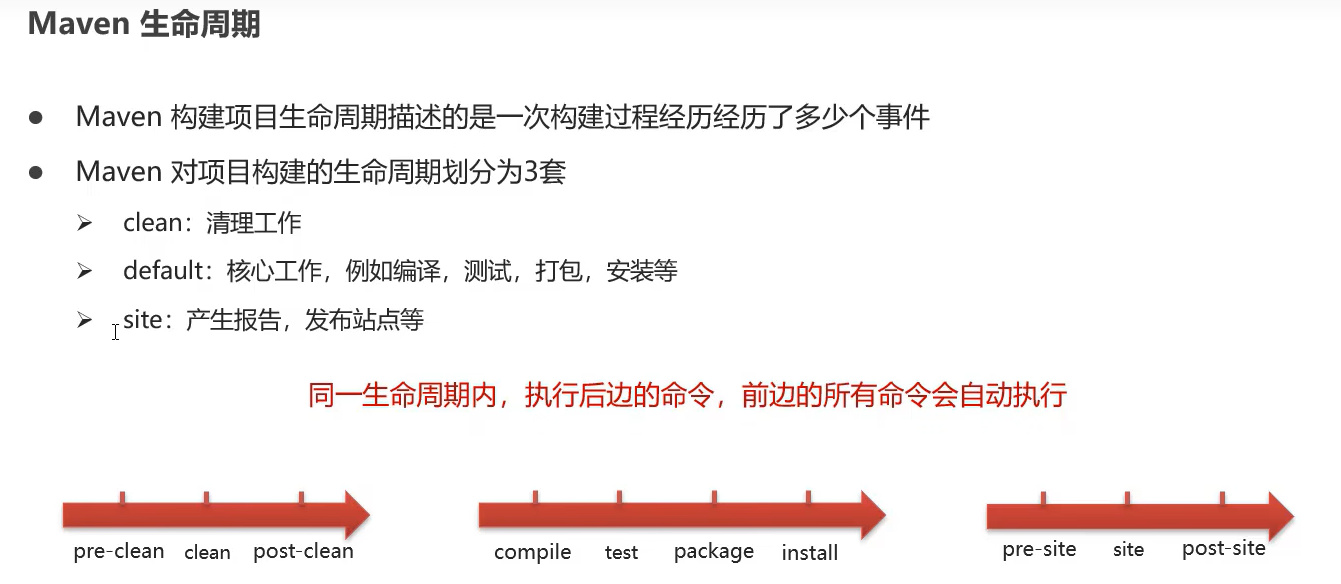
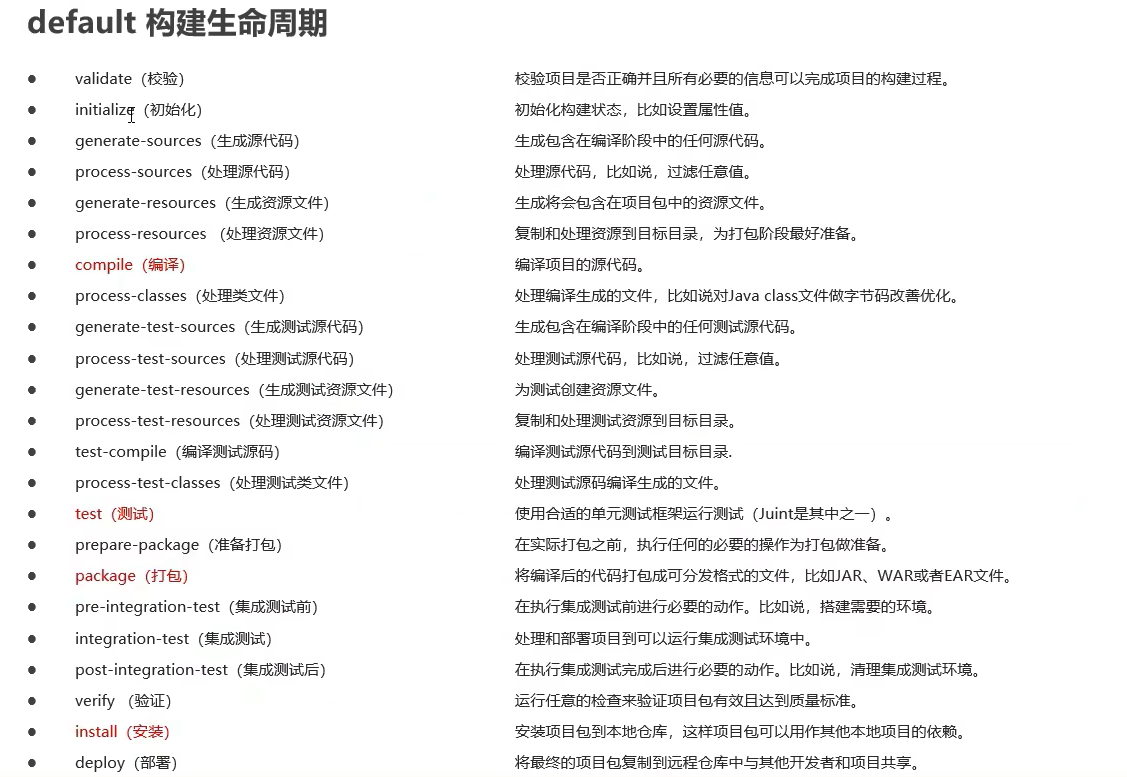
依赖管理
scope可以设置对应jar包的作用范围- 作用范围
- 编译环境
- 测试环境
- 运行环境
  <dependencies>
    <dependency>
      <groupId>junit</groupId>
      <artifactId>junit</artifactId>
      <version>4.11</version>
      <scope>test</scope> <!-- scope指定依赖的作用范围 -->
    </dependency>
  </dependencies>

myBatis
MyBatis是一款优秀的
持久层框架,用于简化JDBC开发MyBatis 本是 Apache的一个开源项目
iBatis, 2010年这个项目由apache software foundation迁移到了google code,并且改名为MyBatis。2013年11月迁移到Github
持久层
- 负责将数据到保存到数据库的那一层代码
- JavaEE三层架构:
- 表现层 页面展示
- 业务层 逻辑处理
- 持久层
JDBC缺点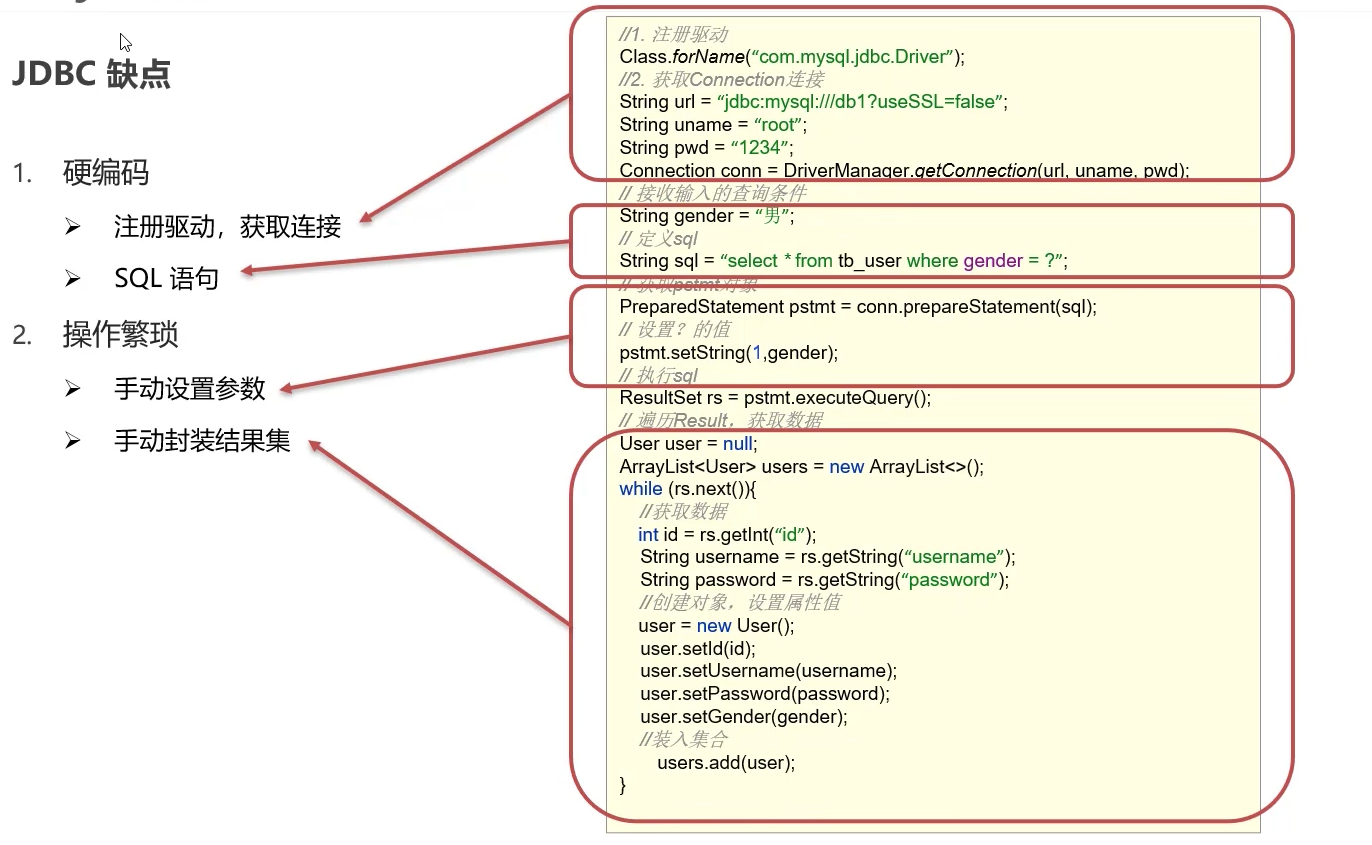
maBatis对JDBC的简化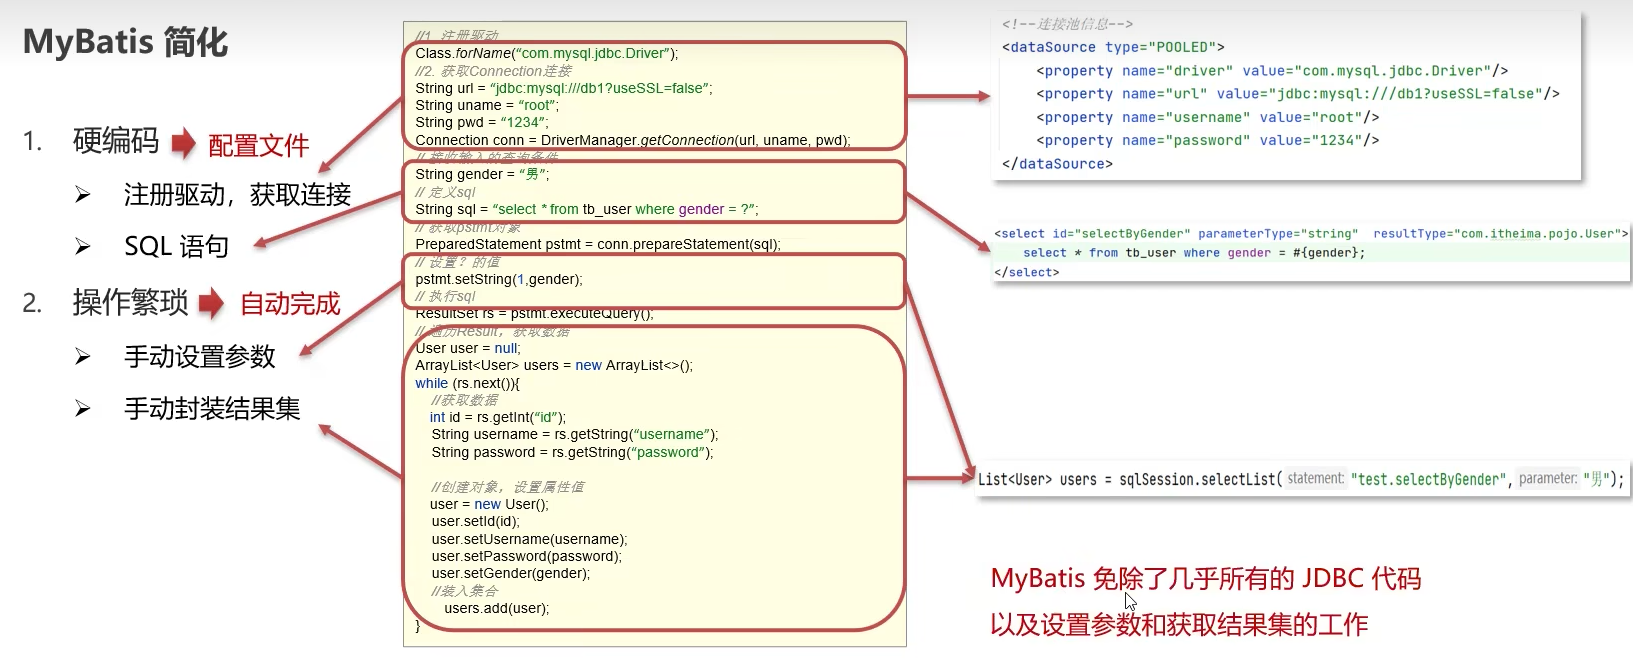
简单示例:基本步骤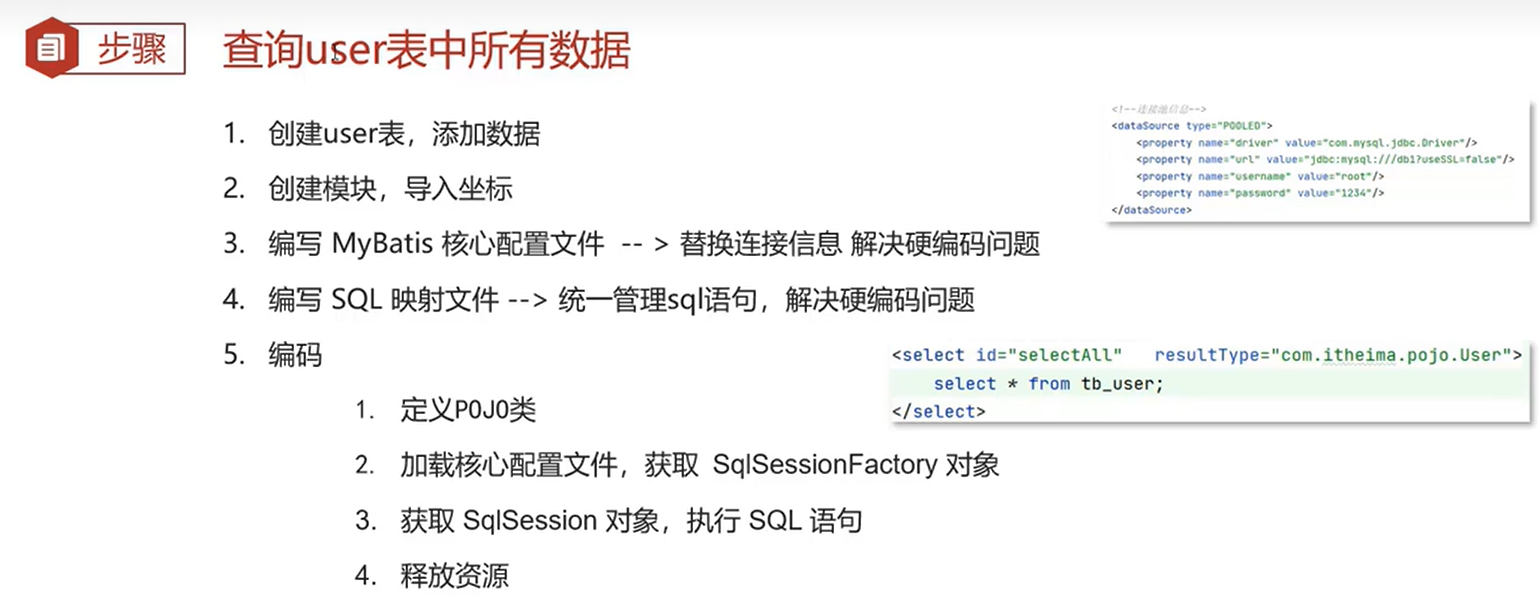
myBatis简单示例
使用示例1:myBatis简单示例
准备数据
use db5;
create table tb_user(
    id int primary key auto_increment,
    name varchar(20),
    password varchar(20),
    gender char(1),
    addr varchar(30)
);
insert into
tb_user(id,name,password,gender,addr)
values
    (1,"张三","123","男","北京"),
    (2,"李四","123","男","北京"),
    (3,"王五","123","男","北京")
;
编辑maven项目配置文件pom.xml,配置相关依赖
    <dependency>
      <!-- mybatis -->
      <groupId>org.mybatis</groupId>
      <artifactId>mybatis</artifactId>
      <version>3.5.5</version>
    </dependency>
    <dependency>
      <!-- mysql的JDBC驱动 -->
      <groupId>mysql</groupId>
      <artifactId>mysql-connector-java</artifactId>
      <version>5.1.46</version>
    </dependency>
编辑mybatis配置文件 src/main/resources/mybatis-config.xml
<?xml version="1.0" encoding="UTF-8" ?>
<!DOCTYPE configuration
  PUBLIC "-//mybatis.org//DTD Config 3.0//EN"
  "http://mybatis.org/dtd/mybatis-3-config.dtd">
<configuration>
  <environments default="development">
    <environment id="development">
      <transactionManager type="JDBC"/>
      <dataSource type="POOLED">
        <property name="driver" value="com.mysql.jdbc.Driver"/> <!-- 填mysql的驱动的路径 -->
        <property name="url" value="jdbc:mysql:///db5?useSSL=false"/>  <!-- 填mysql数据库的路径 -->
        <property name="username" value="root"/>  <!-- 填数据库的username -->
        <property name="password" value="root"/>   <!-- 填数据库的password -->
      </dataSource>
    </environment>
  </environments>
  <mappers>
    <mapper resource="./UserMapper.xml"/>  <!-- 填sql语句的映射文件路径 -->
  </mappers>
</configuration>
编辑sql语句映射文件src/main/resources/UserMapper.xml
<?xml version="1.0" encoding="UTF-8" ?>
<!DOCTYPE mapper
  PUBLIC "-//mybatis.org//DTD Mapper 3.0//EN"
  "http://mybatis.org/dtd/mybatis-3-mapper.dtd">
<mapper namespace="namespaceTest1"> <!-- 在程序中需要通过 `命名空间.sql语句id` 执行该命令  -->
   <select id="selectAllUsers" resultType="com.example.pojo.User"> <!-- resultType是User类的类型  -->
      select * from tb_user
   </select>
</mapper>
定义User类src/main/java/com/example/pojo/User.java
package com.example.pojo;

public class User {
    private Integer id;
    private String name;
    private String password;
    private String gender;
    private String addr;

    public Integer getId() {
        return id;
    }
    public void setId(Integer id) {
        this.id = id;
    }
    public String getName() {
        return name;
    }
    public void setName(String name) {
        this.name = name;
    }
    public String getPassword() {
        return password;
    }
    public void setPassword(String password) {
        this.password = password;
    }
    public String getGender() {
        return gender;
    }
    public void setGender(String gender) {
        this.gender = gender;
    }
    public String getAddr() {
        return addr;
    }
    public void setAddr(String addr) {
        this.addr = addr;
    }
    @Override
    public String toString() {
        return "User [id=" + id + ", name=" + name + ", password=" + password + ", gender=" + gender + ", addr=" + addr
                + "]";
    }

}
执行sql语句src/main/java/com/example/testSelectAll.java
package com.example;

import java.io.InputStream;
import java.util.List;

import org.apache.ibatis.io.Resources;
import org.apache.ibatis.session.SqlSession;
import org.apache.ibatis.session.SqlSessionFactory;
import org.apache.ibatis.session.SqlSessionFactoryBuilder;

import com.example.pojo.User;

public class testSelectAll {
    public static void main(String[] args) throws Exception{
        // 加载mybatis核心配置文件
        String resource = "mybatis-config.xml";
        InputStream inputStream = Resources.getResourceAsStream(resource);
        SqlSessionFactory sqlSessionFactory = new SqlSessionFactoryBuilder().build(inputStream);

        // 获取SqlSession,用其来执行sql语句
        SqlSession session = sqlSessionFactory.openSession();

        //通过 `命名空间.sql语句ID` 执行sql语句,结果会自动封装到`List<User>`中
        List<User> users = session.selectList("namespaceTest1.selectAllUsers"); // 这里依然存在把字符串写到程序中的硬编码问题,需要后续进一步解决

        System.out.println(users);

        // 释放资源
        session.close();
    }
}
输出:
使用示例2:使用Mapper代理方式
目的:解决前一种方法中存在的硬编码问题
配置过程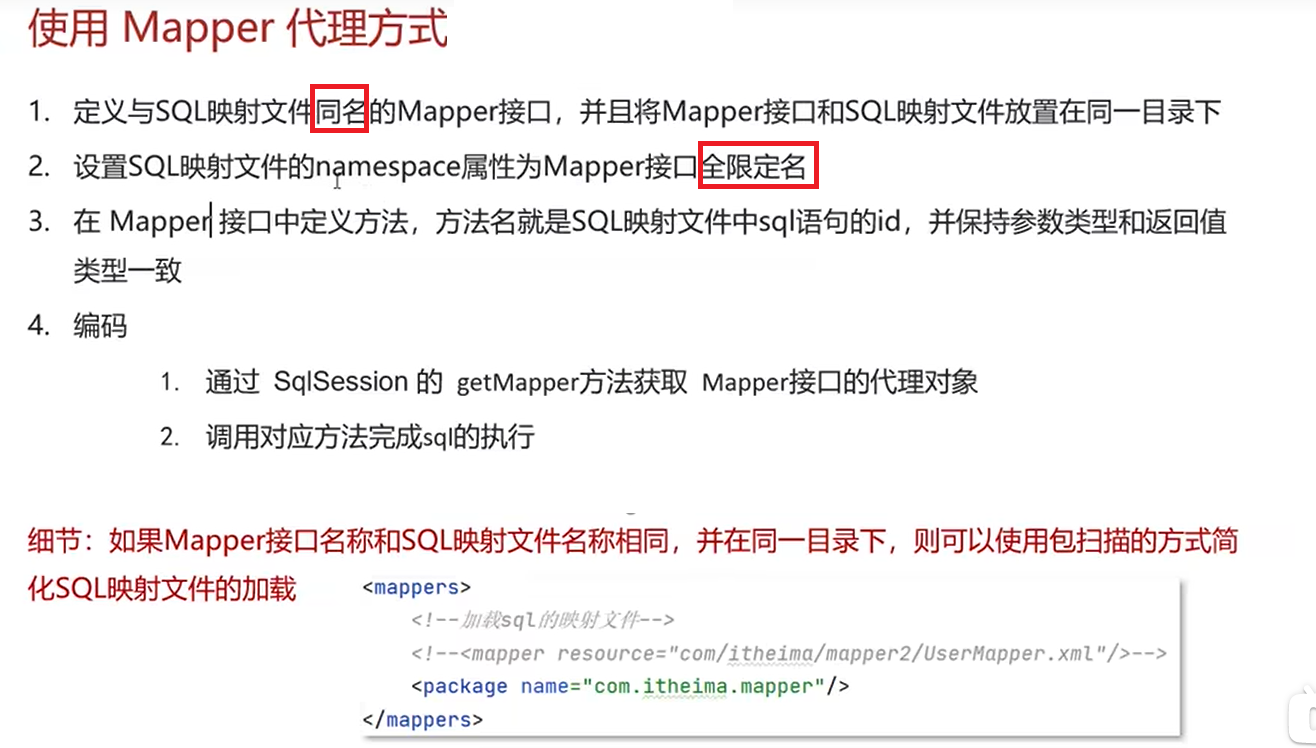
0.修改配置
<?xml version="1.0" encoding="UTF-8" ?>
<!DOCTYPE configuration
  PUBLIC "-//mybatis.org//DTD Config 3.0//EN"
  "http://mybatis.org/dtd/mybatis-3-config.dtd">
<configuration>
  <environments default="development">
    <environment id="development">
      <transactionManager type="JDBC"/>
      <dataSource type="POOLED">
        <!--
            use db5;
            create table tb_user(
                id int primary key auto_increment,
                name varchar(20),
                password varchar(20),
                gender char(1),
                addr varchar(30)
            );
            insert into
            tb_user(id,name,password,gender,addr)
            values
                (1,"张三","123","男","北京"),
                (2,"李四","123","男","北京"),
                (3,"王五","123","男","北京")
            ;
         -->
        <property name="driver" value="com.mysql.jdbc.Driver"/> <!-- 填mysql的驱动的路径 -->
        <property name="url" value="jdbc:mysql:///db5?useSSL=false"/>  <!-- 填mysql数据库的路径 -->
        <property name="username" value="root"/>  <!-- 填数据库的username -->
        <property name="password" value="root"/>   <!-- 填数据库的password -->
      </dataSource>
    </environment>
  </environments>
  <mappers>
    <!-- <mapper resource="com/example/mapper/UserMapper.xml"/>   --> <!-- 填sql语句的映射文件路径 -->
    <package name="com.example.mapper" /> <!-- 使用这种Mapper代理的方式便可以用这种包扫描的写法 -->
  </mappers>
</configuration>
1.定义接口:src/main/java/com/example/mapper/UserMapper.java
- 注意存放路径
- 注意接口的函数名、形参列表、返回值都和
UserMapper.xml中的sql语句有关
package com.example.mapper;

import java.util.List;

import com.example.pojo.User;

public interface UserMapper {
    List<User> selectAll(); // 函数名要和UserMapper.xml中的id名一致
}
2.修改:src/resources/com/example/mapper/UserMapper.xml
- 注意存放路径,
UserMapper.xml原本应当存放在和UserMapper.java相同的位置,但xml文件应当统一放在resources目录下,且resources目录下的文件打包后将会放到项目根目录,所以存放在/resources/com/example/mapper/目录下,打包后也会存放在UserMapper.java所在目录
<?xml version="1.0" encoding="UTF-8" ?>
<!DOCTYPE mapper
  PUBLIC "-//mybatis.org//DTD Mapper 3.0//EN"
  "http://mybatis.org/dtd/mybatis-3-mapper.dtd">
<mapper namespace="com.example.mapper.UserMapper">  <!-- namespace改为接口类 -->
  <select id="selectAll" resultType="com.example.pojo.User">   <!-- id为接口的函数名 -->
    select * from tb_user
  </select>
</mapper>
3.获取UserMapper接口的代理对象
session.getMapper(UserMapper.class)的作用就是实现一个接口代理然后提供代理。
package com.example;

import java.io.InputStream;
import java.util.List;

import org.apache.ibatis.io.Resources;
import org.apache.ibatis.session.SqlSession;
import org.apache.ibatis.session.SqlSessionFactory;
import org.apache.ibatis.session.SqlSessionFactoryBuilder;

import com.example.mapper.UserMapper;
import com.example.pojo.User;

public class testSelectAll {
    public static void main(String[] args) throws Exception{
        // 加载mybatis核心配置文件
        String resource = "mybatis-config.xml";
        InputStream inputStream = Resources.getResourceAsStream(resource);
        SqlSessionFactory sqlSessionFactory = new SqlSessionFactoryBuilder().build(inputStream);

        // 获取SqlSession,用其来执行sql语句
        SqlSession session = sqlSessionFactory.openSession();
        // 方法一:通过 `命名空间.sql语句ID` 执行sql
        // List<User> users = session.selectList("namespaceTest1.selectAllUsers");

        // 方法二:通过mapper
        // 获取UserMapper接口的代理对象
        UserMapper userMapper = session.getMapper(UserMapper.class);
        List<User> users = userMapper.selectAll();

        System.out.println(users);
    }
}
输出:

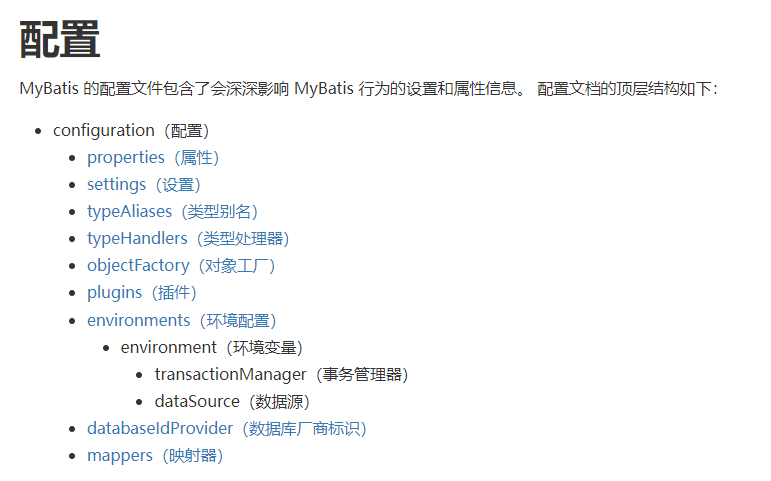
核心配置文件
包别名
- 当这样配置时,
Blog可以用在任何使用 全限名domain.blog.Blog的地方。
<typeAliases>
  <typeAlias alias="Author" type="domain.blog.Author"/>  <!-- 单独配置 -->
  <package name="domain.blog"/> <!-- 包扫描方式配置 -->
</typeAliases>
查询数据
多查询selectAll
数据准备
drop database if exists db5;
create database db5;
use db5;
create table tb_brand(
   -- id
   id int primary key auto_increment,
   -- 品牌名
   brand_name varchar(20),
   -- 公司名
   company_name varchar(20),
   -- 排序优先级
   ordered int,
   -- 描述
   description varchar(100),
   -- 状态:1 启用 0 禁用
   status int
);
insert into
    tb_brand(brand_name,company_name,ordered,description,status)
    values
        ("三只松鼠","三只松鼠股份有限公司",5,'好吃不上火',0),
        ("华为","华为技术有限公司",1,'华为致力于把数字技术带入每个人、每个家庭、每个组织,构建万物互联的智能世界',1),
        ("小米","小米科技有限公司",4,'Are you ok?',1);

SELECT * from tb_brand;
mybatis配置文件修改
<?xml version="1.0" encoding="UTF-8" ?>
<!DOCTYPE configuration
  PUBLIC "-//mybatis.org//DTD Config 3.0//EN"
  "http://mybatis.org/dtd/mybatis-3-config.dtd">
<configuration>
  <environments default="development">
    <environment id="development">
      <transactionManager type="JDBC"/>
      <dataSource type="POOLED">
        <property name="driver" value="com.mysql.jdbc.Driver"/> <!-- 填mysql的驱动的路径 -->
        <property name="url" value="jdbc:mysql:///db5?useSSL=false"/>  <!-- 填mysql数据库的路径 -->
        <property name="username" value="root"/>  <!-- 填数据库的username -->
        <property name="password" value="root"/>   <!-- 填数据库的password -->
      </dataSource>
    </environment>
  </environments>
  <mappers>
    <package name="com.example.mapper" /> <!-- 包扫描方式 -->
  </mappers>
</configuration>
编写pojo.Brand类
package com.example.pojo;

public class Brand {
    Integer id;             // -- id
    String brandName;      // -- 品牌名
    String companyName;    // -- 公司名
    Integer ordered;        // -- 排序优先级
    String description;     // -- 描述
    Integer status;         // -- 状态:1 启用 0 禁用
    public Integer getId() {
        return id;
    }
    public void setId(Integer id) {
        this.id = id;
    }
    public String getBrandName() {
        return brandName;
    }
    public void setBrandName(String brandName) {
        this.brandName = brandName;
    }
    public String getCompanyName() {
        return companyName;
    }
    public void setCompanyName(String companyName) {
        this.companyName = companyName;
    }
    public Integer getOrdered() {
        return ordered;
    }
    public void setOrdered(Integer ordered) {
        this.ordered = ordered;
    }
    public String getDescription() {
        return description;
    }
    public void setDescription(String description) {
        this.description = description;
    }
    public Integer getStatus() {
        return status;
    }
    public void setStatus(Integer status) {
        this.status = status;
    }
    @Override
    public String toString() {
        return "Brand [id=" + id + ", brandName=" + brandName + ", companyName=" + companyName + ", ordered=" + ordered
                + ", description=" + description + ", status=" + status + "]";
    }
}
编写BrandMapper.java接口类
package com.example.mapper;

import java.util.List;

import com.example.pojo.Brand;

public interface BrandMapper {
    List<Brand> selectAll();
}
编写BrandMapper.xml
方法一:原始写法,由于数据库中字段名称为
brand_name类中相应字段名称为brandName两者不一致,在封装数据阶段会出现问题。<?xml version="1.0" encoding="UTF-8"?> <!DOCTYPE mapper PUBLIC "-//mybatis.org//DTD Mapper 3.0//EN" "http://mybatis.org/dtd/mybatis-3-mapper.dtd"> <mapper namespace="com.example.mapper.BrandMapper"> <!-- selectAll --> <select id="selectAll" resultType="com.example.pojo.Brand"> select * from tb_brand; </select> </mapper>方法二:修改sql语句,修改字段别名使其与类中字段名称一致
<?xml version="1.0" encoding="UTF-8"?>
<!DOCTYPE mapper PUBLIC "-//mybatis.org//DTD Mapper 3.0//EN" "http://mybatis.org/dtd/mybatis-3-mapper.dtd">
<mapper namespace="com.example.mapper.BrandMapper">
  <!-- selectAll -->
  <select id="selectAll" resultType="com.example.pojo.Brand">
    select
       id,
       brand_name as brandName,
       company_name as companyName,
       ordered,
       description,
       status,
    from tb_brand;
  </select>
</mapper>
方法三:定义sql片段
<?xml version="1.0" encoding="UTF-8"?>
<!DOCTYPE mapper PUBLIC "-//mybatis.org//DTD Mapper 3.0//EN" "http://mybatis.org/dtd/mybatis-3-mapper.dtd">
<mapper namespace="com.example.mapper.BrandMapper">
<sql id="brand_colums">  <!-- 定义sql片段 -->
       id,
       brand_name as brandName,
       company_name as companyName,
       ordered,
       description,
       status,
</sql>
  <select id="selectAll" resultType="com.example.pojo.Brand">
    select
       <include refid="brand_colums" /> <!-- 引用sql片段 -->
    from tb_brand;
  </select>
</mapper>
方法四:使用resultMap
<?xml version="1.0" encoding="UTF-8"?>
<!DOCTYPE mapper PUBLIC "-//mybatis.org//DTD Mapper 3.0//EN" "http://mybatis.org/dtd/mybatis-3-mapper.dtd">
<mapper namespace="com.example.mapper.BrandMapper">
<resultMap id="brand_resultMap" type="com.example.pojo.Brand">  <!-- 定义resultMap -->
       <result column="brand_name" property="brandName" />
       <result column="company_name" property="companyName" />
</sql>
  <select id="selectAll" resultMap="brand_resultMap"> <!-- resultMap = brand_resultMap -->
    select * from tb_brand;
  </select>
</mapper>
编写testBrand.java测试类
package com.example;

import java.io.InputStream;
import java.util.List;

import org.apache.ibatis.io.Resources;
import org.apache.ibatis.session.SqlSession;
import org.apache.ibatis.session.SqlSessionFactory;
import org.apache.ibatis.session.SqlSessionFactoryBuilder;
import org.junit.Test;

import com.example.mapper.BrandMapper;
import com.example.pojo.Brand;

public class testBrand {
    @Test
    public void testSelectAllBrand() throws Exception{
        // 加载mybatis核心配置文件
        String resource = "mybatis-config.xml";
        InputStream inputStream = Resources.getResourceAsStream(resource);
        SqlSessionFactory sqlSessionFactory = new SqlSessionFactoryBuilder().build(inputStream);

        // 获取SqlSession,用其来执行sql语句
        SqlSession session = sqlSessionFactory.openSession();
        // 方法一:通过 `命名空间.sql语句ID` 执行sql
        // List<User> users = session.selectList("namespaceTest1.selectAllUsers");

        // 方法二:通过mapper
        // 获取UserMapper接口的代理对象
        BrandMapper brandMapper = session.getMapper(BrandMapper.class);
        List<Brand> brands = brandMapper.selectAll();

        System.out.println(brands);
    }
}
单查询selectById
修改BrandMapper.xml
注意点
- sql语句
参数占位符#{}占位符 等效于?也是就是jdbc里的PreparedStatement,有防sql注入的作用${}占位符 1以字符串方式拼接字符串,存在sql注入问题- 可用于动态确定列名或表名
select ${columName1}from ${tableName}
- 可用于动态确定列名或表名
- 返回值
parameterType="int"可省略
- 特殊字符的处理:在xml中编写sql语句的
<等的特殊字符转义字符<=><CDATA区<![CDATA[ 这里可以填特殊字符 ]]>
<?xml version="1.0" encoding="UTF-8"?>
<!DOCTYPE mapper PUBLIC "-//mybatis.org//DTD Mapper 3.0//EN" "http://mybatis.org/dtd/mybatis-3-mapper.dtd">
<mapper namespace="com.example.mapper.BrandMapper">
  <resultMap id="BrandColumMapper" type="com.example.pojo.Brand">
    <result column="brand_name" property="brandName" />
    <result column="company_name" property="companyName" />
  </resultMap>
  <!-- selectAll -->
  <select id="selectAll" resultMap="BrandColumMapper">
    select * from tb_brand;
  </select>

  <!-- selectById -->
  <select id="selectById" parameterType="int" resultMap="BrandColumMapper">
    select * from tb_brand where id=#{id};
  </select>
</mapper>
修改BrandMapper.java
package com.example.mapper;

import java.util.List;

import com.example.pojo.Brand;

public interface BrandMapper {
    List<Brand> selectAll();
    Brand selectById(int id);
}
编写测试类
package com.example;

import java.io.InputStream;
import java.util.List;

import org.apache.ibatis.io.Resources;
import org.apache.ibatis.session.SqlSession;
import org.apache.ibatis.session.SqlSessionFactory;
import org.apache.ibatis.session.SqlSessionFactoryBuilder;
import org.junit.Test;

import com.example.mapper.BrandMapper;
import com.example.pojo.Brand;

public class testBrand {

    @Test
    public void testSelectBrandById() throws Exception{
        // 加载mybatis核心配置文件
        String resource = "mybatis-config.xml";
        InputStream inputStream = Resources.getResourceAsStream(resource);
        SqlSessionFactory sqlSessionFactory = new SqlSessionFactoryBuilder().build(inputStream);

        // 获取SqlSession,用其来执行sql语句
        SqlSession session = sqlSessionFactory.openSession();
        // 方法一:通过 `命名空间.sql语句ID` 执行sql
        // List<User> users = session.selectList("namespaceTest1.selectAllUsers");

        // 方法二:通过mapper
        // 获取UserMapper接口的代理对象
        BrandMapper brandMapper = session.getMapper(BrandMapper.class);
        Brand brands = brandMapper.selectById(1);

        System.out.println(brands);
    }
}
输出结果
Brand [id=1, brandName=三只松鼠, companyName=三只松鼠股份有限公司, ordered=5, description=好吃不上火, status=0]
多条件查询:散装参数
多条件查询参数的接收
散装参数要使用注解@Param("字段名")和sql的${字段名}要一致对象参数要保证对象属性名和sql的${}要一致map集合参数要保证map键和sql的${}要一致
BrandMapper.xml核心代码
<mapper namespace="com.example.mapper.BrandMapper">
  <resultMap id="BrandColumMapper" type="com.example.pojo.Brand">
    <result column="brand_name" property="brandName" />
    <result column="company_name" property="companyName" />
  </resultMap>
  <select id="selectByCondition" resultMap="BrandColumMapper">
    select * from tb_brand
    where status = #{status}
      and company_name like #{companyName} <!-- 此处的companyName的命名规则最好是和对象的属性名保持一致,以避免后续产生的问题 -->
      and brand_name like #{brandName}
      ;
  </select>
</mapper>
BrandMapper.java核心代码
package com.example.mapper;

import java.util.List;

import org.apache.ibatis.annotations.Param;

import com.example.pojo.Brand;

public interface BrandMapper {
    List<Brand> selectAll();
    Brand selectById(int id);

    List<Brand> selectByCondition(
        @Param("status")        int     status,
        @Param("companyName")   String  companyName,
        @Param("brandName")     String  brandName
    );
}
testBrand.java测试代码
@Test
public void testSelectByCondition() throws Exception{
    // 模拟获取到查询数据
    int status = 1;
    String companyName = "华为";
    String brandName = "华为";

    // 对数据处理
    companyName = "%"+companyName+"%";
    brandName = "%"+brandName+"%";


    // 加载mybatis核心配置文件
    String resource = "mybatis-config.xml";
    InputStream inputStream = Resources.getResourceAsStream(resource);
    SqlSessionFactory sqlSessionFactory = new SqlSessionFactoryBuilder().build(inputStream);

    // 获取SqlSession,用其来执行sql语句
    SqlSession session = sqlSessionFactory.openSession();

    // 获取UserMapper接口的代理对象
    BrandMapper brandMapper = session.getMapper(BrandMapper.class);
    List<Brand> brands = brandMapper.selectByCondition(status,companyName,brandName);

    System.out.println(brands);
}
多条件查询:对象参数
BrandMapper.xml核心代码
<mapper namespace="com.example.mapper.BrandMapper">
  <resultMap id="BrandColumMapper" type="com.example.pojo.Brand">
    <result column="brand_name" property="brandName" />
    <result column="company_name" property="companyName" />
  </resultMap>
  <select id="selectByCondition" resultMap="BrandColumMapper">
    select * from tb_brand
    where status = #{status}
      and company_name like #{companyName} <!-- 此处的companyName的命名规则最好是和对象的属性名保持一致,以避免后续产生的问题 -->
      and brand_name like #{brandName}
      ;
  </select>
</mapper>
BrandMapper.java核心代码
package com.example.mapper;

import java.util.List;

import org.apache.ibatis.annotations.Param;

import com.example.pojo.Brand;

public interface BrandMapper {
    List<Brand> selectAll();
    Brand selectById(int id);

    List<Brand> selectByCondition(
        @Param("status")        int     status,
        @Param("companyName")   String  companyName,
        @Param("brandName")     String  brandName
    );

//-----------------------------------------------------------------------------
    List<Brand> selectByCondition(Brand brand);
//-----------------------------------------------------------------------------

}
testBrand.java测试代码
    @Test
    public void testSelectByCondition() throws Exception{
        // 模拟获取到查询数据
        int status = 1;
        String companyName = "华为";
        String brandName = "华为";

        // 对数据处理
        companyName = "%"+companyName+"%";
        brandName = "%"+brandName+"%";


//-----------------------------------------------------------------------------
        Brand searchBrand = new Brand();
        searchBrand.setStatus(status);
        searchBrand.setCompanyName(companyName);
        searchBrand.setBrandName(brandName);
//-----------------------------------------------------------------------------


        // 加载mybatis核心配置文件
        String resource = "mybatis-config.xml";
        InputStream inputStream = Resources.getResourceAsStream(resource);
        SqlSessionFactory sqlSessionFactory = new SqlSessionFactoryBuilder().build(inputStream);

        // 获取SqlSession,用其来执行sql语句
        SqlSession session = sqlSessionFactory.openSession();

//-----------------------------------------------------------------------------
        // 获取UserMapper接口的代理对象
        BrandMapper brandMapper = session.getMapper(BrandMapper.class);
        List<Brand> brands = brandMapper.selectByCondition(searchBrand);
//-----------------------------------------------------------------------------

        System.out.println(brands);
    }
多条件查询:集合参数
testBrand.java测试代码
    @Test
    public void testSelectByCondition() throws Exception{
        // 模拟获取到查询数据
        int status = 1;
        String companyName = "华为";
        String brandName = "华为";

        // 对数据处理
        companyName = "%"+companyName+"%";
        brandName = "%"+brandName+"%";

        Map<String,Object> searchBrand = new HashMap<>();
        searchBrand.put("status",status);
        searchBrand.put("companyName",companyName);
        searchBrand.put("brandName",brandName);


        // 加载mybatis核心配置文件
        String resource = "mybatis-config.xml";
        InputStream inputStream = Resources.getResourceAsStream(resource);
        SqlSessionFactory sqlSessionFactory = new SqlSessionFactoryBuilder().build(inputStream);

        // 获取SqlSession,用其来执行sql语句
        SqlSession session = sqlSessionFactory.openSession();

        // 获取UserMapper接口的代理对象
        BrandMapper brandMapper = session.getMapper(BrandMapper.class);
        List<Brand> brands = brandMapper.selectByCondition(searchBrand);

        System.out.println(brands);
    }
多条件-动态条件查询where标签或1=1恒等式
if 条件判断:用于判断传入的参数是否有值
- test 逻辑表达式
存在问题:
status==null时,第二个if中的and将导致sql语法错误1=1恒等式解决where标签解决
<?xml version="1.0" encoding="UTF-8"?>
<!DOCTYPE mapper PUBLIC "-//mybatis.org//DTD Mapper 3.0//EN" "http://mybatis.org/dtd/mybatis-3-mapper.dtd">
<mapper namespace="com.example.mapper.BrandMapper">
  <resultMap id="BrandColumMapper" type="com.example.pojo.Brand">
    <result column="brand_name" property="brandName" />
    <result column="company_name" property="companyName" />
  </resultMap>
  <!-- selectAll -->
  <select id="selectAll" resultMap="BrandColumMapper">
    select * from tb_brand;
  </select>

  <!-- selectById -->
  <select id="selectById" parameterType="int" resultMap="BrandColumMapper">
    <![CDATA[
      select * from tb_brand where id=#{id};
    ]]>
  </select>
  <!-- selectByCondition -->
  <select id="selectByCondition" resultMap="BrandColumMapper">
    select * from tb_brand
    where
    <if test="status!=null">
      status = #{status}
    </if>
    <if test=" company_name!=null and company_name!='' ">
    and company_name like #{companyName} <!-- 此处的companyName的命名规则最好是和对象的属性名保持一致,以避免后续产生的问题 -->
    </if>
    <if test=" brand_name!=null and brand_name!='' ">
      and brand_name like #{brandName}
    </if>
      ;
  </select>
</mapper>
1=1恒等式解决问题
<?xml version="1.0" encoding="UTF-8"?>
<!DOCTYPE mapper PUBLIC "-//mybatis.org//DTD Mapper 3.0//EN" "http://mybatis.org/dtd/mybatis-3-mapper.dtd">
<mapper namespace="com.example.mapper.BrandMapper">
  <resultMap id="BrandColumMapper" type="com.example.pojo.Brand">
    <result column="brand_name" property="brandName" />
    <result column="company_name" property="companyName" />
  </resultMap>
  <!-- selectAll -->
  <select id="selectAll" resultMap="BrandColumMapper">
    select * from tb_brand;
  </select>

  <!-- selectById -->
  <select id="selectById" parameterType="int" resultMap="BrandColumMapper">
    <![CDATA[
      select * from tb_brand where id=#{id};
    ]]>
  </select>
  <!-- selectByCondition -->
  <select id="selectByCondition" resultMap="BrandColumMapper">
    select * from tb_brand
    where
    1=1
    <if test="status!=null">
      and status = #{status}
    </if>
    <if test=" company_name!=null and company_name!='' ">
    and company_name like #{companyName} <!-- 此处的companyName的命名规则最好是和对象的属性名保持一致,以避免后续产生的问题 -->
    </if>
    <if test=" brand_name!=null and brand_name!='' ">
      and brand_name like #{brandName}
    </if>
      ;
  </select>
</mapper>
where标签解决
where标签能自动去掉多余的and or
<?xml version="1.0" encoding="UTF-8"?>
<!DOCTYPE mapper PUBLIC "-//mybatis.org//DTD Mapper 3.0//EN" "http://mybatis.org/dtd/mybatis-3-mapper.dtd">
<mapper namespace="com.example.mapper.BrandMapper">
  <resultMap id="BrandColumMapper" type="com.example.pojo.Brand">
    <result column="brand_name" property="brandName" />
    <result column="company_name" property="companyName" />
  </resultMap>
  <!-- selectAll -->
  <select id="selectAll" resultMap="BrandColumMapper">
    select * from tb_brand;
  </select>

  <!-- selectById -->
  <select id="selectById" parameterType="int" resultMap="BrandColumMapper">
    <![CDATA[
      select * from tb_brand where id=#{id};
    ]]>
  </select>
  <select id="selectByCondition" resultMap="BrandColumMapper">
    select * from tb_brand
    <where> <!-- where标签会帮你自动去掉多余的and or 如果没有任何条件会去掉自身 -->
      <if test="status!=null">
        and status = #{status}
      </if>
      <if test=" company_name!=null and company_name!='' ">
        and company_name like #{companyName} <!-- 此处的companyName的命名规则最好是和对象的属性名保持一致,以避免后续产生的问题 -->
      </if>
      <if test=" brand_name!=null and brand_name!='' ">
        and brand_name like #{brandName}
      </if>
    </where>
      ;
  </select>
</mapper>
单条件-动态条件查询:when:choose:otherwise
<?xml version="1.0" encoding="UTF-8"?>
<!DOCTYPE mapper PUBLIC "-//mybatis.org//DTD Mapper 3.0//EN" "http://mybatis.org/dtd/mybatis-3-mapper.dtd">
<mapper namespace="com.example.mapper.BrandMapper">
  <resultMap id="BrandColumMapper" type="com.example.pojo.Brand">
    <result column="brand_name" property="brandName" />
    <result column="company_name" property="companyName" />
  </resultMap>

  <select id="selectBySingleCondition" resultMap="BrandColumMapper">
    select * from tb_brand
      <where> <!-- where标签会帮你自动去掉多余的and or 如果没有任何条件会去掉自身 -->
      <choose>
        <when test="status!=null">
        status = #{status}
      </when>
        <when test="companyName!=null and companyName!=''">
          company_name like #{companyName}
          <!-- 此处的companyName的命名规则最好是和对象的属性名保持一致,以避免后续产生的问题 -->
        </when>
        <when test=" brandName!=null and brandName!='' ">
          brand_name like #{brandName}
        </when>
        <otherwise>
          1=1
        </otherwise>
      </choose>
    </where>
    ;
  </select>
</mapper>
BrandMapper.java
package com.example.mapper;

import java.util.List;
import java.util.Map;

import org.apache.ibatis.annotations.Param;

import com.example.pojo.Brand;

public interface BrandMapper {
    List<Brand> selectAll();

    Brand selectById(int id);

    List<Brand> selectByCondition(
        @Param("status")        int     status,
        @Param("companyName")   String  companyName,
        @Param("brandName")     String  brandName
    );

    List<Brand> selectByCondition(Brand brand);

    List<Brand> selectByCondition(Map<String,Object> brand);
//-------------------------------------------------------------
    List<Brand> selectBySingleCondition(Map<String,Object> brand);
//-------------------------------------------------------------
}
测试
package com.example;

import java.io.InputStream;
import java.util.HashMap;
import java.util.List;
import java.util.Map;

import org.apache.ibatis.io.Resources;
import org.apache.ibatis.session.SqlSession;
import org.apache.ibatis.session.SqlSessionFactory;
import org.apache.ibatis.session.SqlSessionFactoryBuilder;
import org.junit.Test;

import com.example.mapper.BrandMapper;
import com.example.pojo.Brand;

public class testBrand {
    @Test
    public void testSelectByCondition() throws Exception{
        // 模拟获取到查询数据
        int status = 1;
        String companyName = "华为";
        String brandName = "华为";

        // 对数据处理
        companyName = "%"+companyName+"%";
        brandName = "%"+brandName+"%";

        Map<String,Object> searchBrand = new HashMap<>();
        // searchBrand.put("status",status);
        searchBrand.put("companyName",companyName);
        // searchBrand.put("brandName",brandName);


        // 加载mybatis核心配置文件
        String resource = "mybatis-config.xml";
        InputStream inputStream = Resources.getResourceAsStream(resource);
        SqlSessionFactory sqlSessionFactory = new SqlSessionFactoryBuilder().build(inputStream);

        // 获取SqlSession,用其来执行sql语句
        SqlSession session = sqlSessionFactory.openSession();

        // 获取UserMapper接口的代理对象
        BrandMapper brandMapper = session.getMapper(BrandMapper.class);
        List<Brand> brands = brandMapper.selectBySingleCondition(searchBrand);

        System.out.println(brands);
    }
}
增添数据
插入单条数据
BrandMapper.xml
  <insert id="add">
    insert into tb_brand(brand_name,company_name,ordered,description,status)
    values(#{brandName},#{companyName},#{ordered},#{description},#{status});
  </insert>
BrandMapper.java
void add(Brand brand);
测试类
    @Test
    public void testAdd() throws Exception {
        // 模拟获取到查询数据

        // 封装数据
        Brand brand = new Brand();
        brand.setBrandName("三星");
        brand.setCompanyName("三星公司");
        brand.setDescription("我们有全世界最好用的电池");
        brand.setOrdered(5);
        brand.setStatus(1);


        // 加载mybatis核心配置文件
        String resource = "mybatis-config.xml";
        InputStream inputStream = Resources.getResourceAsStream(resource);
        SqlSessionFactory sqlSessionFactory = new SqlSessionFactoryBuilder().build(inputStream);

        // 获取SqlSession,用其来执行sql语句
        SqlSession session = sqlSessionFactory.openSession(false);// 第一个参数为autoCommit 默认为false 也就是默认开启事务

        // 获取UserMapper接口的代理对象
        BrandMapper brandMapper = session.getMapper(BrandMapper.class);

        try {
            // jdbc默认为手动提交事务
            brandMapper.add(brand);
            session.commit();//手动提交
            System.out.println("添加成功");

        } catch (Exception e) {
            session.rollback();//回滚
        }
    }
插入单条数据:返回主键
  <!--
      useGeneratedKeys="true"  keyProperty="id"
      useGeneratedKeys 表示返回生成的主键,
      keyProperty 指定要封装到对象的什么字段中
   -->
  <insert id="add" useGeneratedKeys="true"  keyProperty="id">
    insert into tb_brand(brand_name,company_name,ordered,description,status)
    values(#{brandName},#{companyName},#{ordered},#{description},#{status});
  </insert>
@Test
    public void testAdd() throws Exception {
        // 模拟获取到查询数据

        // 封装数据
        Brand brand = new Brand();
        brand.setBrandName("三星");
        brand.setCompanyName("三星公司");
        brand.setDescription("我们有全世界最好用的电池");
        brand.setOrdered(5);
        brand.setStatus(1);


        // 加载mybatis核心配置文件
        String resource = "mybatis-config.xml";
        InputStream inputStream = Resources.getResourceAsStream(resource);
        SqlSessionFactory sqlSessionFactory = new SqlSessionFactoryBuilder().build(inputStream);

        // 获取SqlSession,用其来执行sql语句
        SqlSession session = sqlSessionFactory.openSession(false);// 第一个参数为autoCommit 默认为false 也就是默认开启事务

        // 获取UserMapper接口的代理对象
        BrandMapper brandMapper = session.getMapper(BrandMapper.class);

        try {
            // jdbc默认为手动提交事务
            brandMapper.add(brand);
            session.commit();//手动提交
            System.out.println(brand.getId()); // 输出id
            System.out.println("添加成功");

        } catch (Exception e) {
            session.rollback();//回滚
        }
    }
修改数据
修改全部字段
BrandMapper.xml
  <update id="update">
    update
      tb_brand
    set
      brand_name=#{brandName},
      company_name=#{companyName},
      ordered=#{ordered},
      description=#{description},
      status=#{status}
    where
      id = #{id}
    ;
  </update>
BrandMapper.java
int update(Brand brand);// 返回值可为void 也可为int,为int时,返回影响的行数
测试类
    @Test
    public void testUpdate() throws Exception {
        // 模拟获取到查询数据

        // 封装数据
        Brand brand = new Brand();
        brand.setBrandName("三星");
        brand.setCompanyName("三星公司");
        brand.setDescription("我们不生产电池,我们只是炸弹的搬运工");
        brand.setOrdered(5);
        brand.setStatus(1);
        brand.setId(9);


        // 加载mybatis核心配置文件
        String resource = "mybatis-config.xml";
        InputStream inputStream = Resources.getResourceAsStream(resource);
        SqlSessionFactory sqlSessionFactory = new SqlSessionFactoryBuilder().build(inputStream);

        // 获取SqlSession,用其来执行sql语句
        SqlSession session = sqlSessionFactory.openSession(false);// 第一个参数为autoCommit 默认为false 也就是默认开启事务

        // 获取UserMapper接口的代理对象
        BrandMapper brandMapper = session.getMapper(BrandMapper.class);

        try {// jdbc默认为手动提交事务
            int affectedRows = brandMapper.update(brand);
            session.commit();//手动提交
            System.out.println("更新成功,影响的行数:"+affectedRows);

        } catch (Exception e) {
            session.rollback();//回滚
        }
    }
修改任意字段set:if
  <update id="update">
    update
      tb_brand
    <set>  <!-- 用set标签来避免由if产生的逗号问题 -->
      <if test=" brandName!=null and brandName!='' ">
        brand_name=#{brandName},
      </if>
      <if test=" companyName!=null and companyName!='' ">
        company_name=#{companyName},
      </if>
      <if test=" ordered!=null ">
        ordered=#{ordered},
      </if>
      <if test=" description!=null and description!='' ">
        description=#{description},
      </if>
      <if test=" status!=null ">
        status=#{status}
      </if>
    </set>
    where
      id = #{id}
    ;
  </update>
删除数据
删除单个deleteById
  <!-- deleteById -->
  <delete id="deleteById">
    delete
      from
        tb_brand
      where
        id = #{id}
    ;
  </delete>
int deleteById(int id);
    @Test
    public void testdeleteById() throws Exception {

        // 加载mybatis核心配置文件
        String resource = "mybatis-config.xml";
        InputStream inputStream = Resources.getResourceAsStream(resource);
        SqlSessionFactory sqlSessionFactory = new SqlSessionFactoryBuilder().build(inputStream);

        // 获取SqlSession,用其来执行sql语句
        SqlSession session = sqlSessionFactory.openSession();

        // 获取UserMapper接口的代理对象
        BrandMapper brandMapper = session.getMapper(BrandMapper.class);

        int affectedRows = brandMapper.deleteById(9);
        System.out.println("删除成功,影响的行数:"+affectedRows);

    }
删除多个deleteById:不使用注解版
int deleteByIds(int[] ids);// 删除多个
  <!-- deleteByIds -->
  <delete id="deleteByIds">
  delete
    from
      tb_brand
    where
      id in
        <foreach collection="array" item="id" separator="," open="(" close=")"><!-- mybaties会将数组的参数封装为map集合,其key为array,value为数组 -->
          ${id}
        </foreach>
  ;
  </delete>
    @Test
    public void testdeleteByIds() throws Exception {
        int[] ids = {1,3,5};

        // 加载mybatis核心配置文件
        String resource = "mybatis-config.xml";
        InputStream inputStream = Resources.getResourceAsStream(resource);
        SqlSessionFactory sqlSessionFactory = new SqlSessionFactoryBuilder().build(inputStream);

        // 获取SqlSession,用其来执行sql语句
        SqlSession session = sqlSessionFactory.openSession(false);// 第一个参数为autoCommit 默认为false 也就是默认开启事务

        // 获取UserMapper接口的代理对象
        BrandMapper brandMapper = session.getMapper(BrandMapper.class);

        int affectedRows = brandMapper.deleteByIds(ids);
        System.out.println("删除成功,影响的行数:"+affectedRows);
    }
删除多个deleteById:使用注解版
/*
   mybaties会将数组的参数封装为map集合,
      默认其key为array,value为数组
      使用@Param("ids"),可将key改为ids
*/
int deleteByIds(@Param("ids") int[] ids);// 删除多个
  <!-- deleteByIds -->
  <delete id="deleteByIds">
  delete
    from
      tb_brand
    where
      id in
        <foreach collection="ids" item="id" separator="," open="(" close=")"><!-- collection指定键名 -->
          ${id}
        </foreach>
  ;
  </delete>
myBatis对参数的封装
MyBatis 接口方法中可以接收各种各样的参数,MyBatis底层对于这些参数进行不同的封装处理方式
对于单个参数
- 基本类型:
- 直接使用,
形参名和sql参数占位符可任意,
- 直接使用,
- POJO类型:直接使用,
对象的属性名需和sql参数占位符名称 一致 - Map集合:直接使用,
键名需和sql参数占位符名称 一致 - Collection: 内部自动封装为map集合
map.put("arg0",connection)使用注解@Param("修改默认的arg键名")map.put("connection",connection)
- list: 内部自动封装为map集合
map.put("arg0",原lsit集合)使用注解@Param("修改默认的arg键名")map.put("connection",原lsit集合)map.put("list",原lsit集合)
- array:内部自动封装为map集合
map.put("arg0",原array数组)使用注解@Param("修改默认的arg键名")map.put("array",原array数组)
对于多个参数
- 多个参数会封装为map集合
map.put("arg0",形式参数0)使用注解@Param("修改默认的arg键名")map.put("param0",形式参数0)map.put("arg1",形式参数1)map.put("param1",形式参数1)
题目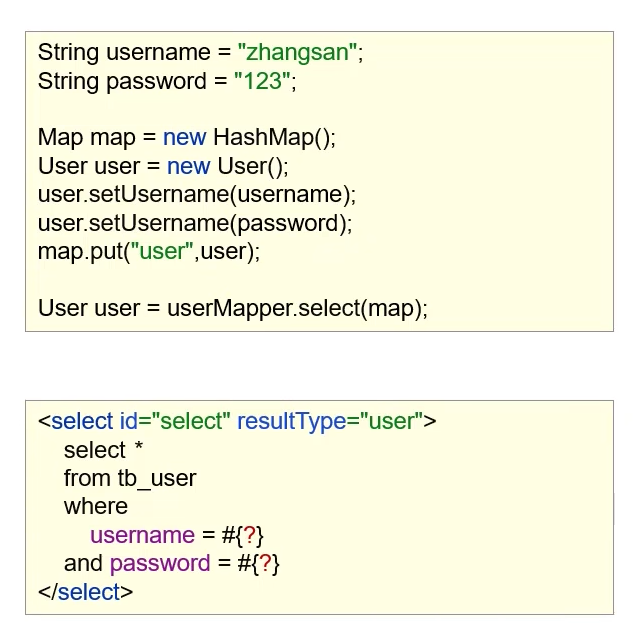
应该为:
user.userName
user.password
使用注解完成简单sql操作
package com.example.mapper;

import java.util.List;
import java.util.Map;

import org.apache.ibatis.annotations.Param;
import org.apache.ibatis.annotations.Select;

import com.example.pojo.Brand;

public interface BrandMapper {
    @Select("select *,brand_name as brandName,company_name as companyName from tb_brand;")
    List<Brand> selectAll();

    @Select("select *,brand_name as brandName,company_name as companyName from tb_brand where id = #{id};")
    Brand selectById(int id);
}
Tomcat
Tomcat 是一个轻量级的Web服务器,
支持Servlet/JSP少量JavaEE规范,
也称为Web容器,Servlet容器
解压后目录结构
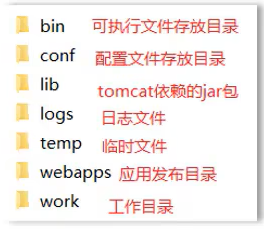
启动与关闭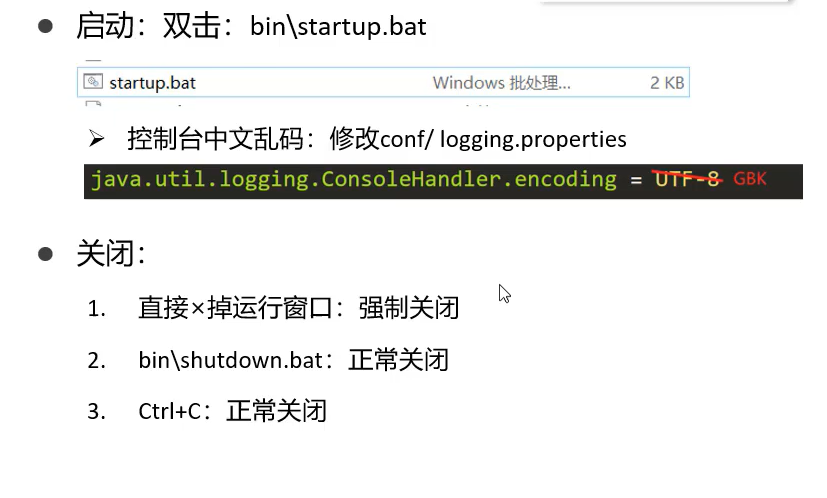
配置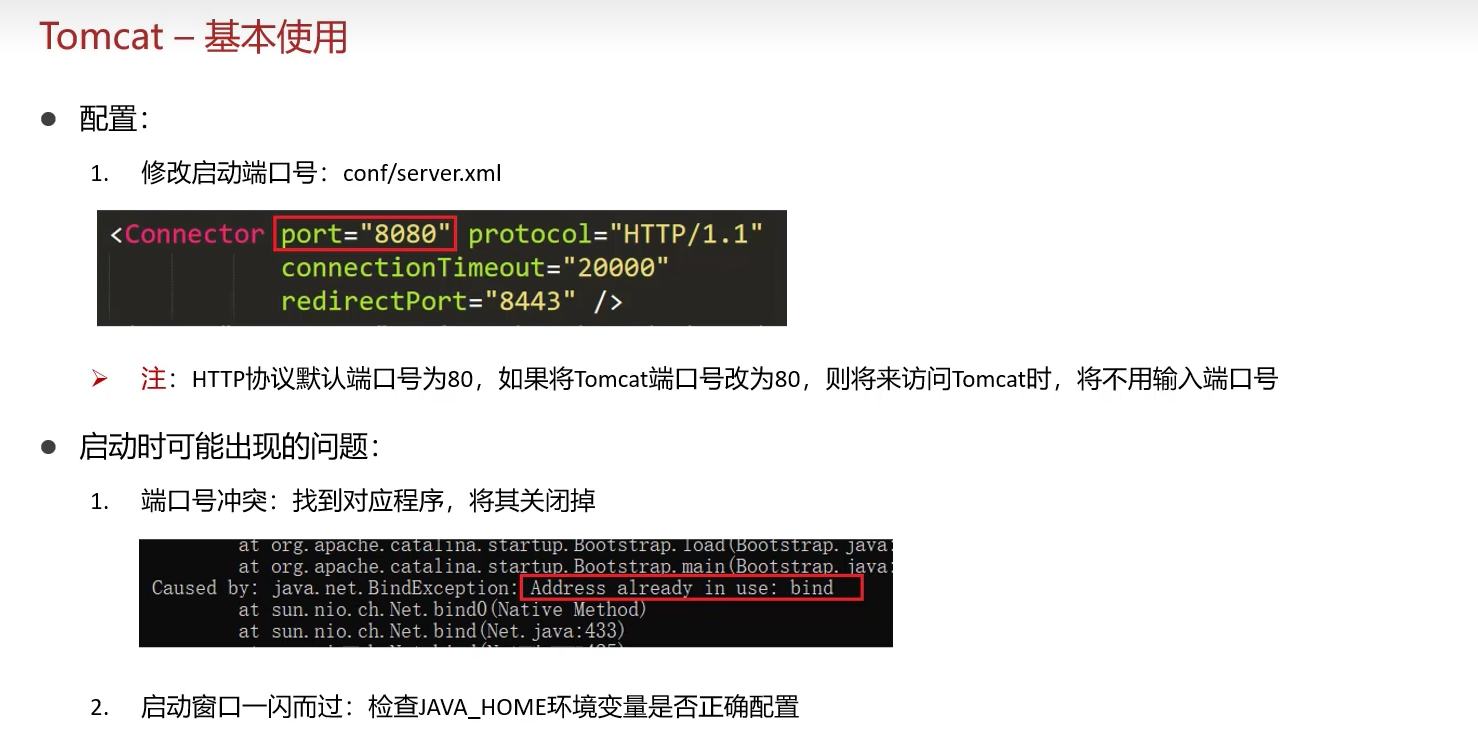
部署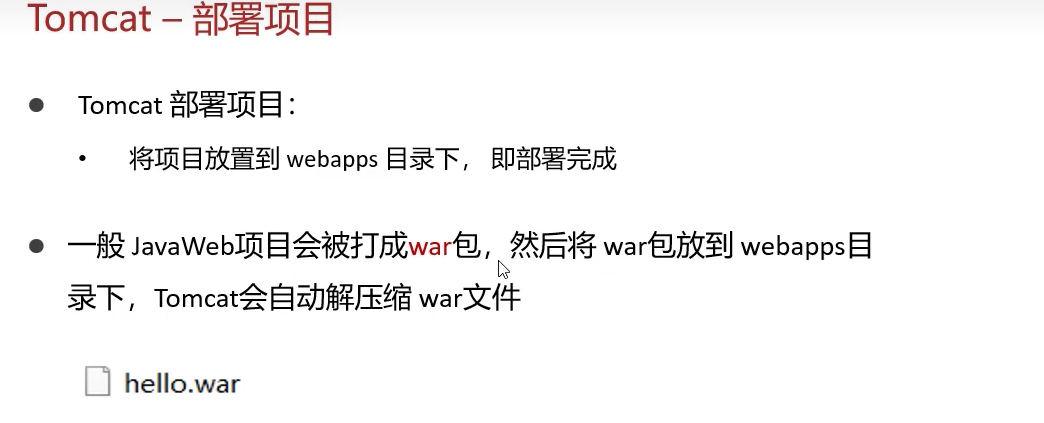
xml
javaWeb项目目录结构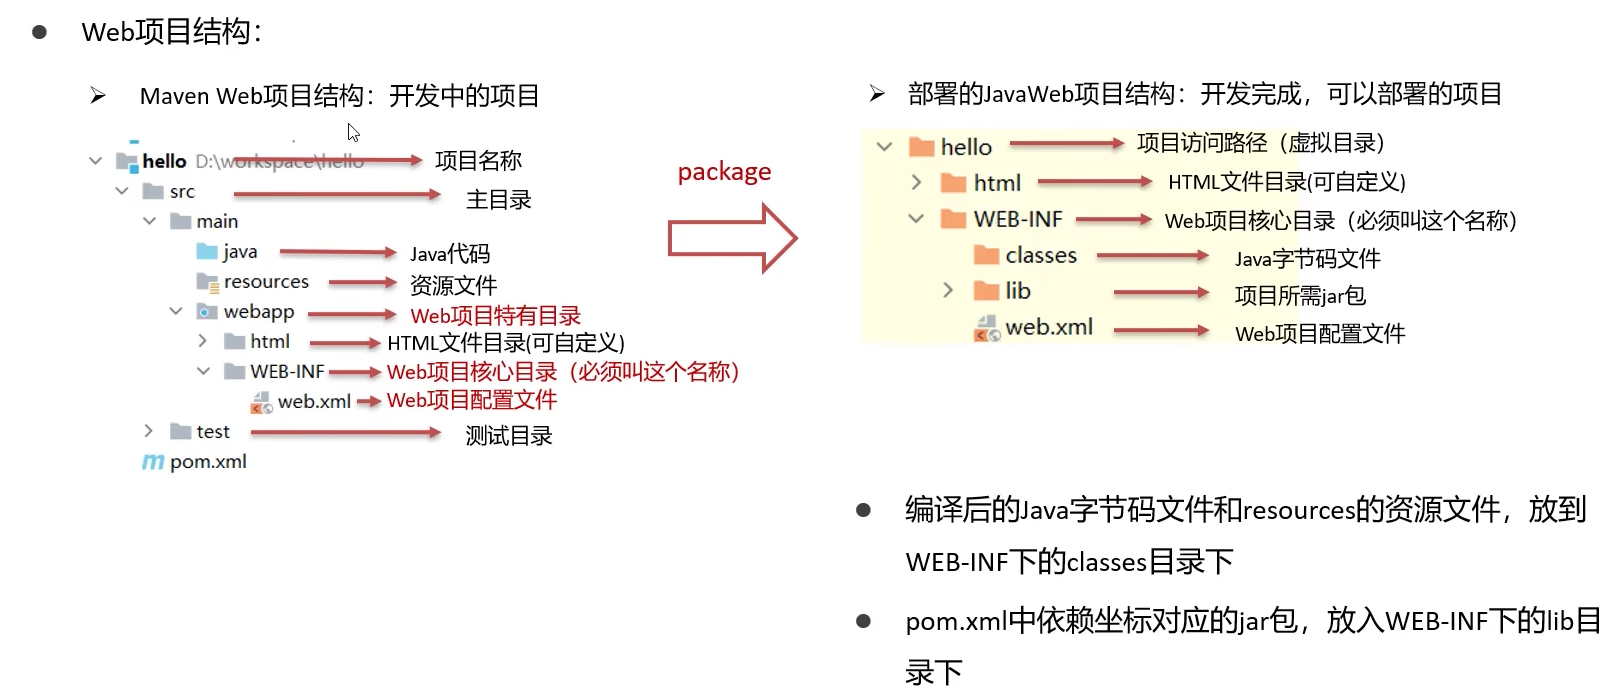
在idea中通过本地tomCat启动javaWeb项目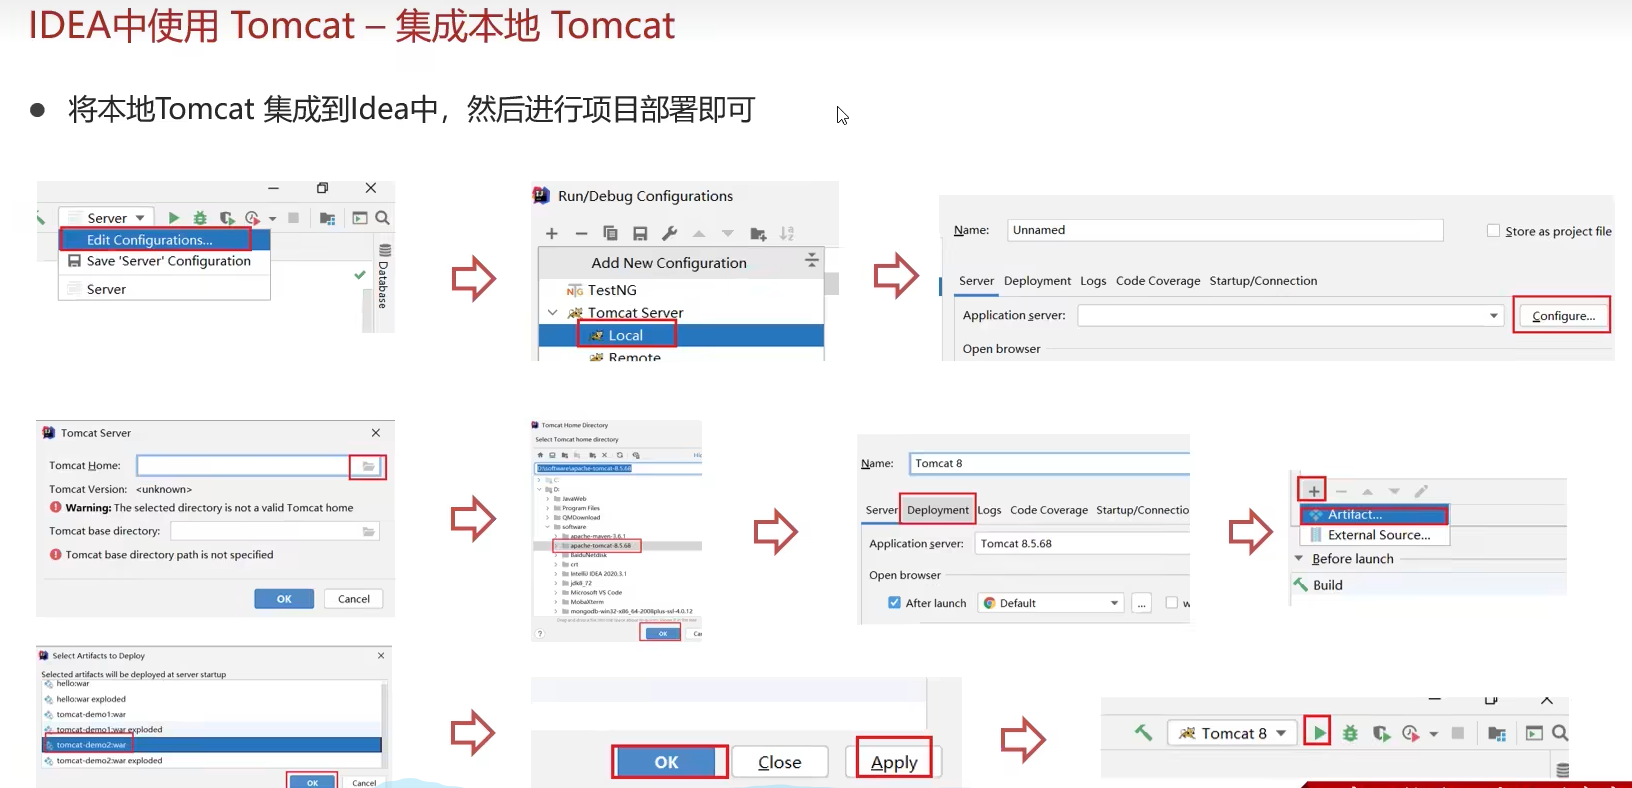
在javaWeb项目中集成tomCat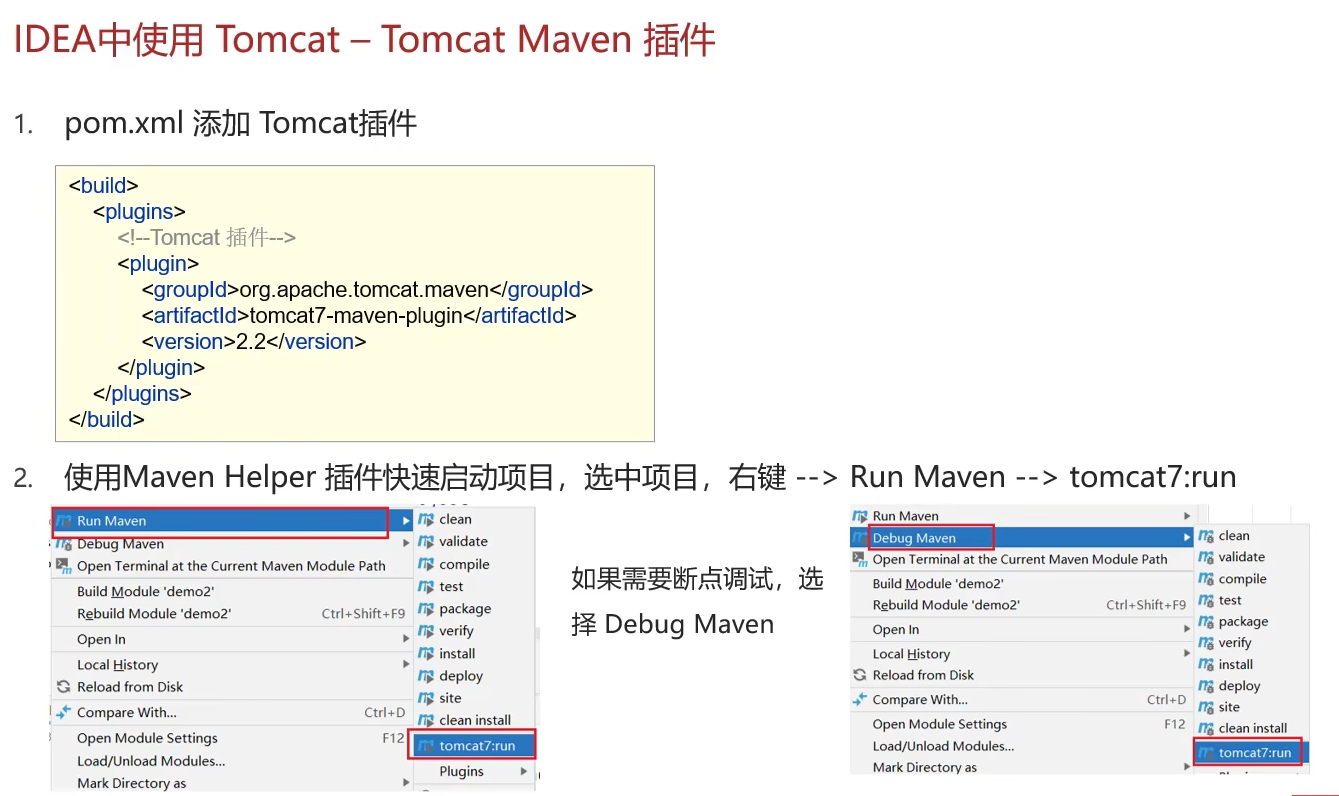
  <build>
    <finalName>web</finalName>
    <plugins>
      <plugin>
        <groupId>org.apache.tomcat.maven</groupId>
        <artifactId>tomcat7-maven-plugin</artifactId>
        <version>2.2</version>
        <configuration>
          <port>8088</port>
          <path>/</path>
        </configuration>
      </plugin>
      <plugin>
        <groupId>org.apache.tomcat.maven</groupId>
        <artifactId>tomcat6-maven-plugin</artifactId>
        <version>2.3-SNAPSHOT</version>
      </plugin>
    </plugins>
  </build>
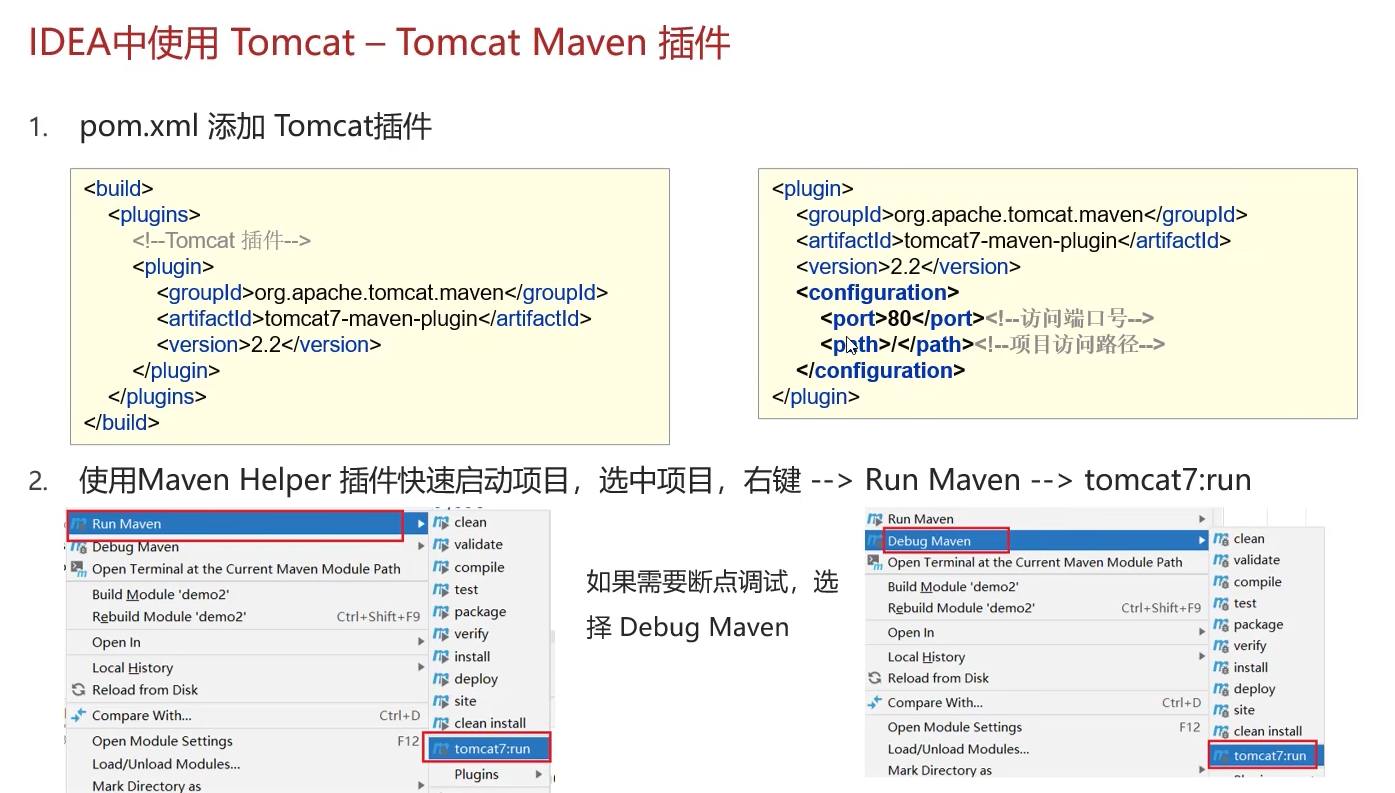
Servlet
Servlet已经是一个非常非常古老的技术了,
而且在实际开发中几乎不会用到,
在面试中也几乎不会问到Servlet相关的知识。
但Struts2和SpringMVC框架,底层都是跟Servlet有关
什么是Servlet
servlet程序是由servlet容器(即tomcat服务器)进行管理的
即:由servlet容器(tomcat)完成servlet的实例化、初始化、服务、销毁
Servlet(Server Applet)是Java Servlet的简称,
是用Java编写的服务器端程序,
主要功能在于交互式地浏览和修改数据,生成动态Web内容。
简单来说 Servlet本质就是处理请求做出响应的实现类
- 客户端发送请求至Web服务器端。
- 服务器将请求信息发送至Servlet
- Servlet 根据请求内容生成响应内容并将其传给服务器。
- 服务器将响应返回给客户端。
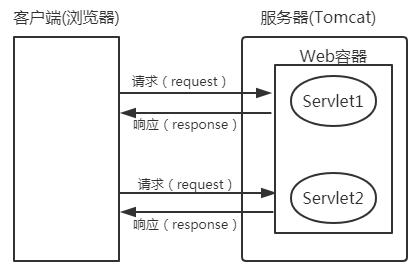
服务器的三大组件:
- servlet:用于处理请求和响应
- filter:用于过滤请求和响应
- listener:用于监听服务器的状态
实现最简Servlet程序
流程
用
maven创建javaWeb项目,在pom.xml配置文件中导入Servlet依赖<dependencies> <dependency> <groupId>javax.servlet</groupId> <artifactId>javax.servlet-api</artifactId> <version>3.1.0</version> <scope>provided</scope> <!-- provided表示该依赖仅在编译和测试环境有效,因为该包在其运行环境(tomcat)中有,如果不这么写会导致冲突 --> </dependency> </dependencies>编写一个类,实现
HttpServlet类 或 继承GenericServlet类 或 实现Servlet接口类重写或实现相应的方法在类上使用注解
@WebServlet("/demo1"),配置其访问路径访问
http://localhost:8080/demo1
实现Servlet接口版
import java.io.IOException;

import javax.servlet.Servlet;
import javax.servlet.ServletConfig;
import javax.servlet.ServletException;
import javax.servlet.ServletRequest;
import javax.servlet.ServletResponse;
import javax.servlet.annotation.WebServlet;

@WebServlet("/demo1")
public class MyServlet implements Servlet {
    @Override
    public void init(ServletConfig arg0) throws ServletException {
        // TODO Auto-generated method stub
    }
    @Override
    public void service(ServletRequest request, ServletResponse response) throws ServletException, IOException {
        System.out.println("收到一个请求");
    }
    @Override
    public void destroy() {
        // TODO Auto-generated method stub
    }
    // 获取ServletConfig对象
    @Override
    public ServletConfig getServletConfig() {
        // TODO Auto-generated method stub
        return null;
    }
    // 获取Servlet信息
    @Override
    public String getServletInfo() {
        // TODO Auto-generated method stub
        return null;
    }
}
继承HttpServlet版
public class MyServlet extends HttpServlet {
    @Override
    protected void doGet(HttpServletRequest req, HttpServletResponse resp) throws ServletException, IOException {
        System.out.println("收到一个get请求");
    }

    @Override
    protected void doPost(HttpServletRequest req, HttpServletResponse resp) throws ServletException, IOException {
        System.out.println("收到一个post请求");
    }
}
继承GenericServlet版
public class MyServlet extends GenericServlet {

}
servlet生命周期
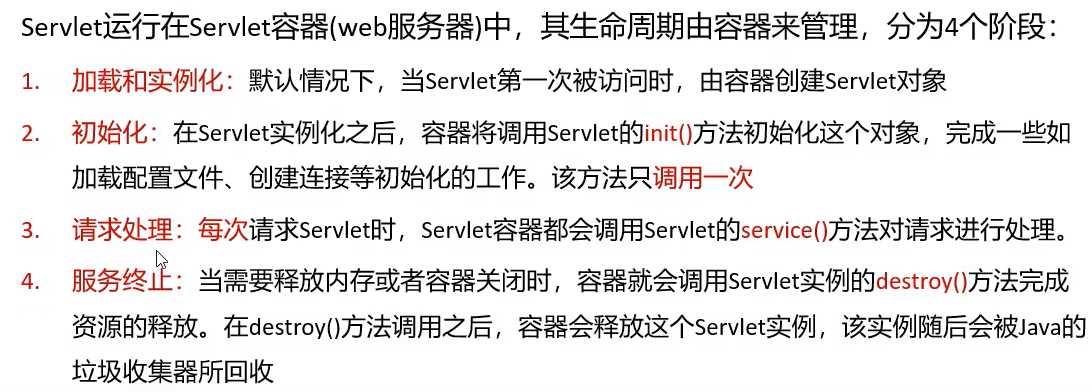
@WebServlet(urlPatterens="/demo1",loadOnStartUp=1)
public class MyServlet implements Servlet {
    /**
     * 调用时机:默认情况下在该servlet被第一次访问时,由容器来调用init()方法,只会被调用一次
     *  * 修改调用时机: loadOnStartUp
     *      * 默认值为-1 表示在该url被访问后再初始化
     *      * 可修改为1 表示在服务器启动后便初始化
     * 调用次数:1次
     */
    @Override
    public void init(ServletConfig arg0) throws ServletException {
        System.out.println("url被第一次访问...");
    }
}
@WebServlet(urlPatterens="/demo1",loadOnStartUp=1)
public class MyServlet implements Servlet {
    /**
     * 调用时机:url每次被访问时调用一次
     * 调用次数:每当被访问就调用
     */
    @Override
    public void service(ServletRequest request, ServletResponse response) throws ServletException, IOException {
        System.out.println("收到一个请求");
    }
}
@WebServlet(urlPatterens="/demo1",loadOnStartUp=1)
public class MyServlet implements Servlet {
    /**
     * 调用时机:Servlet被销毁时(内存释放时,服务进程被正常关闭时),由容器来销毁
     * 调用次数:1次
     */
    @Override
    public void destroy() {
        // TODO Auto-generated method stub
    }
}
HTTPServlet
一般直接继承HTTPServlet
- HttpServlet是指能够处理HTTP协议请求的Servlet,
- 它在原有Servlet接口上添加了一些与HTTP协议处理方法,
- 它比Servlet接口的功能更为强大。
- HttpServlet在实现Servlet接口时,覆写了service方法,
- 该方法体内的代码会自动判断用户的请求方式,
- 如为GET请求,则调用HttpServlet的doGet方法,
- 如为Post请求,则调用doPost方法。
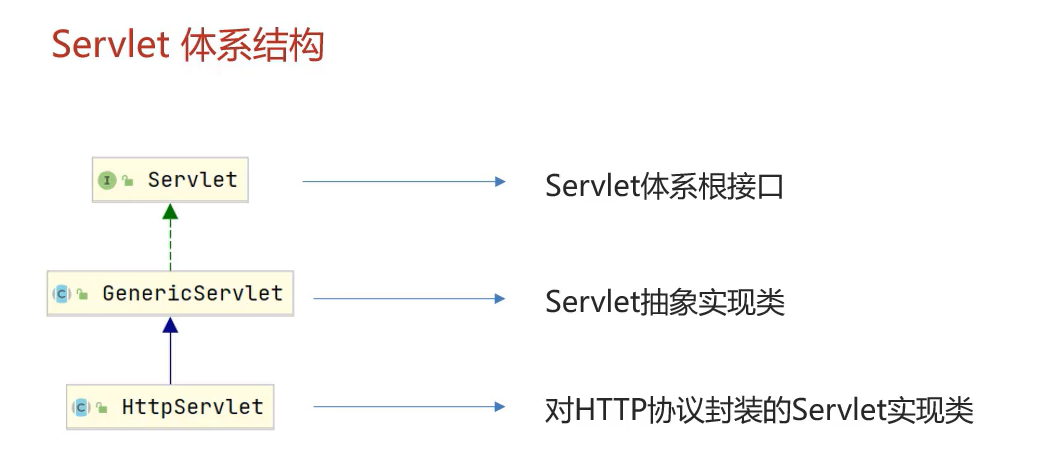
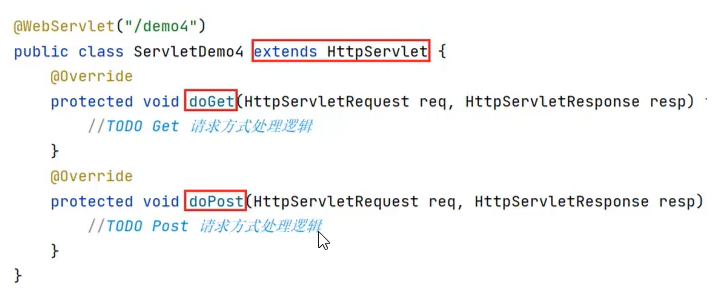
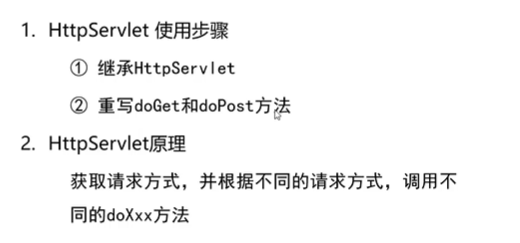
继承HttpServlet版
@WebServlet(urlPatterns="/api/1")
public class MyHttpServlet extends HttpServlet {
    @Override
    protected void doGet(HttpServletRequest req, HttpServletResponse resp) throws ServletException, IOException {
        System.out.println("收到一个get请求");
    }

    @Override
    protected void doPost(HttpServletRequest req, HttpServletResponse resp) throws ServletException, IOException {
        System.out.println("收到一个post请求");
    }
}
urlPattern配置
一个urlPattern可以配置多个访问路径配置
@WebServlet(urlPatterns={"/api/1","/api/2"})
public class MyHttpServlet extends HttpServlet {
}
urlPattern配置规则
精确匹配
@WebServlet(urlPatterns={"/api/1","/api/2"}) // 若一个url同时满足精确匹配和目录匹配,则精确匹配优先级更高目录匹配
@WebServlet(urlPatterns={"/api/1/*","/api/2/*"})扩展名匹配
@WebServlet(urlPatterns={"*.do1","*.do2"}) // 不能写 "/*.do1"任意匹配
@WebServlet(urlPatterns={"/","/*"})
/和/*区别:
- 当项目中的Servlet配置了
/则会覆盖掉tomcat中DefaultServlet(他会处理项目中静态页面的访问,如index.html),当其他的url-pattern都匹配不上时都会走这个Servlet - 当项目中配置了
/*,意味着匹配任意访问路径
优先级

xml方式配置Servlet
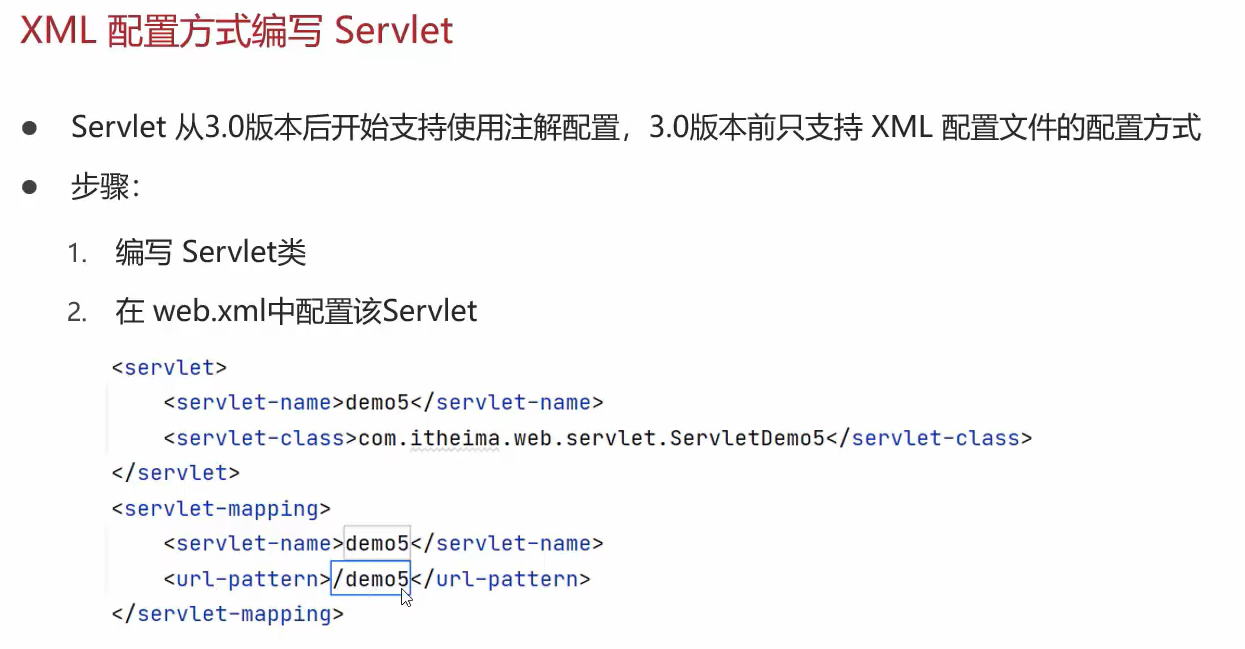
Request对象
Request继承体系
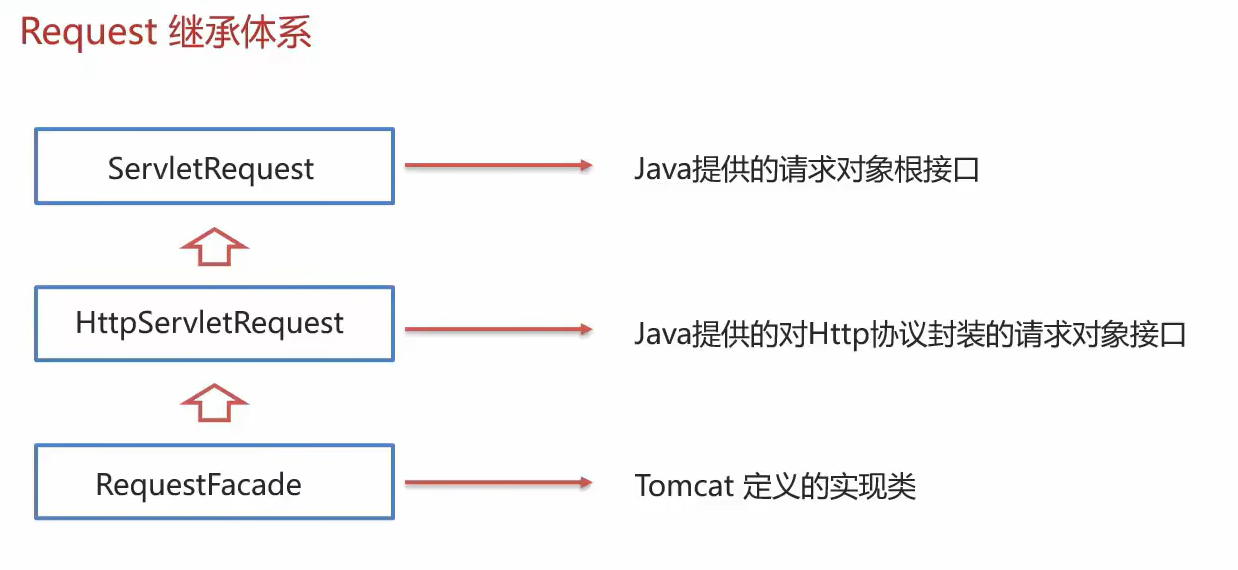
Request常用方法


通用的获取参数的方法
由于不同的请求方式(get,post)需要使用不同的方法来获取参数,这造成了一定的不方便
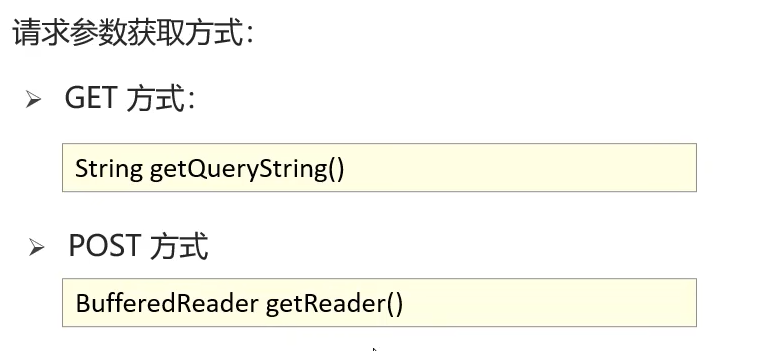
通用的 获取请求数据的 方式
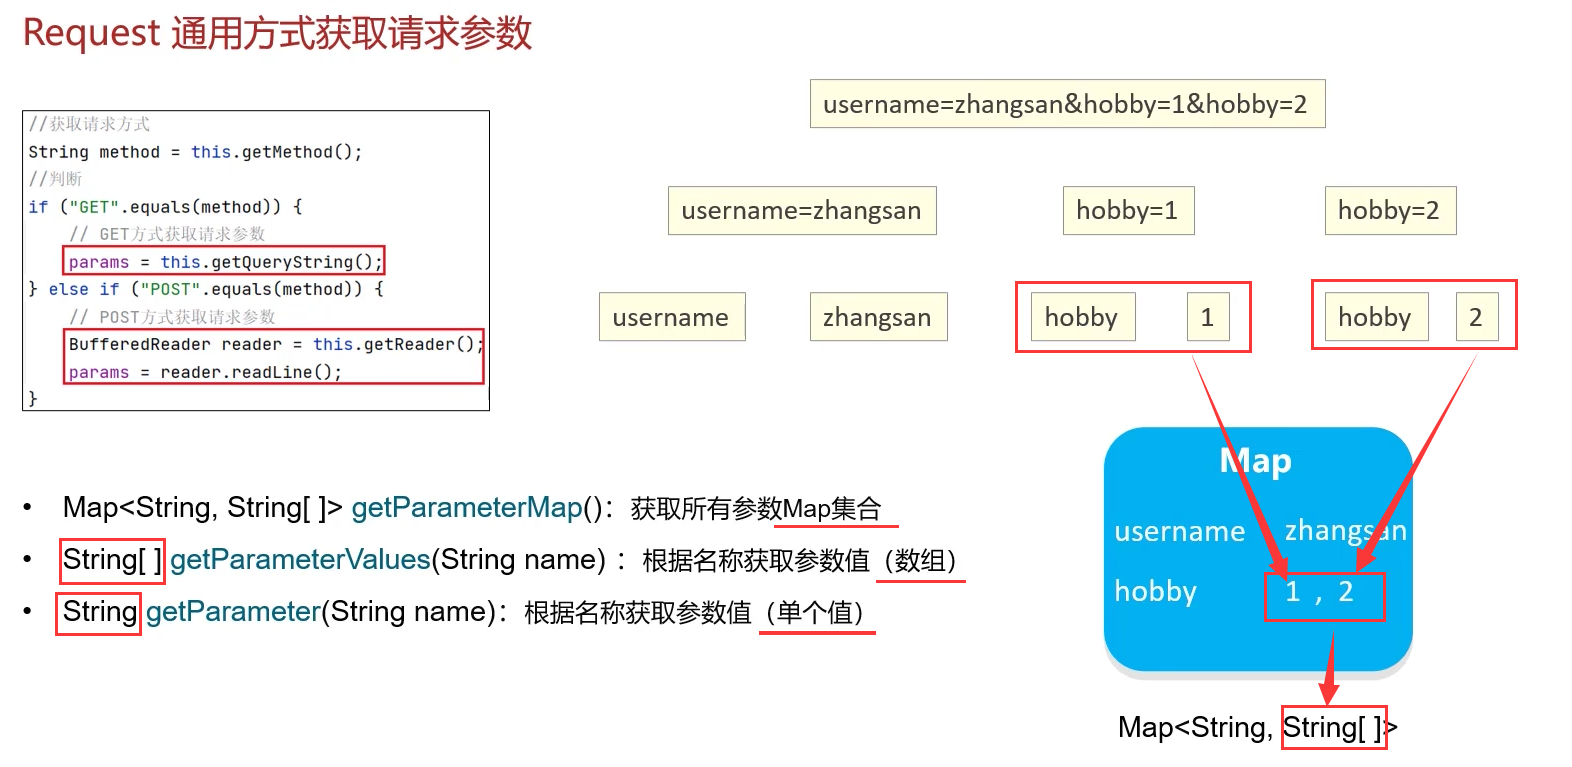
测试代码

收到一个get请求
userName:[2449695354@qq.com]
password:[123123]
readMe:[true]
autoLogin:[true]
hobby:[1, 2, 3]
<!DOCTYPE html>
<html lang="en">
<head>
    <meta charset="UTF-8">
    <meta http-equiv="X-UA-Compatible" content="IE=edge">
    <meta name="viewport" content="width=device-width, initial-scale=1.0">
    <title>Document</title>
</head>
<body>
<h2>Hello World!</h2>
<form action="/api" method="get">
    userName:<input type="text" name="userName"><br>
    password:<input type="password" name="password"><br>
    <input type="checkbox" name="readMe" value="true">readMe <br>
    <input type="checkbox" name="autoLogin" value="true">autoLogin <br>
    <input type="checkbox" name="hobby" value="1">熬夜 <br>
    <input type="checkbox" name="hobby" value="2">敲代码 <br>
    <input type="checkbox" name="hobby" value="3">掉头发 <br>
    <input type="submit">
</form>
</body>
</html>
import java.io.IOException;
import java.util.Arrays;
import java.util.Map;

import javax.servlet.ServletException;
import javax.servlet.annotation.WebServlet;
import javax.servlet.http.HttpServlet;
import javax.servlet.http.HttpServletRequest;
import javax.servlet.http.HttpServletResponse;

@WebServlet("/api")
public class MyServlet extends HttpServlet {

    @Override
    protected void doGet(HttpServletRequest req, HttpServletResponse resp) throws ServletException, IOException {
        System.out.println("收到一个get请求");
        Map<String,String[]> paramMap = req.getParameterMap();
        for(String key : paramMap.keySet()){
            System.out.println(key+":"+Arrays.toString(paramMap.get(key)));
        }
    }

    @Override
    protected void doPost(HttpServletRequest req, HttpServletResponse resp) throws ServletException, IOException {
        // (如果要实现一个接口支持两种请求方式)
        // 由于统一了获取请求参数的格式,故可将post请求转交给doget函数
        this.doGet(req, resp);
    }
}
解决Request输入流中文乱码的问题
注:新版tomcat8.0之后已将get请求乱码问题解决,解码方式为UTF-8
POST方式乱码的解决
由于POST方式的数据是以原始格式放在请求体中的,到达服务端后,底层是通过getReader()方式获取到的,默认会以ISO-8859-1解码,所以可以通过设置获取流的编码方式来解决该问题
req.setCharacterEncoding("UTF-8");// 设置输入流编码
Map<String,String[]> paramMap = req.getParameterMap(); // 然后就能获得正常的数据了
GET方式乱码的解决:原理解释起来比较困难
这种方式也能解决post的乱码
- GET方式的请求数据是放在URL中的,但URL是不支持中文的,
- 浏览器会将中文以
UTF-8格式进行URL编码 - TomCat收到后会以
ISO-8859-1格式进行URL解码 - 问题在于无法修改这个
ISO-8859-1格式为UTF-8 - 所以需要将得到的数据重新以
ISO-8859-1格式解码获取字节码 - 然后再将得到的字节码以以
UTF-8格式解析为字符串
URL编码
- 将字符串按照编码方式转为二进制
- 每个字节转为2个16进制数并在前边加上%
import java.net.URLDecoder;
import java.net.URLEncoder;
import java.nio.charset.StandardCharsets;

public class Test {
    public static void main(String[] args) {
        String userName = "张三";

        // 浏览器做的事
        // 以 ISO_8859_1 编码 URL
        String userName_Browser = URLEncoder.encode(userName,StandardCharsets.UTF_8);
        System.out.println(userName_Browser); // 输出: %E5%BC%A0%E4%B8%89

        // TomCat做的事,
        // 以 ISO_8859_1 解码 URL
        String userName_TomCat = URLDecoder.decode(userName_Browser, StandardCharsets.ISO_8859_1);
        System.out.println(userName_TomCat); // 输出: ??????

        // 作为Servlet开发人员要做的事,
        // 以 ISO_8859_1 解码 `乱码字符串` 获取 `字节数组` , 然后以UTF_8字符集编码解析 `字节数组` 获取 `字符串`
        String userName_Servlet = new String(userName_TomCat.getBytes(StandardCharsets.ISO_8859_1),StandardCharsets.UTF_8);
        System.out.println(userName_Servlet); // 输出: 张三
    }
}
Request内部请求转发转发流转给jsp页面Forward
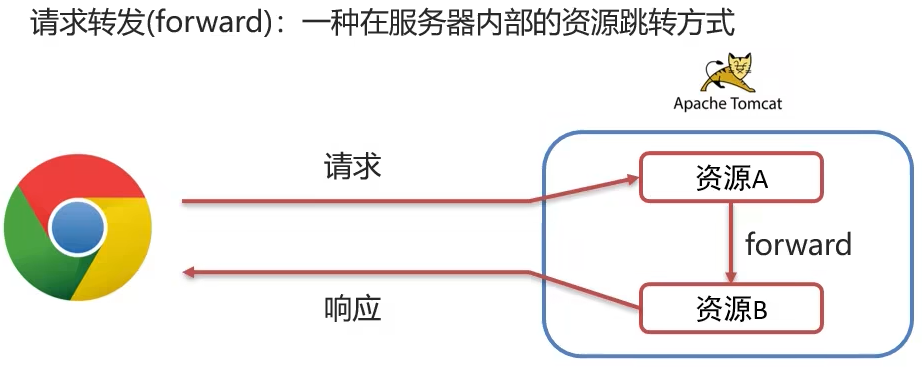
方法
req.getRequestDispatcher("/api/2").forward(req, resp);
传递数据的一些方法
终端输出
/api1 被访问
/api/2 被访问
test的数据为: test的数据
import java.io.IOException;

import javax.servlet.ServletException;
import javax.servlet.annotation.WebServlet;
import javax.servlet.http.HttpServlet;
import javax.servlet.http.HttpServletRequest;
import javax.servlet.http.HttpServletResponse;

@WebServlet("/api/1")
public class MyServlet1 extends HttpServlet { // 该类需为public

    @Override
    protected void doGet(HttpServletRequest req, HttpServletResponse resp) throws ServletException, IOException {
        System.out.println("/api/1 被访问");

        req.setAttribute("test", "test的数据");

        // 转发给 "/api/2" 的处理函数
        req.getRequestDispatcher("/api/2").forward(req, resp);
    }

    @Override
    protected void doPost(HttpServletRequest req, HttpServletResponse resp) throws ServletException, IOException {
        this.doGet(req, resp);
    }
}
import java.io.IOException;

import javax.servlet.ServletException;
import javax.servlet.annotation.WebServlet;
import javax.servlet.http.HttpServlet;
import javax.servlet.http.HttpServletRequest;
import javax.servlet.http.HttpServletResponse;

@WebServlet("/api/2")
public class MyServlet2 extends HttpServlet { // 注意 该类需为public

    @Override
    protected void doGet(HttpServletRequest req, HttpServletResponse resp) throws ServletException, IOException {
        System.out.println("/api/2 被访问");
        System.out.println( "test的数据为: "+req.getAttribute("test") );
    }

    @Override
    protected void doPost(HttpServletRequest req, HttpServletResponse resp) throws ServletException, IOException {
        this.doGet(req, resp);
    }
}
Response对象
实现关系

Response设置响应数据功能介绍
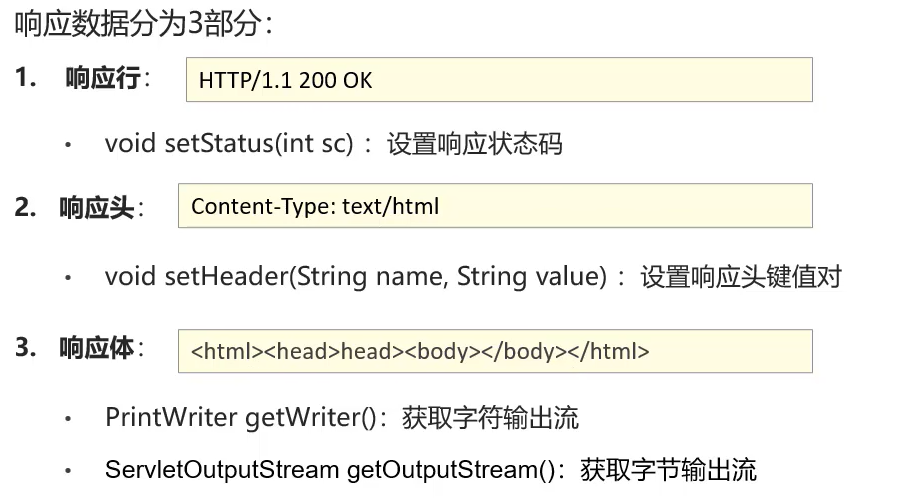
Response完成重定向
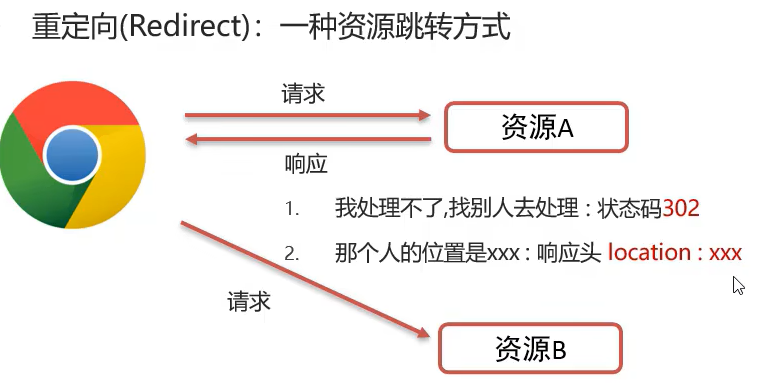
@WebServlet("/api/1")
public class MyServlet1 extends HttpServlet {

    @Override
    protected void doGet(HttpServletRequest req, HttpServletResponse resp) throws ServletException, IOException {
        System.out.println("/api/1 被访问");

        // 设置响应行
        resp.setStatus(302);
        // 设置相应头
        resp.setHeader("location", "/api/2");

        // 等效的简化写法
        // resp.sendRedirect("api/2");
    }

    @Override
    protected void doPost(HttpServletRequest req, HttpServletResponse resp) throws ServletException, IOException {
        this.doGet(req, resp);
    }
}
Response响应字符数据
response.setContentType("text/html;charset=utf-8");
PrintWriter wr = response.getWriter();
wr.write("<h1>测试</h1>");
@WebServlet("/a")
public class MyServlet0 extends HttpServlet {

    @Override
    protected void doGet(HttpServletRequest req, HttpServletResponse response) throws ServletException, IOException {
        response.setContentType("text/html;charset=utf-8"); // 使其支持中文 ,因为,response获取到的输出流默认为IOS-8859-1
        PrintWriter wr = response.getWriter(); // 注意PrintWriter会随着resp的关闭而自动销毁
        wr.write("<h1>测试</h1>");
    }
    @Override
    protected void doPost(HttpServletRequest req, HttpServletResponse resp) throws ServletException, IOException {
        this.doGet(req, resp);
    }
}
Response响应字节数据
OutputStream os = response.getOutputStream();
import java.io.IOException;
import java.io.InputStream;
import java.io.OutputStream;

import javax.servlet.ServletException;
import javax.servlet.annotation.WebServlet;
import javax.servlet.http.HttpServlet;
import javax.servlet.http.HttpServletRequest;
import javax.servlet.http.HttpServletResponse;

import org.apache.commons.io.IOUtils; //commons-io IOUtils是流的工具库

@WebServlet("/a")
public class MyServlet0 extends HttpServlet {

    @Override
    protected void doGet(HttpServletRequest req, HttpServletResponse response) throws ServletException, IOException {
        InputStream is = this.getClass().getResourceAsStream("./123.txt");
        OutputStream os = response.getOutputStream();
        IOUtils.copy(is, os);// 拷贝
        System.out.println("拷贝完毕");
    }
    @Override
    protected void doPost(HttpServletRequest req, HttpServletResponse resp) throws ServletException, IOException {
        this.doGet(req, resp);
    }
}
案例:实现登录注册案例
注册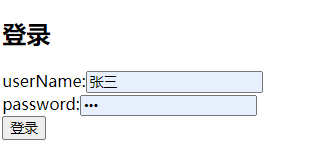
注册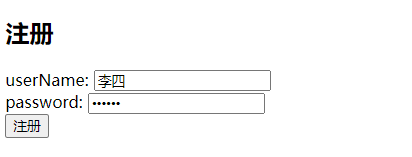
数据准备
CREATE DATABASE IF NOT EXISTS db6;

CREATE TABLE IF NOT EXISTS tb_user(
    id INT AUTO_INCREMENT PRIMARY KEY,
    username VARCHAR(20) UNIQUE NOT NULL,
    password VARCHAR(20) NOT NULL
);

INSERT INTO
    tb_user(username,password)
VALUES
    ("张三","123456"),
    ("王五","123456")
;
项目目录结构
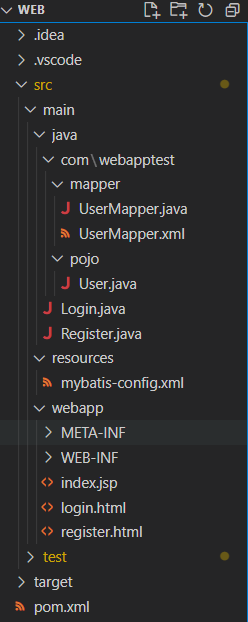
pom.xml
<?xml version="1.0" encoding="UTF-8"?>

<project xmlns="http://maven.apache.org/POM/4.0.0" xmlns:xsi="http://www.w3.org/2001/XMLSchema-instance"
  xsi:schemaLocation="http://maven.apache.org/POM/4.0.0 http://maven.apache.org/xsd/maven-4.0.0.xsd">
  <modelVersion>4.0.0</modelVersion>

  <groupId>com.webapptest</groupId>
  <artifactId>webapptest</artifactId>
  <version>1.1-SNAPSHOT</version>
  <packaging>war</packaging>


  <name>web Maven Webapp</name>
  <!-- FIXME change it to the project's website -->
  <url>http://www.example.com</url>

  <properties>
    <project.build.sourceEncoding>UTF-8</project.build.sourceEncoding>
    <maven.compiler.source>1.7</maven.compiler.source>
    <maven.compiler.target>1.7</maven.compiler.target>
  </properties>

  <dependencies>

    <dependency>
    <groupId>javax.servlet</groupId>
    <artifactId>javax.servlet-api</artifactId>
    <version>3.1.0</version>
    <scope>provided</scope>
  </dependency>


    <dependency>
      <groupId>org.mybatis</groupId>
      <artifactId>mybatis</artifactId>
      <version>3.5.11</version>
    </dependency>


    <dependency>
      <groupId>mysql</groupId>
      <artifactId>mysql-connector-java</artifactId>
      <version>8.0.31</version>
    </dependency>


    <dependency>
      <groupId>org.apache.tomcat</groupId>
      <artifactId>tomcat</artifactId>
      <version>10.1.2</version>
      <type>pom</type>
    </dependency>

    <dependency>
      <groupId>junit</groupId>
      <artifactId>junit</artifactId>
      <version>4.11</version>
      <scope>test</scope>
    </dependency>

  </dependencies>

  <build>
    <finalName>web</finalName>
    <plugins>
      <plugin>
        <groupId>org.apache.tomcat.maven</groupId>
        <artifactId>tomcat7-maven-plugin</artifactId>
        <version>2.2</version>
        <configuration>
          <port>8080</port>
          <path>/</path>
        </configuration>
      </plugin>
    </plugins>

    <pluginManagement><!-- lock down plugins versions to avoid using Maven defaults (may be moved to parent pom) -->
      <plugins>
        <plugin>
          <artifactId>maven-clean-plugin</artifactId>
          <version>3.1.0</version>
        </plugin>
        <!-- see http://maven.apache.org/ref/current/maven-core/default-bindings.html#Plugin_bindings_for_war_packaging -->
        <plugin>
          <artifactId>maven-resources-plugin</artifactId>
          <version>3.0.2</version>
        </plugin>
        <plugin>
          <artifactId>maven-compiler-plugin</artifactId>
          <version>3.8.0</version>
        </plugin>
        <plugin>
          <artifactId>maven-surefire-plugin</artifactId>
          <version>2.22.1</version>
        </plugin>
        <plugin>
          <artifactId>maven-war-plugin</artifactId>
          <version>3.2.2</version>
        </plugin>
        <plugin>
          <artifactId>maven-install-plugin</artifactId>
          <version>2.5.2</version>
        </plugin>
        <plugin>
          <artifactId>maven-deploy-plugin</artifactId>
          <version>2.8.2</version>
        </plugin>
      </plugins>
    </pluginManagement>
  </build>
</project>
mybatis-config.xml
<?xml version="1.0" encoding="UTF-8" ?>
<!DOCTYPE configuration
PUBLIC "-//mybatis.org//DTD Config 3.0//EN"
"http://mybatis.org/dtd/mybatis-3-config.dtd">
<configuration>
<environments default="development">
<environment id="development">
<transactionManager type="JDBC"/>
<dataSource type="POOLED">
<property name="driver" value="com.mysql.cj.jdbc.Driver"/> <!-- 填mysql的驱动的路径 -->
<property name="url" value="jdbc:mysql:///db6?useSSL=false&useServerPrepStemts=true"/> <!-- 填mysql数据库的路径 -->
<property name="username" value="root"/> <!-- 填数据库的username -->
<property name="password" value="root"/> <!-- 填数据库的password -->
</dataSource>
</environment>
</environments>
<mappers>
<package name="com.webapptest.mapper" /> <!-- 使用这种Mapper代理的方式便可以用这种包扫描的写法 -->
</mappers>
</configuration>
UserMapper.java
package com.webapptest.mapper;
import java.util.List;

import org.apache.ibatis.annotations.Insert;
import org.apache.ibatis.annotations.Param;
// import org.apache.ibatis.annotations.Select;
import org.apache.ibatis.annotations.Select;

import com.webapptest.pojo.User;

public interface UserMapper {

    List<User> selectAll();

    User selectUserById(int id);

    @Select("select * from tb_user where username = #{username} and password = #{password};")
    User selectUserByUsernameAndPassword(
        @Param("username") String username,
        @Param("password") String password
    );

    @Insert("INSERT INTO tb_user(id,username,password) values(null,#{username},#{password});")
    int addUser(User user);
}
UserMapper.xml
<?xml version="1.0" encoding="UTF-8" ?>
<!DOCTYPE mapper
  PUBLIC "-//mybatis.org//DTD Mapper 3.0//EN"
  "http://mybatis.org/dtd/mybatis-3-mapper.dtd">
<mapper namespace="com.webapptest.mapper.UserMapper">  <!-- namespace改为接口类 -->
  <select id="selectAll" resultType="com.webapptest.pojo.User">   <!-- id为接口的函数名 -->
    select * from tb_user;
  </select>
  <!-- selectUserById -->
  <select id="selectUserById" resultType="com.webapptest.pojo.User">
    select * from tb_user where id = #{id};
  </select>
</mapper>
pojo/User.java
package com.webapptest.pojo;

public class User {
    Integer id;
    String username;
    String password;
    public Integer getId() {
        return id;
    }
    public void setId(Integer id) {
        this.id = id;
    }
    public String getUsername() {
        return username;
    }
    public void setUsername(String username) {
        this.username = username;
    }
    public String getPassword() {
        return password;
    }
    public void setPassword(String password) {
        this.password = password;
    }
    @Override
    public String toString() {
        return "User [id=" + id + ", username=" + username + ", password=" + password + "]";
    }
}
Login.java
- 踩坑记录,WebServlet的实现类需放到
/src/main/java/目录下
import java.io.IOException;
import java.io.InputStream;

import javax.servlet.ServletException;
import javax.servlet.http.HttpServlet;
import javax.servlet.http.HttpServletRequest;
import javax.servlet.http.HttpServletResponse;

import org.apache.ibatis.io.Resources;

import javax.servlet.annotation.WebServlet;

import org.apache.ibatis.session.SqlSession;
import org.apache.ibatis.session.SqlSessionFactory;
import org.apache.ibatis.session.SqlSessionFactoryBuilder;

import com.webapptest.mapper.UserMapper;
import com.webapptest.pojo.User;

@WebServlet(urlPatterns = "/api/login")
public class Login extends HttpServlet {
    @Override
    public void doGet(HttpServletRequest request, HttpServletResponse response) throws ServletException, IOException {
        request.setCharacterEncoding("UTF-8");
        response.setCharacterEncoding("UTF-8");

        String username = request.getParameter("username");
        String password = request.getParameter("password");

        System.out.println(username);
        System.out.println(password);

        // 加载mybatis核心配置文件
        String resource = "mybatis-config.xml";
        InputStream inputStream = Resources.getResourceAsStream(resource);
        SqlSessionFactory sqlSessionFactory = new SqlSessionFactoryBuilder().build(inputStream);

        // 获取SqlSession,用其来执行sql语句
        SqlSession session = sqlSessionFactory.openSession(true);

        // 获取UserMapper接口的代理对象
        UserMapper userMapper = session.getMapper(UserMapper.class);
        User user = userMapper.selectUserByUsernameAndPassword(username,password);
        if(user!=null)
            response.getWriter().println("登录成功!");
        else
            response.getWriter().println("登录失败!");

        response.setContentType("text/html;charset=utf-8");

        session.close();
    }

    @Override
    public void doPost(HttpServletRequest req, HttpServletResponse resp) throws ServletException, IOException {
        this.doGet(req, resp);
    }
}
Register.java
import java.io.IOException;
import java.io.InputStream;

import javax.servlet.ServletException;
import javax.servlet.http.HttpServlet;
import javax.servlet.http.HttpServletRequest;
import javax.servlet.http.HttpServletResponse;

import org.apache.ibatis.io.Resources;

import javax.servlet.annotation.WebServlet;

import org.apache.ibatis.session.SqlSession;
import org.apache.ibatis.session.SqlSessionFactory;
import org.apache.ibatis.session.SqlSessionFactoryBuilder;

import com.webapptest.mapper.UserMapper;
import com.webapptest.pojo.User;

@WebServlet(urlPatterns = "/api/register")
public class Register extends HttpServlet {
    @Override
    public void doGet(HttpServletRequest request, HttpServletResponse response) throws ServletException, IOException {
        request.setCharacterEncoding("UTF-8");
        response.setCharacterEncoding("UTF-8");

        String username = request.getParameter("username");
        String password = request.getParameter("password");

        User user = new User();
        user.setUsername(username);
        user.setPassword(password);

        System.out.println(username);
        System.out.println(password);

        // 加载mybatis核心配置文件
        String resource = "mybatis-config.xml";
        InputStream inputStream = Resources.getResourceAsStream(resource);
        SqlSessionFactory sqlSessionFactory = new SqlSessionFactoryBuilder().build(inputStream);

        // 获取SqlSession,用其来执行sql语句
        SqlSession session = sqlSessionFactory.openSession(true);

        // 获取UserMapper接口的代理对象
        UserMapper userMapper = session.getMapper(UserMapper.class);

        int affectedRows=0;

        try {
            // 因为用户名是unique 插入出错则直接提示注册失败
            affectedRows = userMapper.addUser(user);
            response.getWriter().println("注册成功!"+ affectedRows);

        } catch (Exception e) {
            System.out.println(e);
            response.getWriter().println("注册失败!" + affectedRows);
        }
        response.setContentType("text/html;charset=utf-8");
        session.close();
    }

    @Override
    public void doPost(HttpServletRequest req, HttpServletResponse resp) throws ServletException, IOException {
        this.doGet(req, resp);
    }
}
login.html
<!DOCTYPE html>
<html lang="en">
<head>
    <meta charset="UTF-8">
    <meta http-equiv="X-UA-Compatible" content="IE=edge">
    <meta name="viewport" content="width=device-width, initial-scale=1.0">
    <title>Document</title>
</head>
<body>
    <h2>登录</h2>
    <form action="/api/login" method="post">
        userName:<input type="text" name="username"> <br>
        password:<input type="password" name="password"> <br>
        <input type="submit" value="登录">
    </form>
</body>
</html>
register.html
<!DOCTYPE html>
<html lang="en">
<head>
    <meta charset="UTF-8">
    <meta http-equiv="X-UA-Compatible" content="IE=edge">
    <meta name="viewport" content="width=device-width, initial-scale=1.0">
    <title>Document</title>
</head>
<body>
    <h2>注册</h2>
    <form action="/api/register" method="post">
        userName: <input type="text" name="username"> <br>
        password: <input type="password" name="password"> <br>
        <input type="submit" value="注册">
    </form>
</body>
</html>
优化:把SqlSessionFactory优化为工具类
package com.webapptest.datebase;
import java.io.IOException;
import java.io.InputStream;

import org.apache.ibatis.io.Resources;
import org.apache.ibatis.session.SqlSession;
import org.apache.ibatis.session.SqlSessionFactory;
import org.apache.ibatis.session.SqlSessionFactoryBuilder;

public class DBSessionPool {// 数据库连接池
    public static SqlSessionFactory sqlSessionFactory=null;
    public static SqlSession getSession(Boolean isAutoCommit) throws IOException {
        if(DBSessionPool.sqlSessionFactory==null){
            // 加载mybatis核心配置文件
            String resource = "mybatis-config.xml";
            InputStream inputStream = Resources.getResourceAsStream(resource);
            DBSessionPool.sqlSessionFactory = new SqlSessionFactoryBuilder().build(inputStream);
        }
        // 获取SqlSession,用其来执行sql语句
        return DBSessionPool.sqlSessionFactory.openSession(isAutoCommit);
    }
}
从数据库连接池 获取 sqlSession
import java.io.IOException;
import javax.servlet.ServletException;
import javax.servlet.http.HttpServlet;
import javax.servlet.http.HttpServletRequest;
import javax.servlet.http.HttpServletResponse;


import javax.servlet.annotation.WebServlet;

import org.apache.ibatis.session.SqlSession;

import com.webapptest.datebase.DBSessionPool;
import com.webapptest.mapper.UserMapper;
import com.webapptest.pojo.User;

@WebServlet(urlPatterns = "/api/login")
public class Login extends HttpServlet {
    @Override
    public void doGet(HttpServletRequest request, HttpServletResponse response) throws ServletException, IOException {
        request.setCharacterEncoding("UTF-8");
        response.setCharacterEncoding("UTF-8");

        String username = request.getParameter("username");
        String password = request.getParameter("password");

        System.out.println(username);
        System.out.println(password);


         //从数据库连接池 获取 sqlSession
        SqlSession session = DBSessionPool.getSession(true);

        // 获取UserMapper接口的代理对象
        UserMapper userMapper = session.getMapper(UserMapper.class);
        User user = userMapper.selectUserByUsernameAndPassword(username,password);
        if(user!=null)
            response.getWriter().println("登录成功!");
        else
            response.getWriter().println("登录失败!");

        response.setContentType("text/html;charset=utf-8");

        session.close();
    }

    @Override
    public void doPost(HttpServletRequest req, HttpServletResponse resp) throws ServletException, IOException {
        this.doGet(req, resp);
    }
}
JSP(Java Server Pages)Java服务端页面
简单了解即可,JSP已经逐渐退出历史舞台了。
JSP本质和PHP类似
JSP已经逐渐被AJAX技术取代了
JSP=HTML+JAVA
{{ProjectRoot}}/src/main/webapp/index.jsp
<%@ page contentType="text/html;charset=UTF-8" language="java" %>
<html>
  <body>
  <h2>Hello World!</h2>
  <%
    <!-- System.out.println("Hello JSP..."); -->
      out.println("Hello JSP...");
  %>
  </body>
</html>
编译后大概的样子
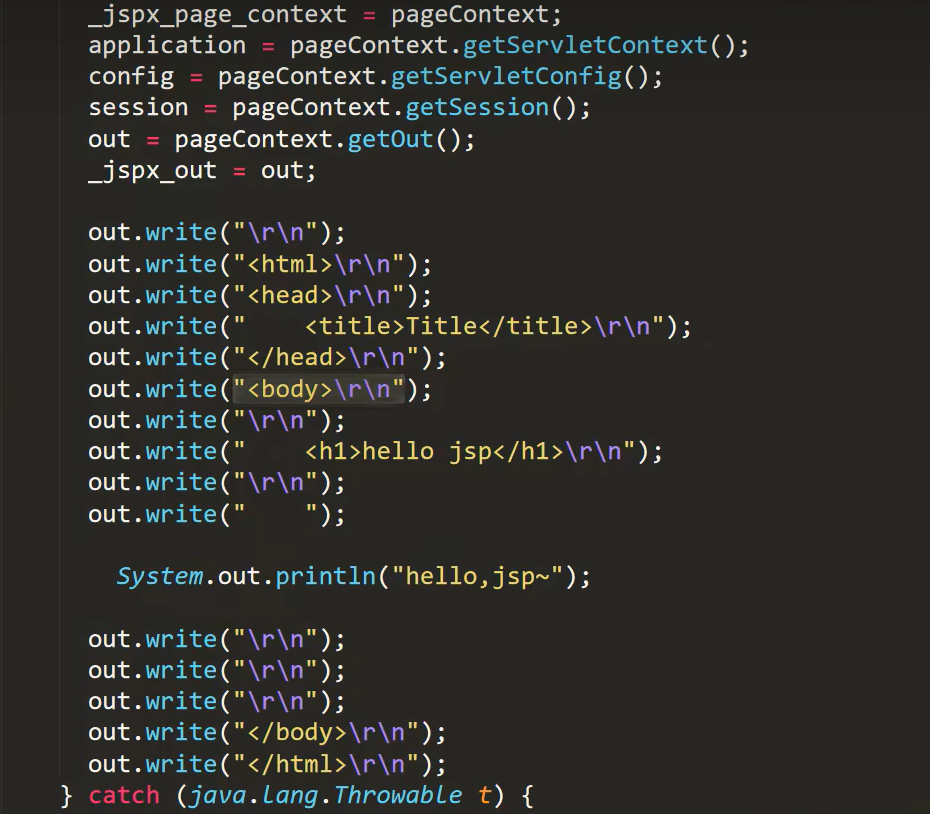
pom.xml
    <dependency>
      <groupId>javax.servlet.jsp</groupId>
      <artifactId>jsp-api</artifactId>
      <version>2.2.1-b03</version>
      <scope>provided</scope>
    </dependency>
JSP本质就是一个Servlet
JSP在被访问时,由JSP容器(Tomcat)将其转换为Java文件(Servlet),在由JSP容器(Tomcat)将其编译,最终对外提供服务的其实就是这个字节码文件
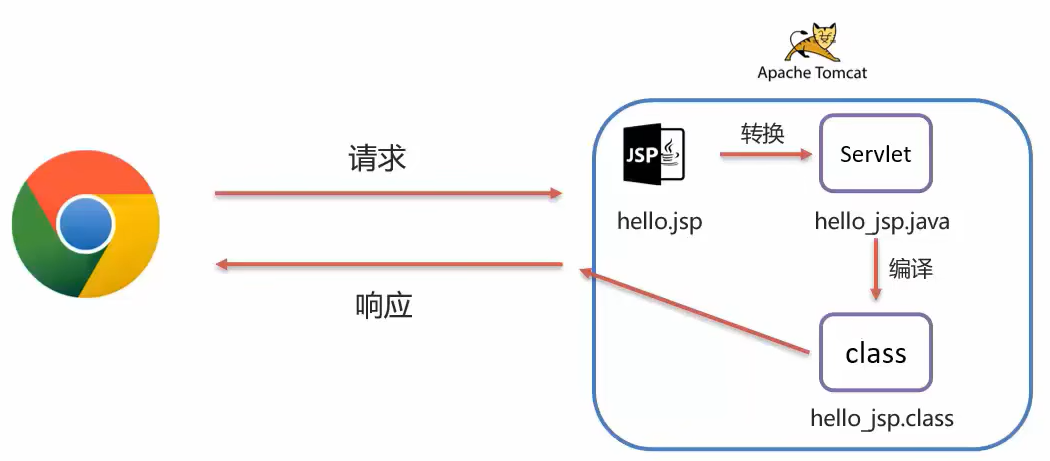
JSP脚本标记分类

缺点
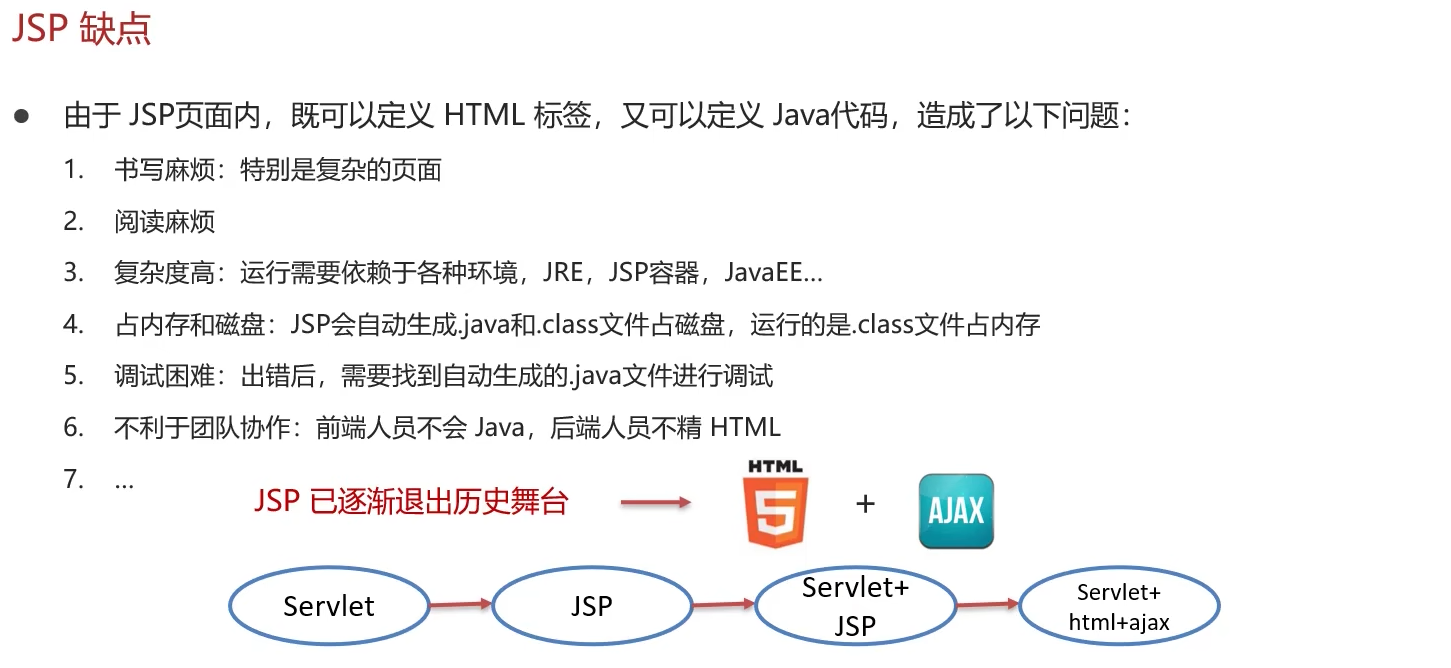
servlet+jsp
这种方式的主要解决java代码和html代码混在一起难以阅读的问题,
核心原理是,
- 将需要的数据在servlet中封装好,
req.setAttribute("test", "test的数据");- 然后通过通过内部转发流转给jsp页面
req.getRequestDispatcher("/api/2").forward(req, resp);- jsp页面通过
EL表达式语言读取封装好的数据
EL表达式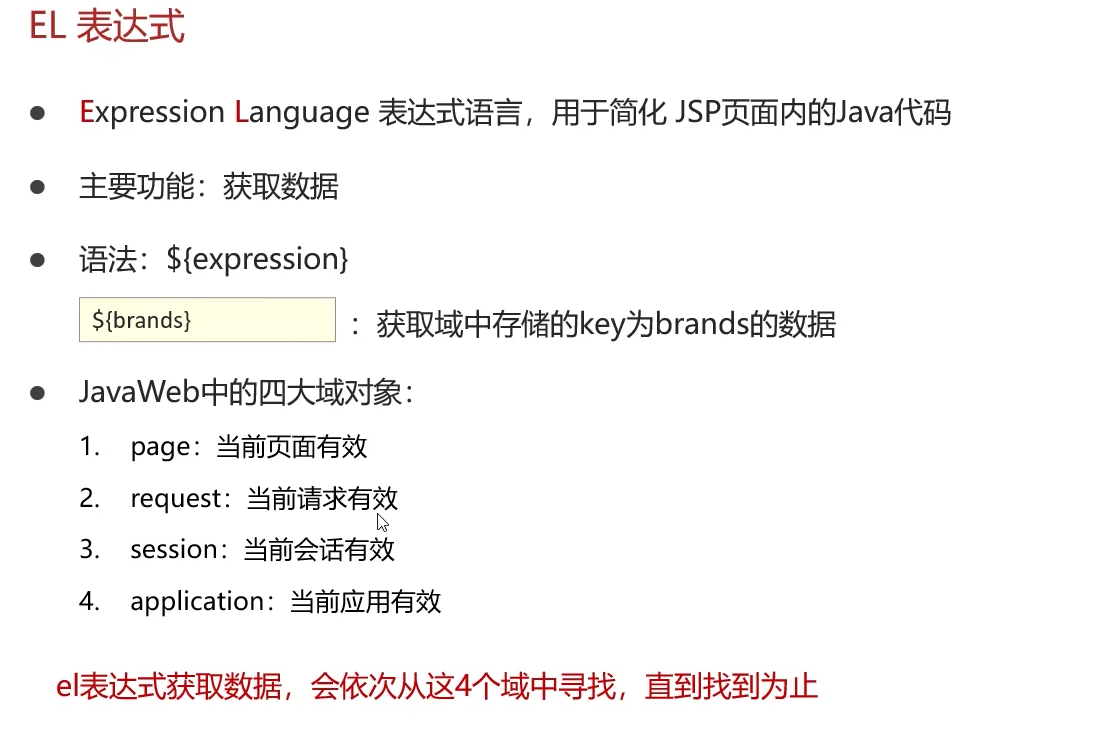
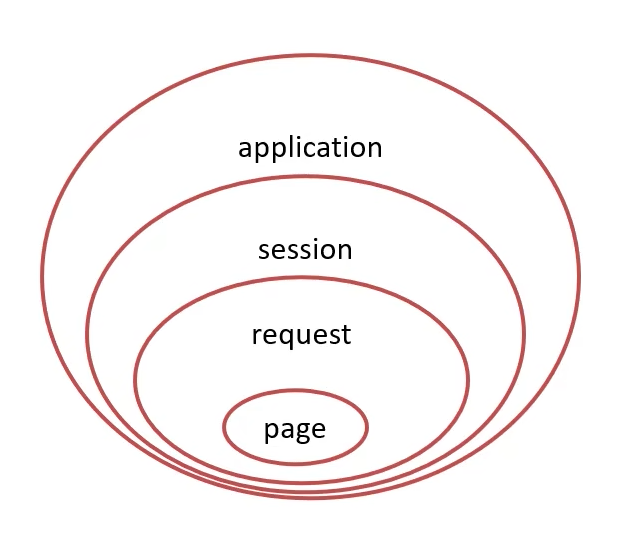
基本的书写格式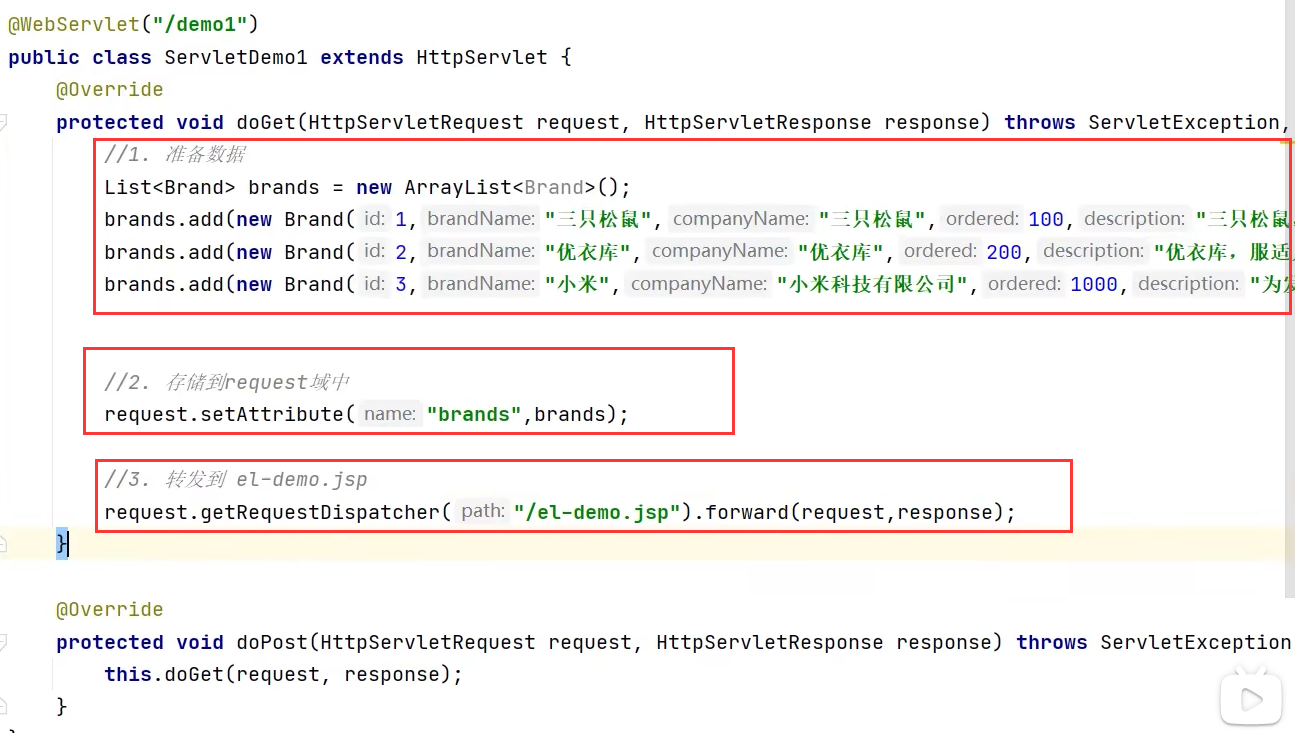
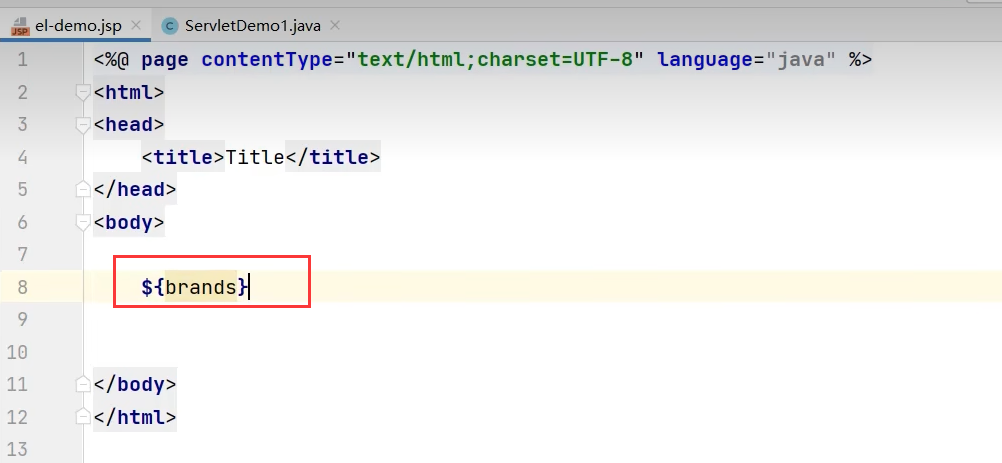
JSTF标签
该技术主要是解决了过去java的if和for循环不得不写在jsp代码中的问题
其实就是以html标签的方式写java的某些语句
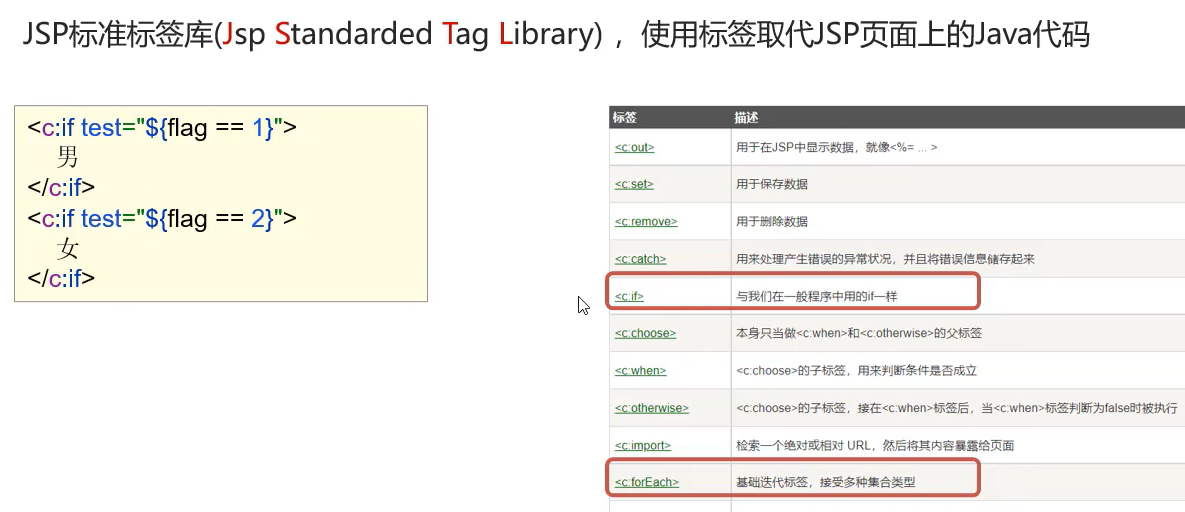
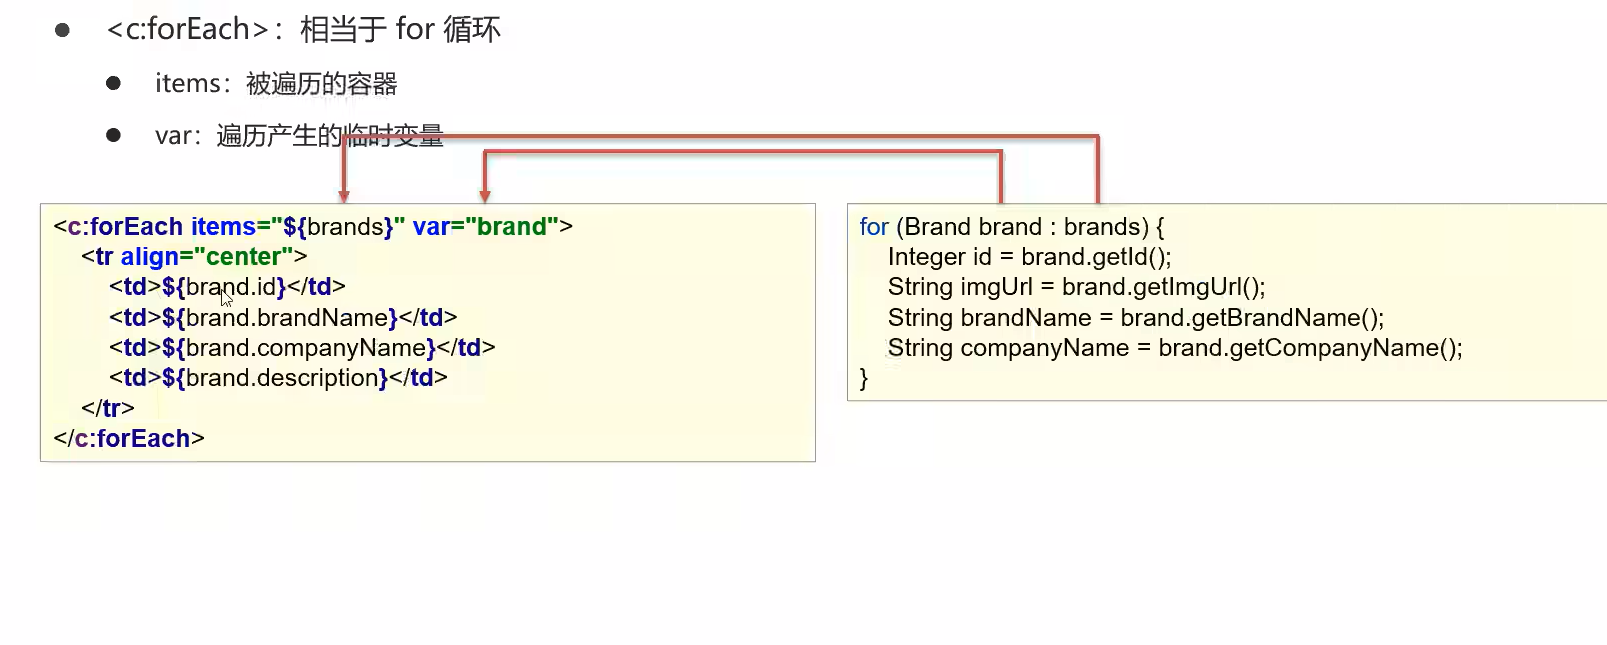
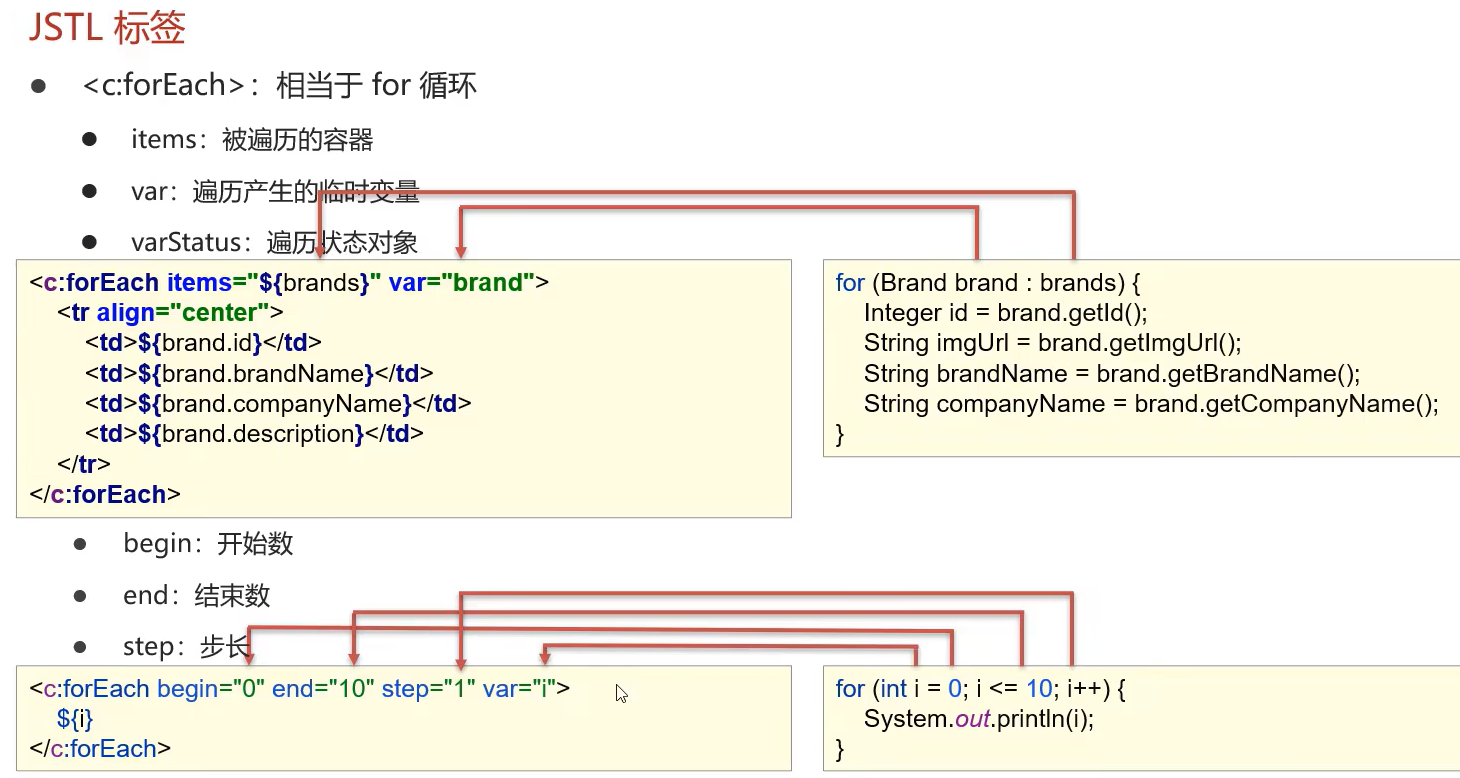
使用JSTF标签的预备步骤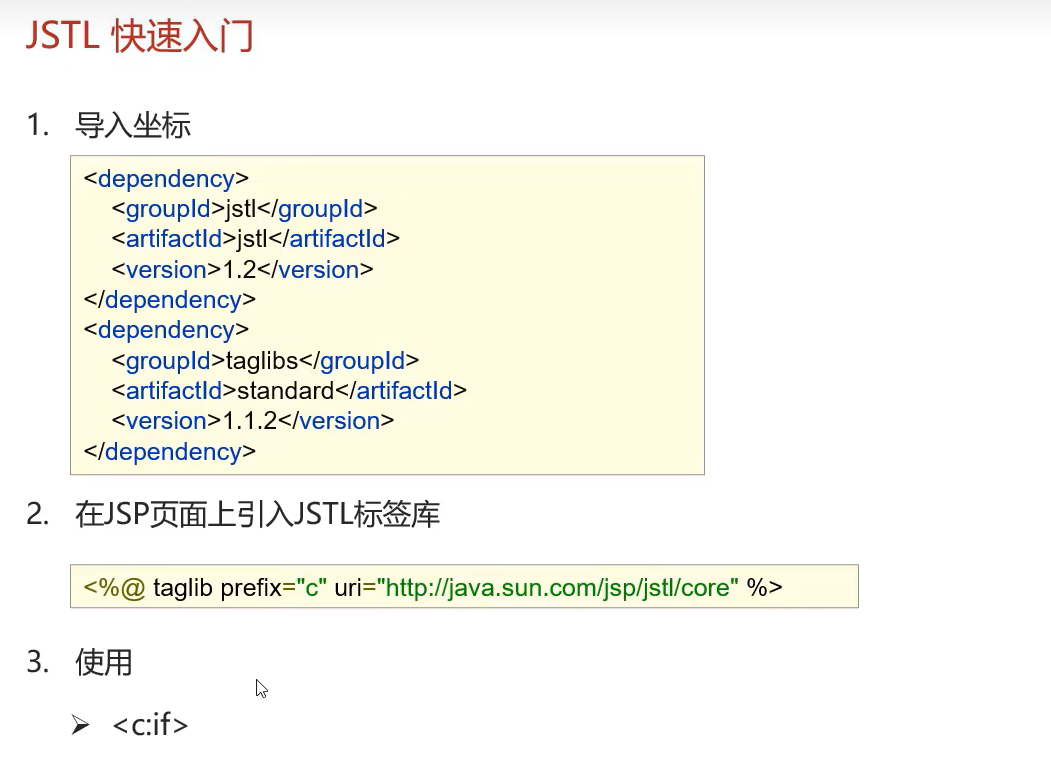
MVC模式与三层架构
MVC模式
MVC是一种分层开发的模式,其中:
- M: Model,业务模型,处理业务
- V: View,视图,界面展示
- C: Controller,控制器,处理请求,调用模型和视图
MVC好处
- 职责单一
- 互不影响有利于分工协作
- 有利于组件重用
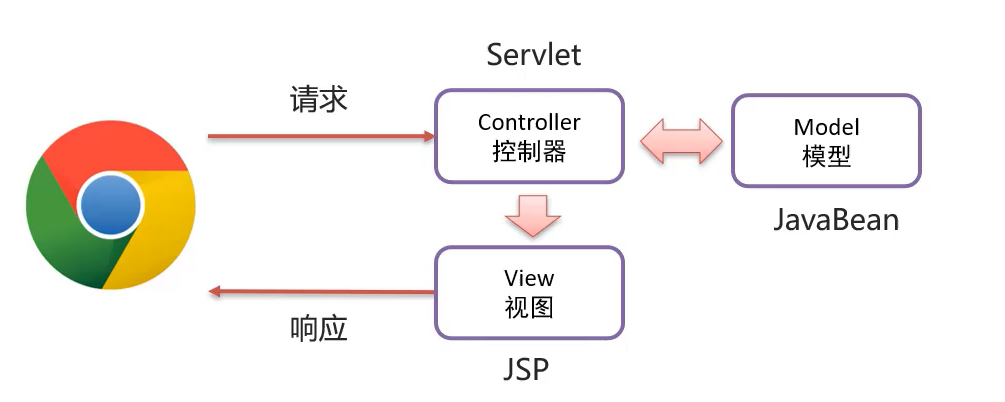
三层架构
- 数据访问层:对数据库的CRUD基本操作
- 业务逻辑层:对业务逻辑进行封装,组合数据访问层层中基本功能,形成复杂的业务逻辑功能
- 表现层:接收请求,封装数据,调用业务逻辑层,响应数据
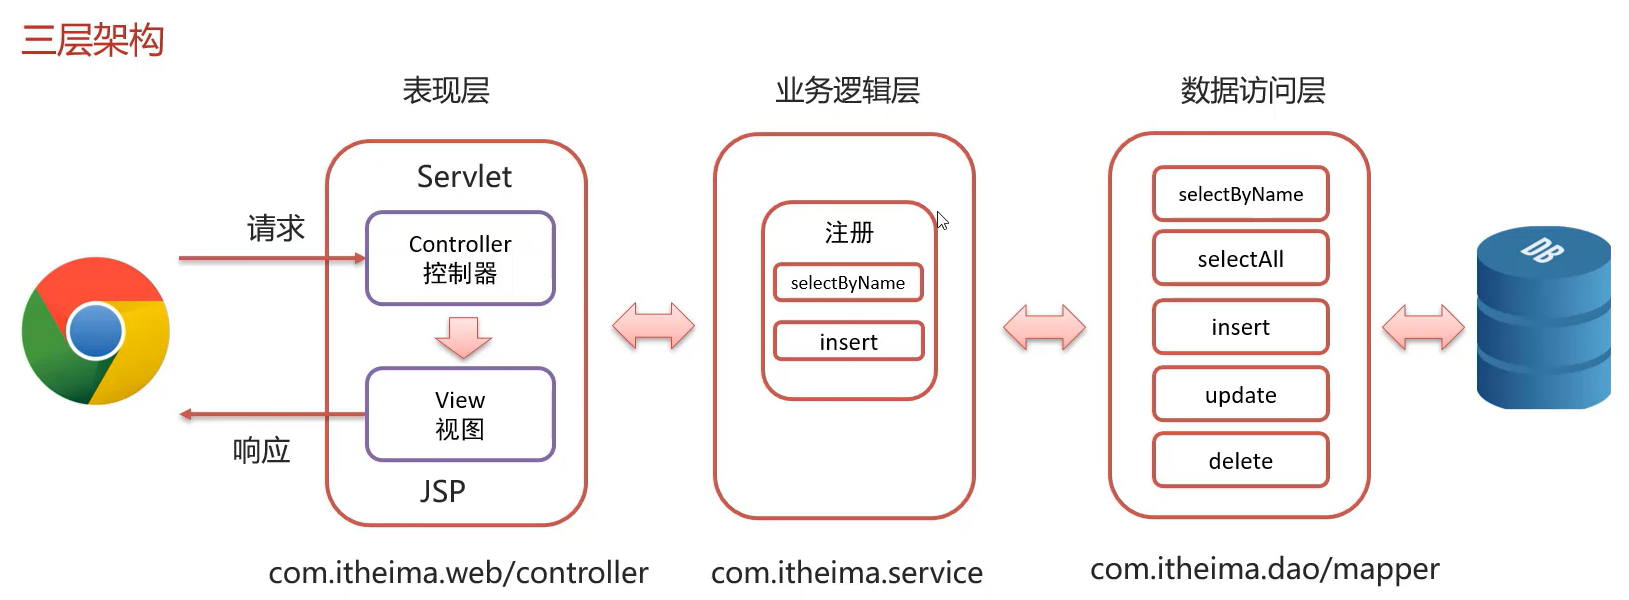
三层架构项目结构
依次分别为:
- 数据访问层
- 业务逻辑层
- 表现层(控制器+视图)
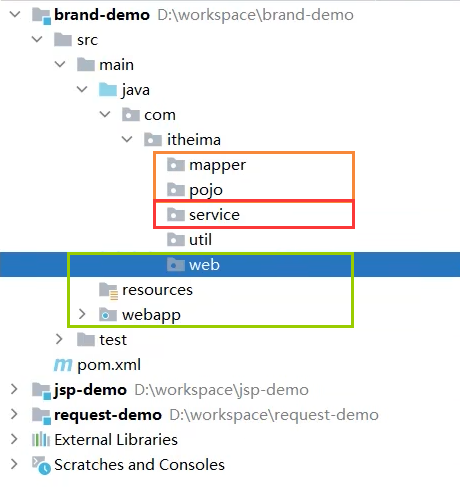
SSM三大框架
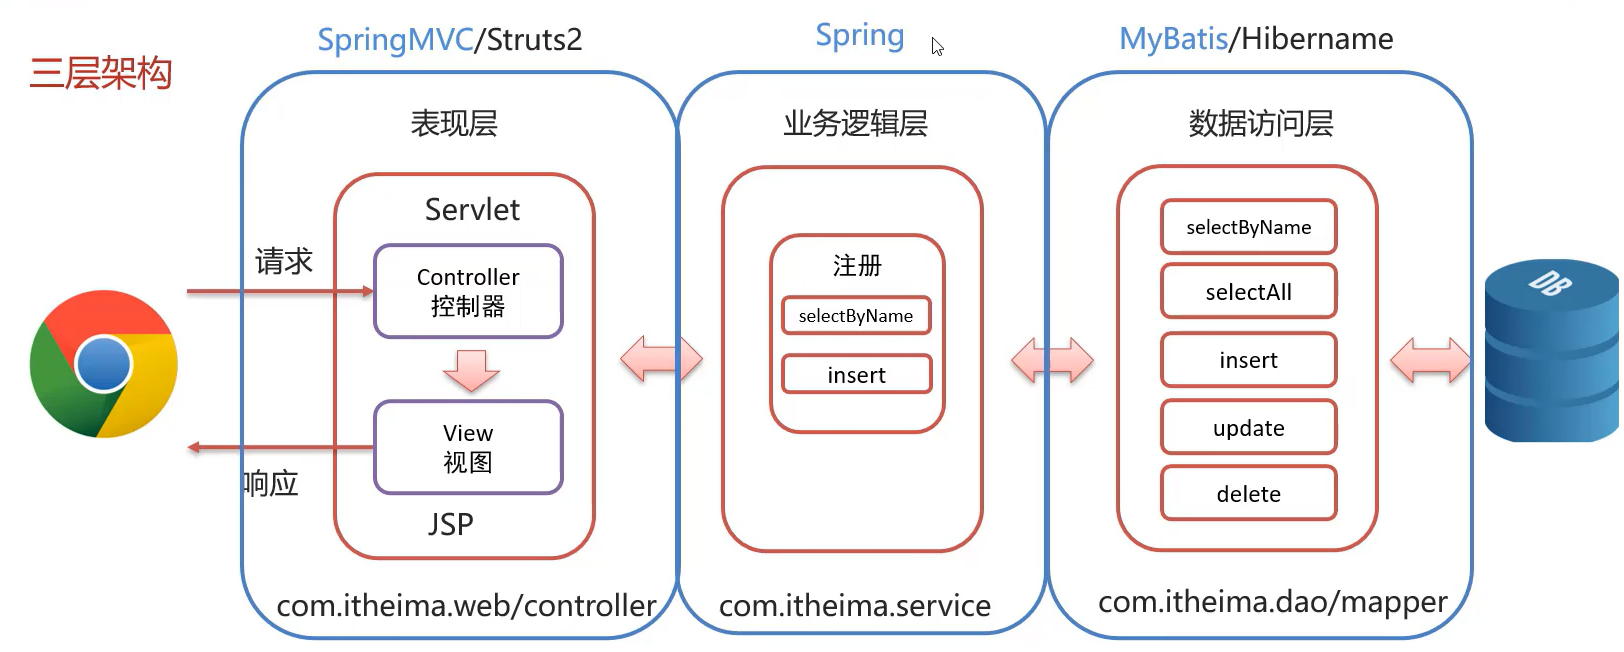
MVC三层模式与三层架构的区别
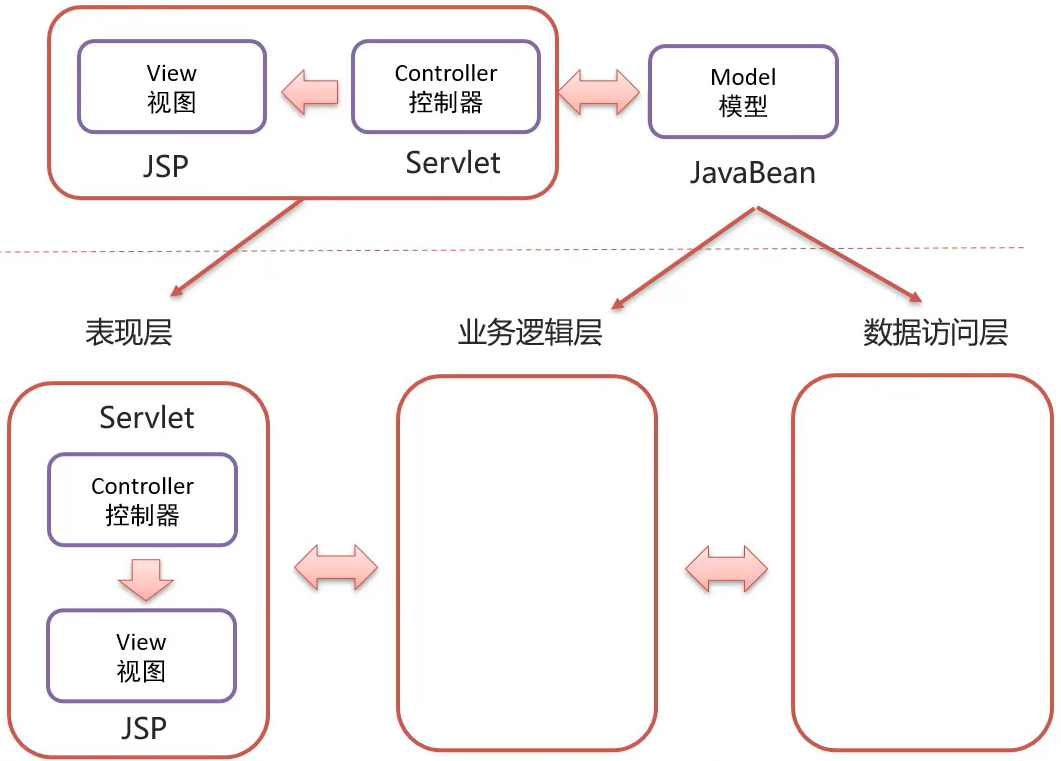
案例业务逻辑
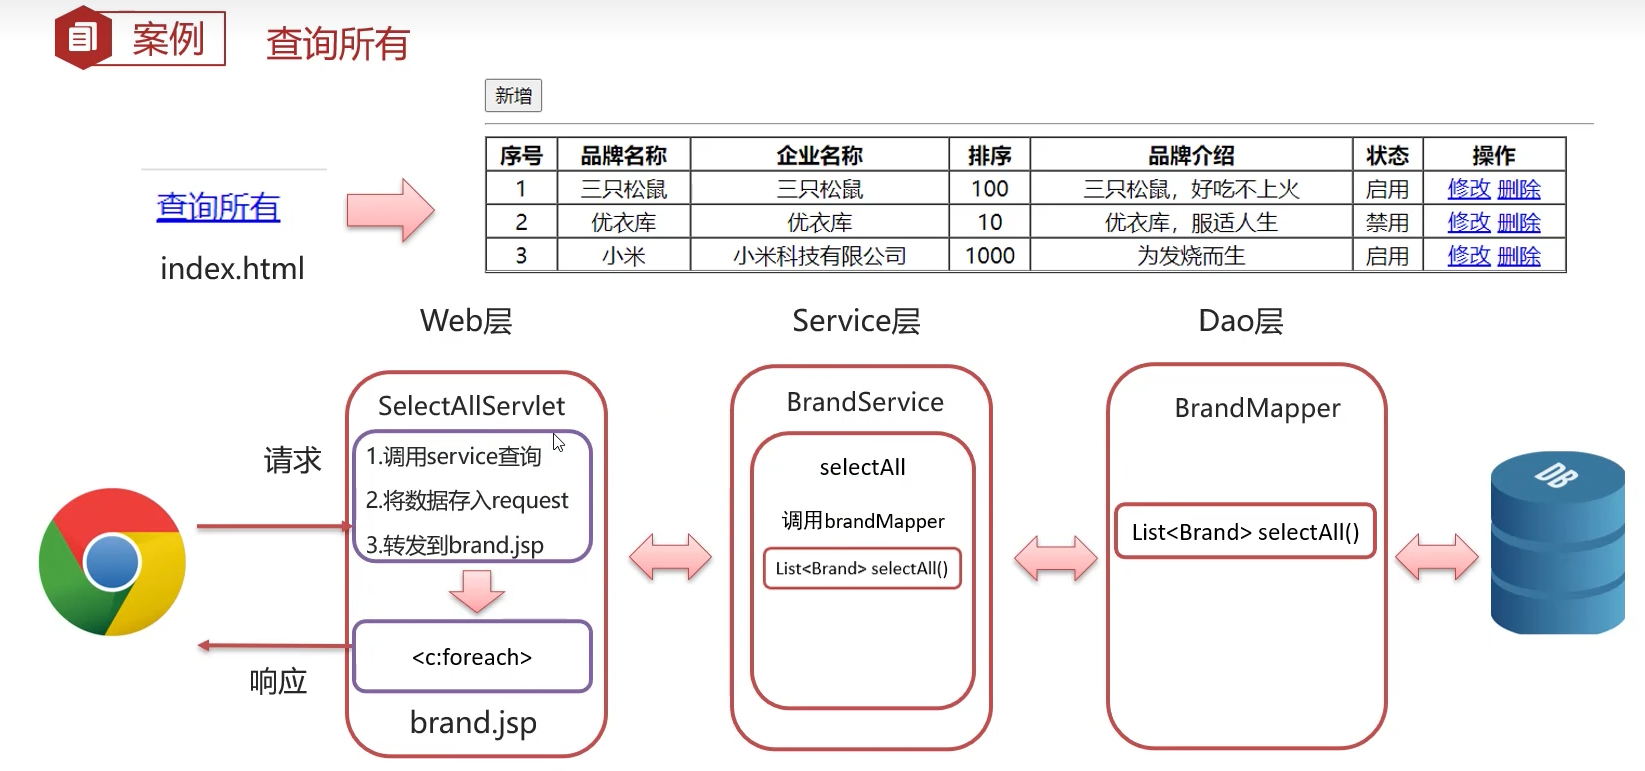
使用三层架构重写登录注册案例
项目目录结构
database 数据访问层
mybatis-config.xmlmapperpojoDBSessionPool.java单例模式的数据库池
service业务逻辑层web表现层(控制器+视图)
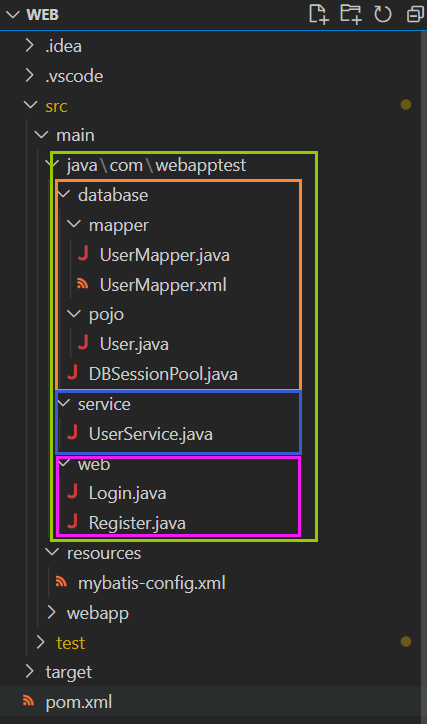
database数据访问层
database/DBSessionPool.java
package com.webapptest.database;
import java.io.IOException;
import java.io.InputStream;
import org.apache.ibatis.io.Resources;
import org.apache.ibatis.session.SqlSessionFactory;
import org.apache.ibatis.session.SqlSessionFactoryBuilder;

public class DBSessionPool {// 数据库连接池
    public static SqlSessionFactory sqlSessionFactory=null;
    public static SqlSessionFactory getSqlSessionFactory() {
        if(DBSessionPool.sqlSessionFactory==null){
            // 加载mybatis核心配置文件
            try {
                String resource = "mybatis-config.xml";
                InputStream inputStream;
                inputStream = Resources.getResourceAsStream(resource);
                DBSessionPool.sqlSessionFactory = new SqlSessionFactoryBuilder().build(inputStream);
            } catch (IOException e) {
                e.printStackTrace();
            }
        }
        return DBSessionPool.sqlSessionFactory;
    }
}
database/mapper/UserMapper.java
package com.webapptest.database.mapper;
import java.util.List;

import org.apache.ibatis.annotations.Insert;
import org.apache.ibatis.annotations.Param;
import org.apache.ibatis.annotations.Select;

import com.webapptest.database.pojo.User;

public interface UserMapper {

    List<User> selectAll();

    User selectUserById(int id);

    @Select("select * from tb_user where username = #{username} and password = #{password};")
    User selectUserByUsernameAndPassword(
        @Param("username") String username,
        @Param("password") String password
    );

    @Insert("INSERT INTO tb_user(id,username,password) values(null,#{username},#{password});")
    int addUser(User user);
}
database/mapper/UserMapper.xml
<?xml version="1.0" encoding="UTF-8" ?>
<!DOCTYPE mapper
  PUBLIC "-//mybatis.org//DTD Mapper 3.0//EN"
  "http://mybatis.org/dtd/mybatis-3-mapper.dtd">
<mapper namespace="com.webapptest.database.mapper.UserMapper">  <!-- namespace改为接口类 -->
  <select id="selectAll" resultType="com.webapptest.database.pojo.User">   <!-- id为接口的函数名 -->
    select * from tb_user;
  </select>
  <!-- selectUserById -->
  <select id="selectUserById" resultType="com.webapptest.database.pojo.User">
    select * from tb_user where id = #{id};
  </select>
</mapper>
../resources/mybatis-config.xml
<?xml version="1.0" encoding="UTF-8" ?>
<!DOCTYPE configuration
PUBLIC "-//mybatis.org//DTD Config 3.0//EN"
"http://mybatis.org/dtd/mybatis-3-config.dtd">
<configuration>
<environments default="development">
<environment id="development">
<transactionManager type="JDBC"/>
<dataSource type="POOLED">
<property name="driver" value="com.mysql.cj.jdbc.Driver"/> <!-- 填mysql的驱动的路径 -->
<property name="url" value="jdbc:mysql:///db6?useSSL=false&useServerPrepStemts=true"/> <!-- 填mysql数据库的路径 -->
<property name="username" value="root"/> <!-- 填数据库的username -->
<property name="password" value="root"/> <!-- 填数据库的password -->
</dataSource>
</environment>
</environments>
<mappers>
<package name="com.webapptest.database.mapper" /> <!-- 使用这种Mapper代理的方式便可以用这种包扫描的写法 -->
</mappers>
</configuration>
service业务逻辑层
service/UserService.java
package com.webapptest.service;
import org.apache.ibatis.session.SqlSession;
import com.webapptest.database.DBSessionPool;
import com.webapptest.database.mapper.UserMapper;
import com.webapptest.database.pojo.User;

public class UserService {
    SqlSession session = DBSessionPool.getSqlSessionFactory().openSession(false); // 获取sqlSession

    // 添加用户
    public boolean addUser(User user){
        UserMapper userMapper = session.getMapper(UserMapper.class);
        int affectedRows=0;
        try {
            affectedRows = userMapper.addUser(user);
            if(affectedRows == 1) {
                session.commit(); // 提交事务
                return true;
            }else{
                session.rollback();// 回滚事务
                return false;
            }
        } catch (Exception e) {
            session.rollback();// 回滚事务
            return false;
        } finally {
            session.close();
        }
    }
    public User checkUserExist(String username,String password){// 检查用户是否存在
        UserMapper userMapper = session.getMapper(UserMapper.class);
        return userMapper.selectUserByUsernameAndPassword(username,password);
    }
}
web表现层(控制器+视图)
web/Login.java
package com.webapptest.web;


import java.io.IOException;
import javax.servlet.ServletException;
import javax.servlet.http.HttpServlet;
import javax.servlet.http.HttpServletRequest;
import javax.servlet.http.HttpServletResponse;


import javax.servlet.annotation.WebServlet;

import com.webapptest.database.pojo.User;
import com.webapptest.service.UserService;


@WebServlet(urlPatterns = "/api/login")
public class Login extends HttpServlet {

    UserService userService = new UserService(); // 服务层

    @Override
    public void doGet(HttpServletRequest request, HttpServletResponse response) throws ServletException, IOException {
        request.setCharacterEncoding("UTF-8");
        response.setCharacterEncoding("UTF-8");

        String username = request.getParameter("username");
        String password = request.getParameter("password");

        // 调用服务层,检查用户存在
        User user = userService.checkUserExist(username, password);

        if(user!=null)
            response.getWriter().println("登录成功!");
        else
            response.getWriter().println("登录失败!");

        response.setContentType("text/html;charset=utf-8");
    }

    @Override
    public void doPost(HttpServletRequest req, HttpServletResponse resp) throws ServletException, IOException {
        this.doGet(req, resp);
    }
}
web/Register.java
package com.webapptest.web;
import java.io.IOException;

import javax.servlet.ServletException;
import javax.servlet.http.HttpServlet;
import javax.servlet.http.HttpServletRequest;
import javax.servlet.http.HttpServletResponse;


import javax.servlet.annotation.WebServlet;

import com.webapptest.database.pojo.User;
import com.webapptest.service.UserService;

@WebServlet(urlPatterns = "/api/register")
public class Register extends HttpServlet {
    UserService userService = new UserService();
    @Override
    public void doGet(HttpServletRequest request, HttpServletResponse response) throws ServletException, IOException {
        request.setCharacterEncoding("UTF-8");
        response.setCharacterEncoding("UTF-8");
        response.setContentType("text/html;charset=utf-8");


        String username = request.getParameter("username");
        String password = request.getParameter("password");

        User user = new User();
        user.setUsername(username);
        user.setPassword(password);

        Boolean result = userService.addUser(user);

        if(result)
            response.getWriter().println("注册成功!");
        else
            response.getWriter().println("注册失败!");
    }

    @Override
    public void doPost(HttpServletRequest req, HttpServletResponse resp) throws ServletException, IOException {
        this.doGet(req, resp);
    }
}
maven配置
pom.xml
<?xml version="1.0" encoding="UTF-8"?>

<project xmlns="http://maven.apache.org/POM/4.0.0" xmlns:xsi="http://www.w3.org/2001/XMLSchema-instance"
  xsi:schemaLocation="http://maven.apache.org/POM/4.0.0 http://maven.apache.org/xsd/maven-4.0.0.xsd">
  <modelVersion>4.0.0</modelVersion>

  <groupId>com.webapptest</groupId>
  <artifactId>webapptest</artifactId>
  <version>1.1-SNAPSHOT</version>
  <packaging>war</packaging>


  <name>web Maven Webapp</name>
  <!-- FIXME change it to the project's website -->
  <url>http://www.example.com</url>

  <properties>
    <project.build.sourceEncoding>UTF-8</project.build.sourceEncoding>
    <maven.compiler.source>1.7</maven.compiler.source>
    <maven.compiler.target>1.7</maven.compiler.target>
  </properties>

  <dependencies>

    <dependency>
      <groupId>javax.servlet.jsp</groupId>
      <artifactId>jsp-api</artifactId>
      <version>2.2.1-b03</version>
      <scope>provided</scope>
    </dependency>


    <dependency>
    <groupId>javax.servlet</groupId>
    <artifactId>javax.servlet-api</artifactId>
    <version>3.1.0</version>
    <scope>provided</scope>
  </dependency>


    <dependency>
      <groupId>org.mybatis</groupId>
      <artifactId>mybatis</artifactId>
      <version>3.5.11</version>
    </dependency>


    <dependency>
      <groupId>mysql</groupId>
      <artifactId>mysql-connector-java</artifactId>
      <version>8.0.31</version>
    </dependency>


    <dependency>
      <groupId>org.apache.tomcat</groupId>
      <artifactId>tomcat</artifactId>
      <version>10.1.2</version>
      <type>pom</type>
    </dependency>

    <dependency>
      <groupId>junit</groupId>
      <artifactId>junit</artifactId>
      <version>4.11</version>
      <scope>test</scope>
    </dependency>

  </dependencies>

  <build>
    <finalName>web</finalName>
    <plugins>
      <plugin>
        <groupId>org.apache.tomcat.maven</groupId>
        <artifactId>tomcat7-maven-plugin</artifactId>
        <version>2.2</version>
        <configuration>
          <port>8080</port>
          <path>/</path>
        </configuration>
      </plugin>
    </plugins>

    <pluginManagement><!-- lock down plugins versions to avoid using Maven defaults (may be moved to parent pom) -->
      <plugins>
        <plugin>
          <artifactId>maven-clean-plugin</artifactId>
          <version>3.1.0</version>
        </plugin>
        <!-- see http://maven.apache.org/ref/current/maven-core/default-bindings.html#Plugin_bindings_for_war_packaging -->
        <plugin>
          <artifactId>maven-resources-plugin</artifactId>
          <version>3.0.2</version>
        </plugin>
        <plugin>
          <artifactId>maven-compiler-plugin</artifactId>
          <version>3.8.0</version>
        </plugin>
        <plugin>
          <artifactId>maven-surefire-plugin</artifactId>
          <version>2.22.1</version>
        </plugin>
        <plugin>
          <artifactId>maven-war-plugin</artifactId>
          <version>3.2.2</version>
        </plugin>
        <plugin>
          <artifactId>maven-install-plugin</artifactId>
          <version>2.5.2</version>
        </plugin>
        <plugin>
          <artifactId>maven-deploy-plugin</artifactId>
          <version>2.8.2</version>
        </plugin>
      </plugins>
    </pluginManagement>
  </build>
</project>
如果任何一个方法都写一个Servelet实现类,代码会变的很臃肿
在Web表现层根据请求的URL直接调用service业务逻辑层的方法
自定义BaseServlet,根据浏览器请求的URL路径完成处理函数的调用
优化后目录结构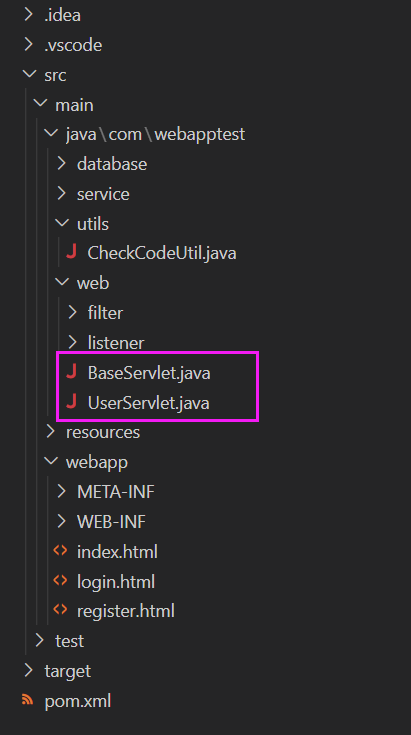
优化后登录界面及响应结果JSON结果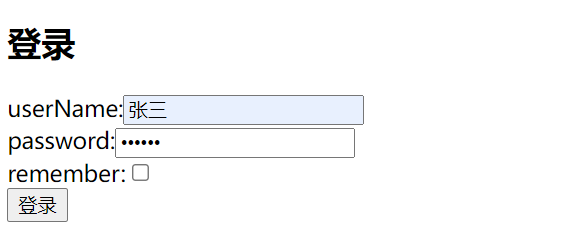
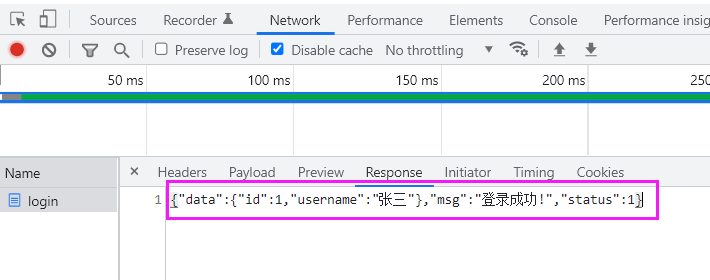
优化后注册界面及响应结果JSON结果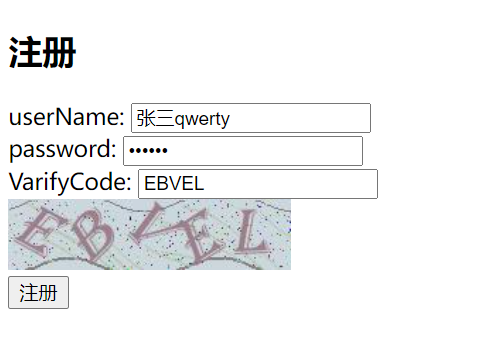

login.html
<!DOCTYPE html>
<html lang="en">
<head>
    <meta charset="UTF-8">
    <meta http-equiv="X-UA-Compatible" content="IE=edge">
    <meta name="viewport" content="width=device-width, initial-scale=1.0">
    <title>Document</title>
</head>
<body>
    <h2>登录</h2>
    <form action="/api/user/login" method="post">
        userName:<input type="text" name="username"> <br>
        password:<input type="password" name="password"> <br>
        remember:<input type="checkbox" name="remember" value="true"> <br>
        <input type="submit" value="登录">
    </form>
</body>
</html>
register.html
<!DOCTYPE html>
<html lang="en">
<head>
    <meta charset="UTF-8">
    <meta http-equiv="X-UA-Compatible" content="IE=edge">
    <meta name="viewport" content="width=device-width, initial-scale=1.0">
    <title>Document</title>
</head>
<body>
    <h2>注册</h2>
    <form action="/api/user/register" method="post">
        userName: <input type="text" name="username"> <br>
        password: <input type="password" name="password"> <br>
        VarifyCode: <input type="text" name="VarifyCode" > <br>
        <img src="/api/user/getVerifytImage" alt="" style="width: 200px;height: 50px;"> <br>
        <input type="submit" value="注册">
    </form>
</body>
</html>
BaseServlet.java
package com.webapptest.web;

import java.io.IOException;
import java.lang.reflect.Method;

import javax.servlet.ServletException;
import javax.servlet.http.HttpServlet;
import javax.servlet.http.HttpServletRequest;
import javax.servlet.http.HttpServletResponse;

public class BaseServlet extends HttpServlet {
    @Override
    protected void service(HttpServletRequest req, HttpServletResponse resp) {
        String uriString = req.getRequestURI(); // 获取URI: /user/login
        int supliceIndex = uriString.lastIndexOf("/"); // 找到最后一个/符号的位置
        String methodName = uriString.substring(supliceIndex+1); //获取方法名: login

        try {// 通过反射获取这个方法,并执行这个方法
            Method method = this.getClass().getDeclaredMethod(methodName,HttpServletRequest.class,HttpServletResponse.class);
            method.invoke(this, req,resp);
        } catch (Exception e) {
            e.printStackTrace();
        }
        System.out.println("BaseServlet的service被调用了");
    }
}
UserServlet.java
package com.webapptest.web;

import java.io.IOException;

import javax.servlet.annotation.WebServlet;
import javax.servlet.http.HttpServletRequest;
import javax.servlet.http.HttpServletResponse;

import com.alibaba.fastjson.JSON;
import com.webapptest.database.pojo.User;
import com.webapptest.service.UserService;
import com.webapptest.utils.CheckCodeUtil;

// 当浏览器访问 /api/user/login 时,
// 会由 BaseServlet 的 service 函数 找到子类的 login 这个函数,然后执行他
@WebServlet("/api/user/*")
public class UserServlet extends BaseServlet{
    UserService userService = new UserService(); // 服务层
    public void login(HttpServletRequest request,HttpServletResponse response ) throws IOException{

        request.setCharacterEncoding("UTF-8");
        response.setCharacterEncoding("UTF-8");
        response.setContentType("text/html;charset=utf-8");

        String username = request.getParameter("username");
        String password = request.getParameter("password");

        // 调用服务层,检查用户存在
        User user = userService.checkUserExist(username, password);

        ResponseData responseData = new ResponseData();
        if(user!=null){
            responseData.setStatus(1);
            responseData.setMsg("登录成功!");
            user.setPassword(null);// 清除密码信息
            responseData.setData(user);// 把user对象传递过去
        }
        else{
            responseData.setStatus(0);
            responseData.setMsg("登录失败!");
        }
        response.getWriter().write(JSON.toJSONString(responseData));// 响应数据

        System.out.println("UserServlet的login被调用了");
    }
    // 获取注册用户时需要的验证码图片
    public void getVerifytImage(HttpServletRequest request,HttpServletResponse response) throws IOException{
        // 生成5位的随机验证码,并保存到session中
        String VarifyCode = CheckCodeUtil.generateVerifyCode(5);
        request.getSession().setAttribute("VarifyCode", VarifyCode);
        // 生成图片返回给浏览器
        CheckCodeUtil.outputImage(200, 50, response.getOutputStream(), VarifyCode);
        System.out.println("UserServlet的getVerifytImage被调用了");
    }
    // 注册用户
    public void register(HttpServletRequest request,HttpServletResponse response) throws IOException{
        request.setCharacterEncoding("UTF-8");
        response.setCharacterEncoding("UTF-8");
        response.setContentType("text/html;charset=utf-8");

        String username = request.getParameter("username");
        String password = request.getParameter("password");
        String VarifyCode = request.getParameter("VarifyCode"); // 从浏览器得到的VarifyCode
        String VarifyCode_inSession = (String) request.getSession().getAttribute("VarifyCode");// 从session中获得的VarifyCode

        User user = new User();
        user.setUsername(username);
        user.setPassword(password);

        ResponseData responseData = new ResponseData();

        if( VarifyCode.equalsIgnoreCase(VarifyCode_inSession) == false) // 忽略大小写的比对
        {
            responseData.setStatus(1);
            responseData.setMsg("注册失败!,验证码错误。");
            response.getWriter().write(JSON.toJSONString(responseData));
            return;
        }

        Boolean result = userService.addUser(user);

        if(result){
            responseData.setStatus(1);
            responseData.setMsg("注册成功!");
        }
        else{
            responseData.setStatus(0);
            responseData.setMsg("注册失败!");
        }
        response.getWriter().write(JSON.toJSONString(responseData));

        System.out.println("UserServlet的register被调用了");
    }
    private class ResponseData{
        int status;
        String msg;
        Object data;
        public int getStatus() {
            return status;
        }
        public void setStatus(int status) {
            this.status = status;
        }
        public String getMsg() {
            return msg;
        }
        public void setMsg(String msg) {
            this.msg = msg;
        }
        public Object getData() {
            return data;
        }
        public void setData(Object data) {
            this.data = data;
        }

    }
}
Fastjson:JSON 数据和 Java 对象转换
Fastjson是阿里巴巴提供的一个Java语言编写的高性能功能完善的JSON库,是目前Java语言中最快的JSON库,可以实现Java对象和JSON字符串的相互转换。
<dependency>
  <groupld>com.alibaba</groupld>
  <artifactld>fastjson</artifactld>
  <version>1.2.62</version>
</dependency>
User user = new User();
user.setUsername("admin");
user.setPassword("123456");

// 将java对象 转 json字符串
String jsonStr = JSON.toJSONString(obj);

// 将json字符串 转 java对象
User user = JSON.parseObject(jsonStr,User.class);
Cookie、Session会话跟踪技术
简单来说,就是用来解决http协议无状态性的,
用来让服务端与客户端能在多次请求间共享数据
可以让服务端能够识别两次不同的请求是否为同一身份的用户
可用来做身份验证
实现方式:
- 客户端会话跟踪技术:Cookie
- 服务端会话跟踪技术:Session
Cookie
Cookie基本使用和原理
在服务端发送cookie
服务端发送 cookie 给浏览器 基于http协议,
保存在响应头的setCookie字段中
浏览器会自动保存cookie
package com.webapptest.web;

import java.io.IOException;

import javax.servlet.ServletException;
import javax.servlet.annotation.WebServlet;
import javax.servlet.http.Cookie;
import javax.servlet.http.HttpServlet;
import javax.servlet.http.HttpServletRequest;
import javax.servlet.http.HttpServletResponse;

@WebServlet("/api/getCookie")
public class GetCookie extends HttpServlet{
    @Override
    protected void doGet(HttpServletRequest req, HttpServletResponse resp) throws ServletException, IOException {
        // 发送cookie
        resp.addCookie(new Cookie("key", "value"));
    }
}
在客户端发送所有收到的cookie
浏览器发送 cookie 给服务器 基于http协议,
保存在请求头的Cookie字段中
浏览器会自动发送所有cookie
package com.webapptest.web;

import java.io.IOException;

import javax.servlet.ServletException;
import javax.servlet.annotation.WebServlet;
import javax.servlet.http.Cookie;
import javax.servlet.http.HttpServlet;
import javax.servlet.http.HttpServletRequest;
import javax.servlet.http.HttpServletResponse;

@WebServlet("/api/sendCookie")
public class SendCookie extends HttpServlet{
    @Override
    protected void doGet(HttpServletRequest req, HttpServletResponse resp) throws ServletException, IOException {
        Cookie[] cookies = req.getCookies();
        for (Cookie cookie : cookies) {
            System.out.println(cookie.getName()+":"+cookie.getValue());
        }
    }
}
Cookie存活时间
cookie存活时间
- 默认情况下,服务端发来的cookie,浏览器会保存在内存中,浏览器关闭后cookie销毁
- 服务端可以通过
setMaxAge(int seconds)设置发送的cookie的存活时间- 正数:将cookie存入浏览器所在电脑
硬盘,持久化存储,过期自动销毁 - 0:
即刻删除浏览器所在电脑中对应字段的值 - 负数:默认值,存入浏览器所在电脑的
内存,关闭浏览器后自动销毁
- 正数:将cookie存入浏览器所在电脑
Cookie默认不支持存储中文
- 但可在发送是使用URL来编码,收到后再编码会中文
Cookie发送中文
发送中文
package com.webapptest.web;

import java.io.IOException;
import java.net.URLEncoder;
import java.nio.charset.StandardCharsets;

import javax.servlet.ServletException;
import javax.servlet.annotation.WebServlet;
import javax.servlet.http.Cookie;
import javax.servlet.http.HttpServlet;
import javax.servlet.http.HttpServletRequest;
import javax.servlet.http.HttpServletResponse;

@WebServlet("/api/getCookie")
public class GetCookie extends HttpServlet{

    @Override
    protected void doGet(HttpServletRequest req, HttpServletResponse resp) throws ServletException, IOException {
        // 发送cookie
        Cookie cookie = new Cookie("key", URLEncoder.encode("中文", StandardCharsets.UTF_8));
        cookie.setMaxAge(3600);// 设置过期时间
        resp.addCookie(cookie);
    }
}
接收中文
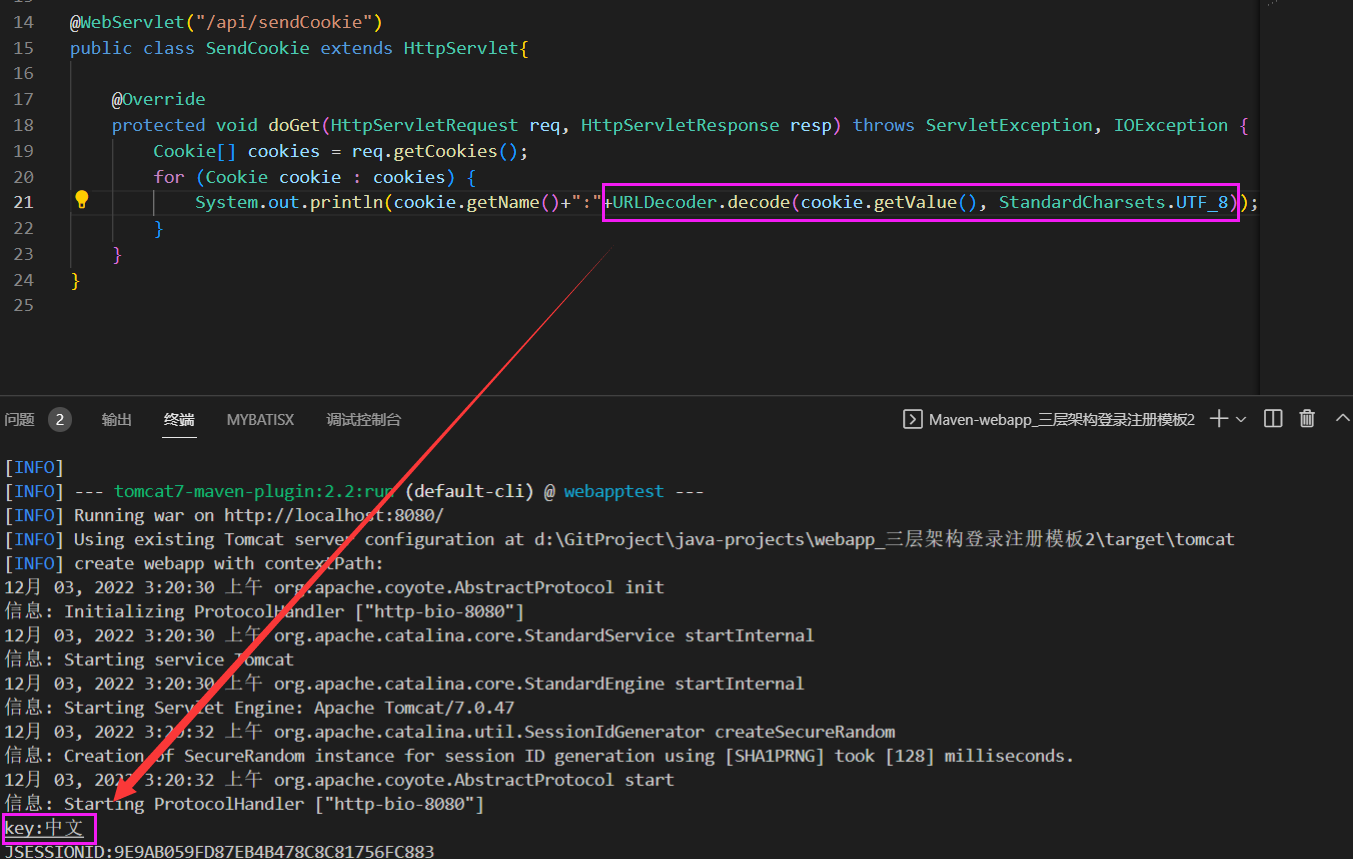
package com.webapptest.web;

import java.io.IOException;
import java.net.URLDecoder;
import java.nio.charset.StandardCharsets;

import javax.servlet.ServletException;
import javax.servlet.annotation.WebServlet;
import javax.servlet.http.Cookie;
import javax.servlet.http.HttpServlet;
import javax.servlet.http.HttpServletRequest;
import javax.servlet.http.HttpServletResponse;

@WebServlet("/api/sendCookie")
public class SendCookie extends HttpServlet{

    @Override
    protected void doGet(HttpServletRequest req, HttpServletResponse resp) throws ServletException, IOException {
        Cookie[] cookies = req.getCookies();
        for (Cookie cookie : cookies) {
            System.out.println(cookie.getName()+":"+URLDecoder.decode(cookie.getValue(), StandardCharsets.UTF_8));
        }
    }
}
Session
Session 是基于 Cookie 实现的
原理理解:浏览器第一次访问服务器后,服务器会为这个会话创建一个Session对象,存放在内存中,在这个Session对象中能够存储键值对信息,而后,服务器响应浏览器,并在响应头的Cookie中附带这个SessionID,浏览器第二次访问服务器时,会在响应头的Cookie字段中自动携带这个SessionID,服务器通过这个SessionID去内存中寻找这个Session,就能获取到上一次在Session中存储的信息
浏览器第一次访问服务器时,服务器自动创建Session对象并在响应头中携带该Session的ID
package com.webapptest.web;
import java.io.IOException;
import java.net.URLEncoder;
import java.nio.charset.StandardCharsets;
import javax.servlet.ServletException;
import javax.servlet.annotation.WebServlet;
import javax.servlet.http.Cookie;
import javax.servlet.http.HttpServlet;
import javax.servlet.http.HttpServletRequest;
import javax.servlet.http.HttpServletResponse;
import javax.servlet.http.HttpSession;
@WebServlet("/api/GetSession")
public class GetSession extends HttpServlet{
@Override
protected void doGet(HttpServletRequest req, HttpServletResponse resp) throws ServletException, IOException {
HttpSession session = req.getSession();
System.out.println(session.getAttribute("测试"));
}
}
浏览器第二次访问服务器时,浏览器自动通过Cookie携带Session的ID,服务器根据该SessionID从内存中找出该Session
package com.webapptest.web;
import java.io.IOException;
import javax.servlet.ServletException;
import javax.servlet.annotation.WebServlet;
import javax.servlet.http.HttpServlet;
import javax.servlet.http.HttpServletRequest;
import javax.servlet.http.HttpServletResponse;
import javax.servlet.http.HttpSession;
@WebServlet("/api/SendSession")
public class SendSession extends HttpServlet{
@Override
protected void doGet(HttpServletRequest req, HttpServletResponse resp) throws ServletException, IOException {
HttpSession session = req.getSession();
session.setAttribute("测试", "Session测试");
}
}
Session的钝化与活化
服务器重启后,Session中的数据是否还在?
- 钝化:在服务器
正常关闭后,Tomcat会自动将Session数据写入硬盘的文件中(对象序列化) - 活化:再次启动服务器后,从文件中加载数据到Session中,然后文件会被删除
Session在浏览器的生命周期
- 默认为关闭浏览器窗口便自动销毁。
- 若生命周期有延长,需在服务端指定
Session在服务端的生命周期
默认为30分钟,可在web.xml 或tomcat的默认配置文件中修改
<!DOCTYPE web-app PUBLIC "-//Sun Microsystems, Inc.//DTD Web Application 2.3//EN"
"http://java.sun.com/dtd/web-app_2_3.dtd">
<web-app>
<display-name>Archetype Created Web Application</display-name>
<session-config>
<session-timeout>30</session-timeout>
</session-config>
</web-app>
手动销毁
package com.webapptest.web;
import java.io.IOException;
import java.net.URLEncoder;
import java.nio.charset.StandardCharsets;
import javax.servlet.ServletException;
import javax.servlet.annotation.WebServlet;
import javax.servlet.http.Cookie;
import javax.servlet.http.HttpServlet;
import javax.servlet.http.HttpServletRequest;
import javax.servlet.http.HttpServletResponse;
import javax.servlet.http.HttpSession;
@WebServlet("/api/GetSession")
public class GetSession extends HttpServlet{
@Override
protected void doGet(HttpServletRequest req, HttpServletResponse resp) throws ServletException, IOException {
HttpSession session = req.getSession();
session.invalidate();// 销毁该session
System.out.println(session.getAttribute("测试"));
}
}
实现登录记住我功能:通过Cookie实现
在页面中提供记住我remember选项
<!DOCTYPE html>
<html lang="en">
<head>
<meta charset="UTF-8">
<meta http-equiv="X-UA-Compatible" content="IE=edge">
<meta name="viewport" content="width=device-width, initial-scale=1.0">
<title>Document</title>
</head>
<body>
<h2>登录</h2>
<form action="/api/login" method="post">
userName:<input type="text" name="username"> <br>
password:<input type="password" name="password"> <br>
remember:<input type="checkbox" name="remember" value="true"> <br>
<input type="submit" value="登录">
</form>
</body>
</html>
处理登录业务,同时处理remember业务逻辑,打钩则生成cookie,发送给客户端
package com.webapptest.web;
import java.io.IOException;
import java.net.URLEncoder;
import java.nio.charset.StandardCharsets;
import javax.servlet.ServletException;
import javax.servlet.http.Cookie;
import javax.servlet.http.HttpServlet;
import javax.servlet.http.HttpServletRequest;
import javax.servlet.http.HttpServletResponse;
import javax.servlet.annotation.WebServlet;
import com.webapptest.database.pojo.User;
import com.webapptest.service.UserService;
@WebServlet(urlPatterns = "/api/login")
public class Login extends HttpServlet {
UserService userService = new UserService(); // 服务层
@Override
public void doGet(HttpServletRequest request, HttpServletResponse response) throws ServletException, IOException {
request.setCharacterEncoding("UTF-8");
response.setCharacterEncoding("UTF-8");
response.setContentType("text/html;charset=utf-8");
String username = request.getParameter("username");
String password = request.getParameter("password");
String remember = request.getParameter("remember");
// 调用服务层,检查用户存在
User user = userService.checkUserExist(username, password);
//---------------------------------------------------------------------------------
if(user!=null){
response.getWriter().println("登录成功!");
if("true".equals(remember)){ // 如果需要记住客户端,
Cookie cusername = new Cookie("username",URLEncoder.encode(username,StandardCharsets.UTF_8)); // 用户名密码,统一URL编码
Cookie cpassword = new Cookie("password",URLEncoder.encode(password,StandardCharsets.UTF_8)); // 用户名密码,统一URL编码
cusername.setMaxAge(60*60*24);
cpassword.setMaxAge(60*60*24);
cusername.setPath("/"); // 作用域
cpassword.setPath("/"); // 作用域
response.addCookie(cusername);
response.addCookie(cpassword);
}
}
//---------------------------------------------------------------------------------
else
response.getWriter().println("登录失败!");
}
@Override
public void doPost(HttpServletRequest req, HttpServletResponse resp) throws ServletException, IOException {
this.doGet(req, resp);
}
}
后续的登录逻辑,用户访问
/login如果能从用户的cookie中找到用户名密码,直接登录,否则内部跳转到/login.html页面
package com.webapptest.web;
import java.io.IOException;
import java.net.URLDecoder;
import java.nio.charset.StandardCharsets;
import javax.servlet.ServletException;
import javax.servlet.http.Cookie;
import javax.servlet.http.HttpServlet;
import javax.servlet.http.HttpServletRequest;
import javax.servlet.http.HttpServletResponse;
import javax.servlet.annotation.WebServlet;
import com.webapptest.database.pojo.User;
import com.webapptest.service.UserService;
@WebServlet(urlPatterns = "/login")
public class Login_Rdirector extends HttpServlet {
UserService userService = new UserService(); // 服务层
@Override
public void doGet(HttpServletRequest request, HttpServletResponse response) throws ServletException, IOException {
request.setCharacterEncoding("UTF-8");
response.setCharacterEncoding("UTF-8");
response.setContentType("text/html;charset=utf-8");
String username=null;
String password=null;
//---------------------------------------------------------------------------------
Cookie[] cookies = request.getCookies(); // 从客户端cookie中提取用户名和密码信息
for (Cookie cookie : cookies) {
if(cookie.getName().equals("username"))
username = URLDecoder.decode(cookie.getValue(), StandardCharsets.UTF_8); // 解码URL用户名
if(cookie.getName().equals("password"))
password = URLDecoder.decode(cookie.getValue(), StandardCharsets.UTF_8); // 解码URL密码
}
//---------------------------------------------------------------------------------
System.out.println(username);
System.out.println(password);
// 调用服务层,检查用户存在
User user = userService.checkUserExist(username, password);
if(user!=null)
response.getWriter().println("登录成功!"); // 如果存在,直接回复登陆成功
else
request.getRequestDispatcher("/login.html").forward(request, response); // 如果不存在,内部流转到登录页面
}
@Override
public void doPost(HttpServletRequest req, HttpServletResponse resp) throws ServletException, IOException {
this.doGet(req, resp);
}
}
实现登录记住我功能:通过Session实现
package com.webapptest.web;
import java.io.IOException;
import java.net.URLDecoder;
import java.nio.charset.StandardCharsets;
import javax.servlet.ServletException;
import javax.servlet.http.Cookie;
import javax.servlet.http.HttpServlet;
import javax.servlet.http.HttpServletRequest;
import javax.servlet.http.HttpServletResponse;
import javax.servlet.http.HttpSession;
import javax.servlet.annotation.WebServlet;
import com.webapptest.database.pojo.User;
import com.webapptest.service.UserService;
@WebServlet(urlPatterns = "/login")
public class Login_Rdirector extends HttpServlet {
UserService userService = new UserService(); // 服务层
@Override
public void doGet(HttpServletRequest request, HttpServletResponse response) throws ServletException, IOException {
request.setCharacterEncoding("UTF-8");
response.setCharacterEncoding("UTF-8");
response.setContentType("text/html;charset=utf-8");
//---------------------------------------------------------------------------------
HttpSession httpSession = request.getSession();
String username=( String ) httpSession.getAttribute("username");
String password=( String ) httpSession.getAttribute("password");
//---------------------------------------------------------------------------------
System.out.println(username);
System.out.println(password);
// 调用服务层,检查用户存在
User user = userService.checkUserExist(username, password);
if(user!=null)
response.getWriter().println("登录成功!"); // 如果存在,直接回复登陆成功
else
request.getRequestDispatcher("/login.html").forward(request, response); // 如果不存在,内部流转到登录页面
}
@Override
public void doPost(HttpServletRequest req, HttpServletResponse resp) throws ServletException, IOException {
this.doGet(req, resp);
}
}
实现注册用户验证码的案例
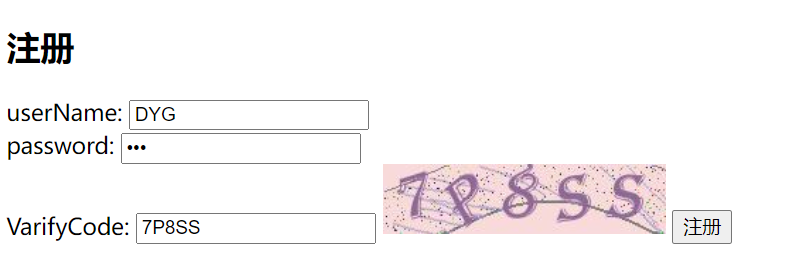

登录界面
<!DOCTYPE html>
<html lang="en">
<head>
<meta charset="UTF-8">
<meta http-equiv="X-UA-Compatible" content="IE=edge">
<meta name="viewport" content="width=device-width, initial-scale=1.0">
<title>Document</title>
</head>
<body>
<h2>注册</h2>
<form action="/api/register" method="post">
userName: <input type="text" name="username"> <br>
password: <input type="password" name="password"> <br>
<!-- --------------------------------------------------------------------- -->
VarifyCode: <input type="text" name="VarifyCode" >
<img src="/api/GetVarifyCodeImg" alt="" style="width: 200px;height: 50px;">
<!-- --------------------------------------------------------------------- -->
<input type="submit" value="注册">
</form>
</body>
</html>
获取验证码图片
核心操作生成验证码图片返回给服务端
并且要把验证码存取在服务端的session中
package com.webapptest.web;
import java.io.IOException;
import javax.servlet.ServletException;
import javax.servlet.annotation.WebServlet;
import javax.servlet.http.HttpServlet;
import javax.servlet.http.HttpServletRequest;
import javax.servlet.http.HttpServletResponse;
import com.webapptest.utils.CheckCodeUtil;
@WebServlet("/api/GetVarifyCodeImg")
public class GetVarifyCodeImg extends HttpServlet{
@Override
protected void doGet(HttpServletRequest req, HttpServletResponse resp) throws ServletException, IOException {
// 生成5位的随机验证码,并保存到session中
String VarifyCode = CheckCodeUtil.generateVerifyCode(5);
req.getSession().setAttribute("VarifyCode", VarifyCode);
// 生成200x50的图片,通过输出流返回给浏览器
CheckCodeUtil.outputImage(200, 50, resp.getOutputStream(), VarifyCode);
}
}
重写/api/register.java
要将session中的验证码和客户端收到的验证码进行比对
package com.webapptest.web;
import java.io.IOException;
import javax.servlet.ServletException;
import javax.servlet.http.HttpServlet;
import javax.servlet.http.HttpServletRequest;
import javax.servlet.http.HttpServletResponse;
import javax.servlet.annotation.WebServlet;
import com.webapptest.database.pojo.User;
import com.webapptest.service.UserService;
@WebServlet(urlPatterns = "/api/register")
public class Register extends HttpServlet {
UserService userService = new UserService();
@Override
public void doGet(HttpServletRequest request, HttpServletResponse response) throws ServletException, IOException {
request.setCharacterEncoding("UTF-8");
response.setCharacterEncoding("UTF-8");
response.setContentType("text/html;charset=utf-8");
String username = request.getParameter("username");
String password = request.getParameter("password");
String VarifyCode = request.getParameter("VarifyCode"); // 从浏览器得到的VarifyCode
// 从session中获得的VarifyCode
String VarifyCode_inSession = (String) request.getSession().getAttribute("VarifyCode");
// 忽略大小写的比对
if( VarifyCode.equalsIgnoreCase(VarifyCode_inSession) == false)
{
response.getWriter().println("注册失败!,验证码错误。");
return;
}
User user = new User();
user.setUsername(username);
user.setPassword(password);
Boolean result = userService.addUser(user);
if(result)
response.getWriter().println("注册成功!");
else
response.getWriter().println("注册失败!");
}
@Override
public void doPost(HttpServletRequest req, HttpServletResponse resp) throws ServletException, IOException {
this.doGet(req, resp);
}
}
生成验证码图片的工具类
Filter
概念
Filter表示过滤器,是JavaWeb三大组件(Servlet、Filter、Listener)之一。
拦截资源路径
Filter拦截资源路径@WebFilter("/*")- 具体资源:
/index.jsp:只有访问index.jsp时才会被拦截。 - 目录拦截:
/user/*:访问/user下的所有资源,都会被拦截 - 后缀名:
*jsp:访问后缀名为jsp的资源,都会被拦截 - 拦截所有:
/*:访问所有资源,都会被拦截
注解的优先级
注解配置的Filter,优先级按照过滤器类名(字符串)的排序
过滤器链执行流程
package com.webapptest.web.filter;
import java.io.IOException;
import javax.servlet.Filter;
import javax.servlet.FilterChain;
import javax.servlet.FilterConfig;
import javax.servlet.ServletException;
import javax.servlet.ServletRequest;
import javax.servlet.ServletResponse;
import javax.servlet.annotation.WebFilter;
import javax.servlet.http.HttpServletRequest;
import javax.servlet.http.HttpServletResponse;
@WebFilter("/login")
public class GolbleFilter implements Filter {
@Override
public void doFilter(ServletRequest request, ServletResponse response, FilterChain chain)
throws IOException, ServletException
{
HttpServletRequest httpServletRequest = (HttpServletRequest)request;
// 1.放行前,对request中的数据进行预处理
// 此处可对 httpServletRequest 处理
// 2. 放行,转交给下一个过滤器,如果已经是最后一个过滤器,则交给实际的Servlet的处理函数
chain.doFilter(request, response);
HttpServletResponse httpServletResponse = (HttpServletResponse)response;
// 3. 此时拿到的 response 是经过 过滤器和实际Servlet处理函数处理过的response
// 此处可对 httpServletResponse 处理
}
@Override
public void destroy() {
}
@Override
public void init(FilterConfig filterConfig) throws ServletException {
}
}
Listener
概念
Listener表示监听器,是JavaWeb三大组件(Servlet、Filter、Listener)之一
监听器可以监听就是在
application,session,request三个对象创建、销毁或者往其中添加修改删除属性时自动执行代码的功能组件
Listener分类
JavaWeb中提供了8个监听器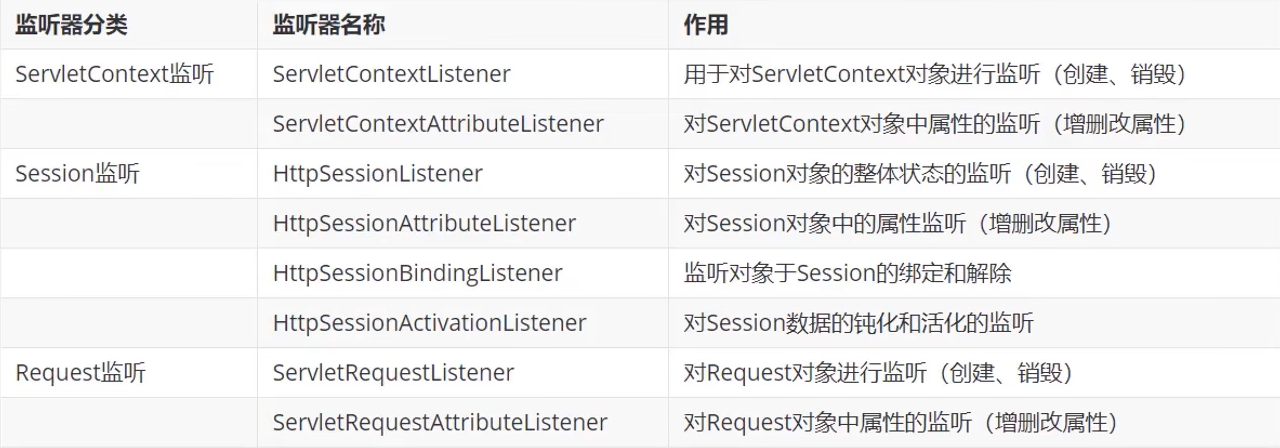
基本使用
package com.webapptest.web.filter.listener;
import javax.servlet.ServletContextEvent;
import javax.servlet.ServletContextListener;
import javax.servlet.annotation.WebListener;
@WebListener // 记得加注解
public class ServeletAppListener implements ServletContextListener { // 类名任意,关键是要实现接口,添加注解
@Override
public void contextInitialized(ServletContextEvent sce) {
System.out.println("ServeletApp启动了......");
}
@Override
public void contextDestroyed(ServletContextEvent sce) {
System.out.println("ServeletApp关闭了......");
}
}
补充:文件上传
前端写法
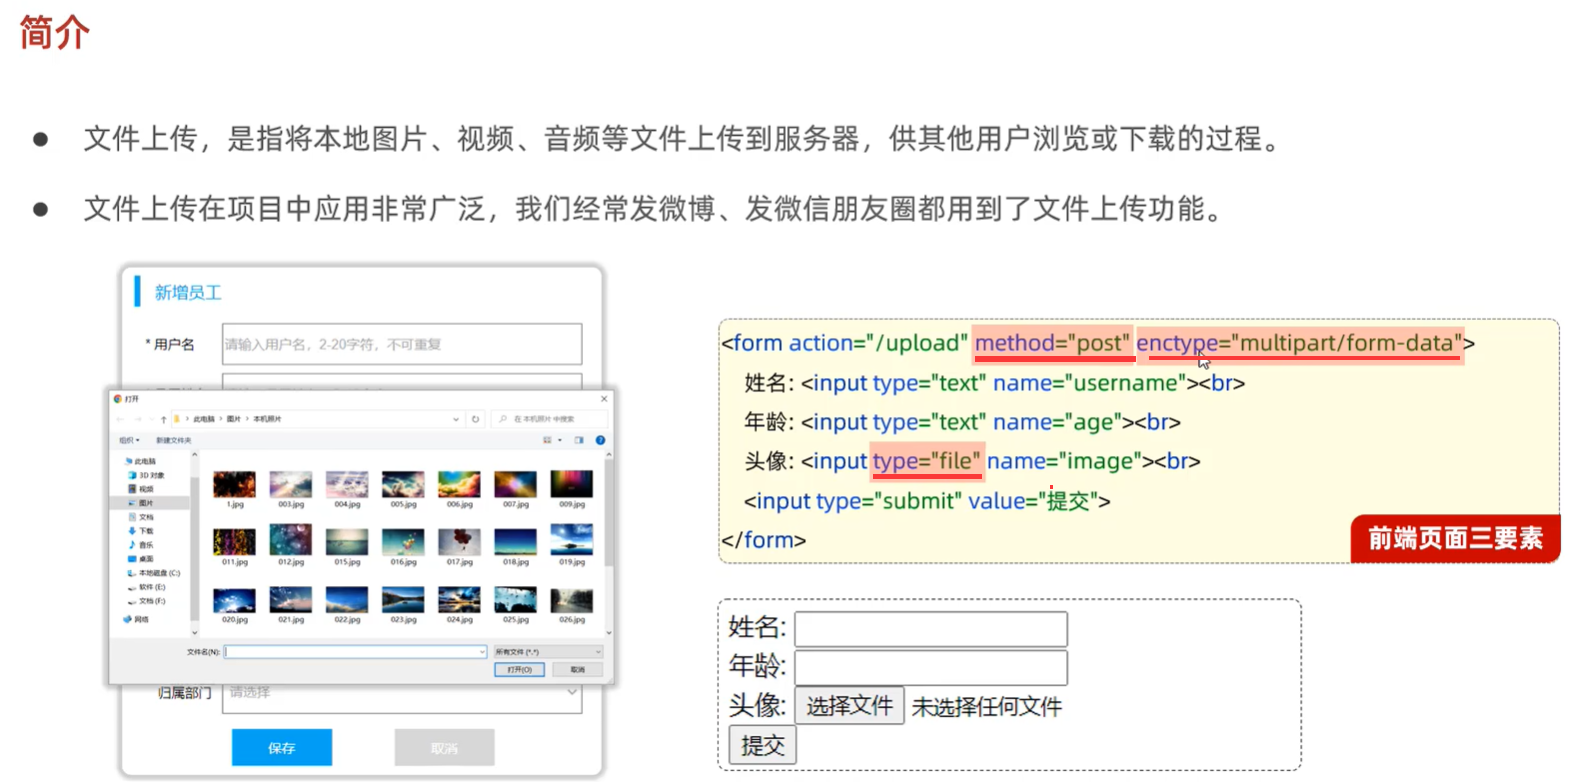
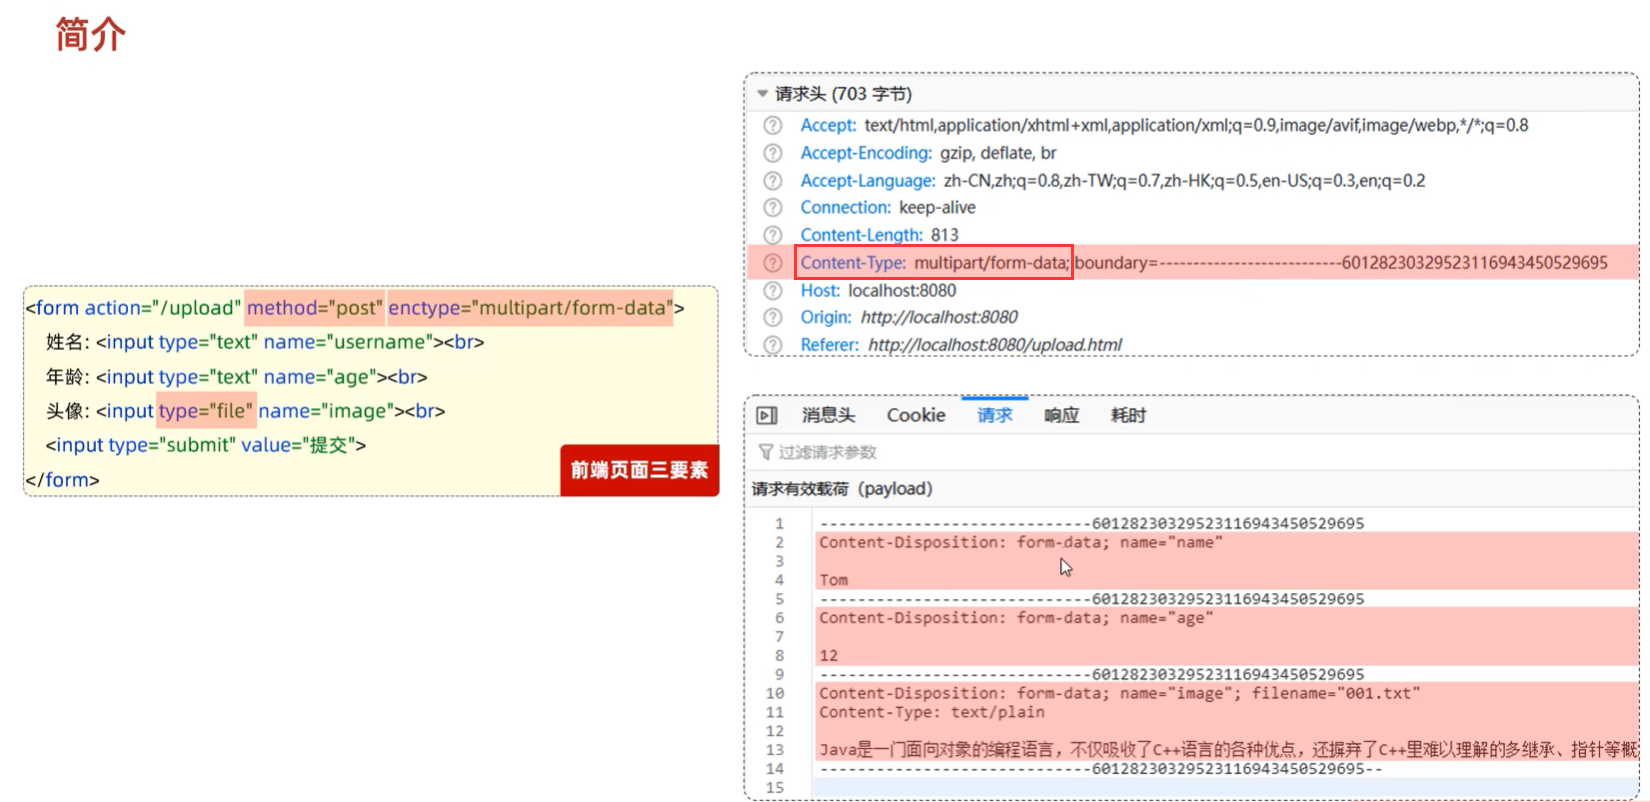
上传单个文件
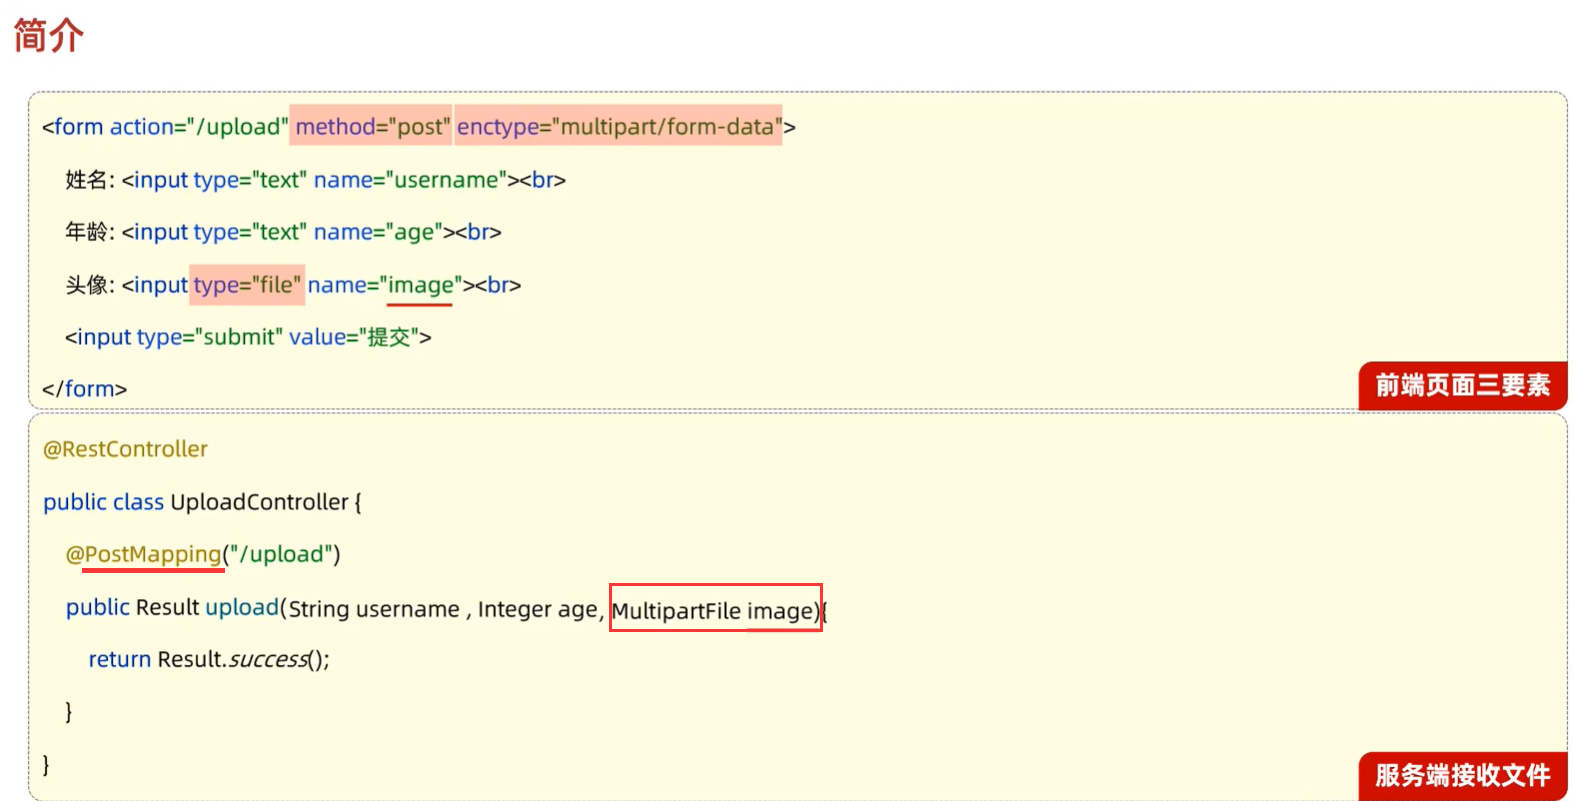
上传多个文件
写法上应该可以:
<input type="file" name="images">
<input type="file" name="images">
<input type="file" name="file2">
<input type="file" name="file3">
@PostMapping
public Result upload(MultipartFile[] images,MultipartFile file2,MultipartFile file3){
}
本地存储
ideals:
存储在本地磁盘上,比如./public下,
可以尝试存储文件名用uuid.后缀名,然后用一个file表来记录文件的:主键id,外键,原始文件名,存储文件名
给一篇文章上传附件,就是插入一条数据,insert 外键=文章id
获取一篇文章的所有附件,就是查询file表,where articleId=?
通过访问localhost/public/存储文件名来获取原始文件
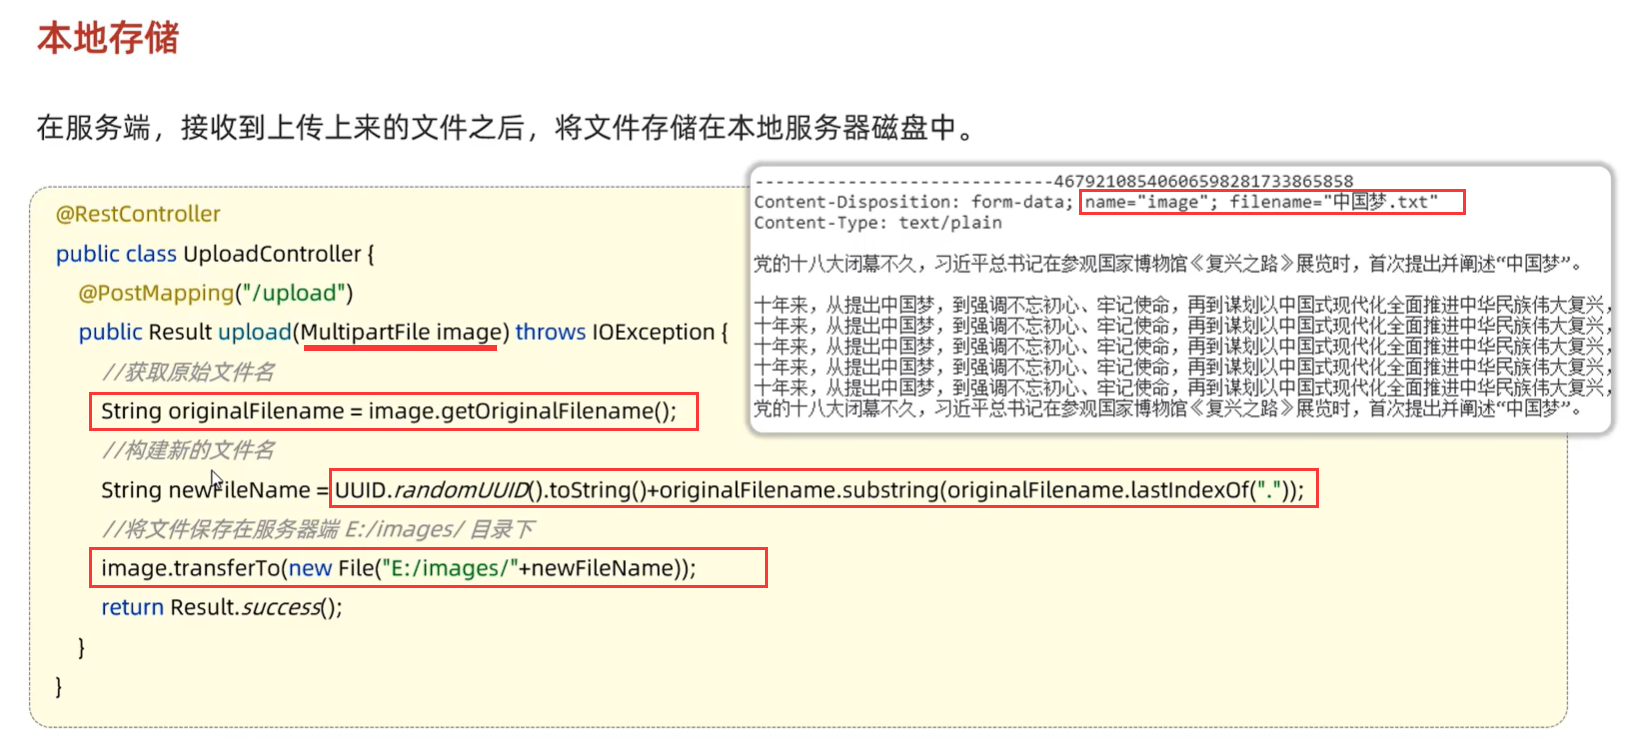
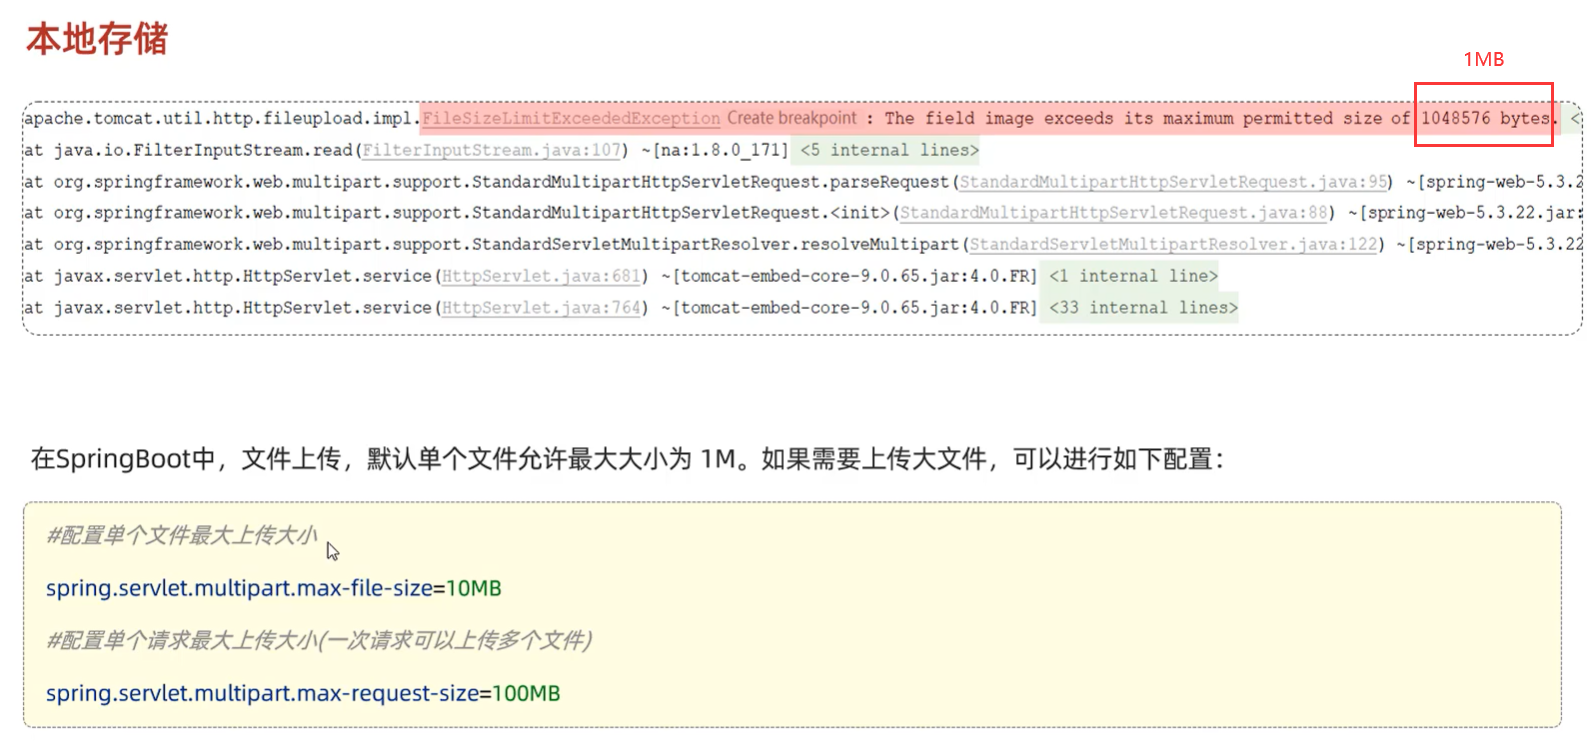
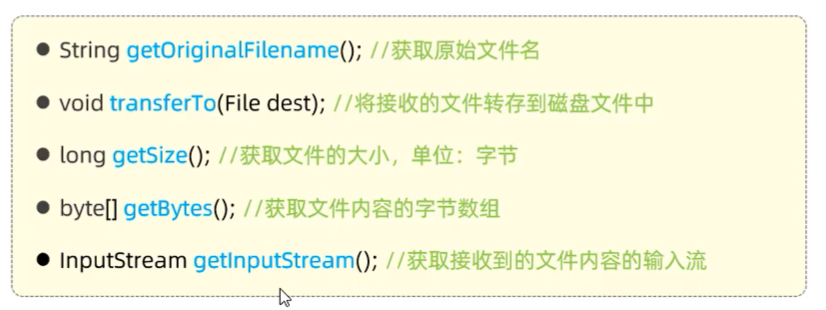
远程存储
直接看阿里云的OSS存储相关文档
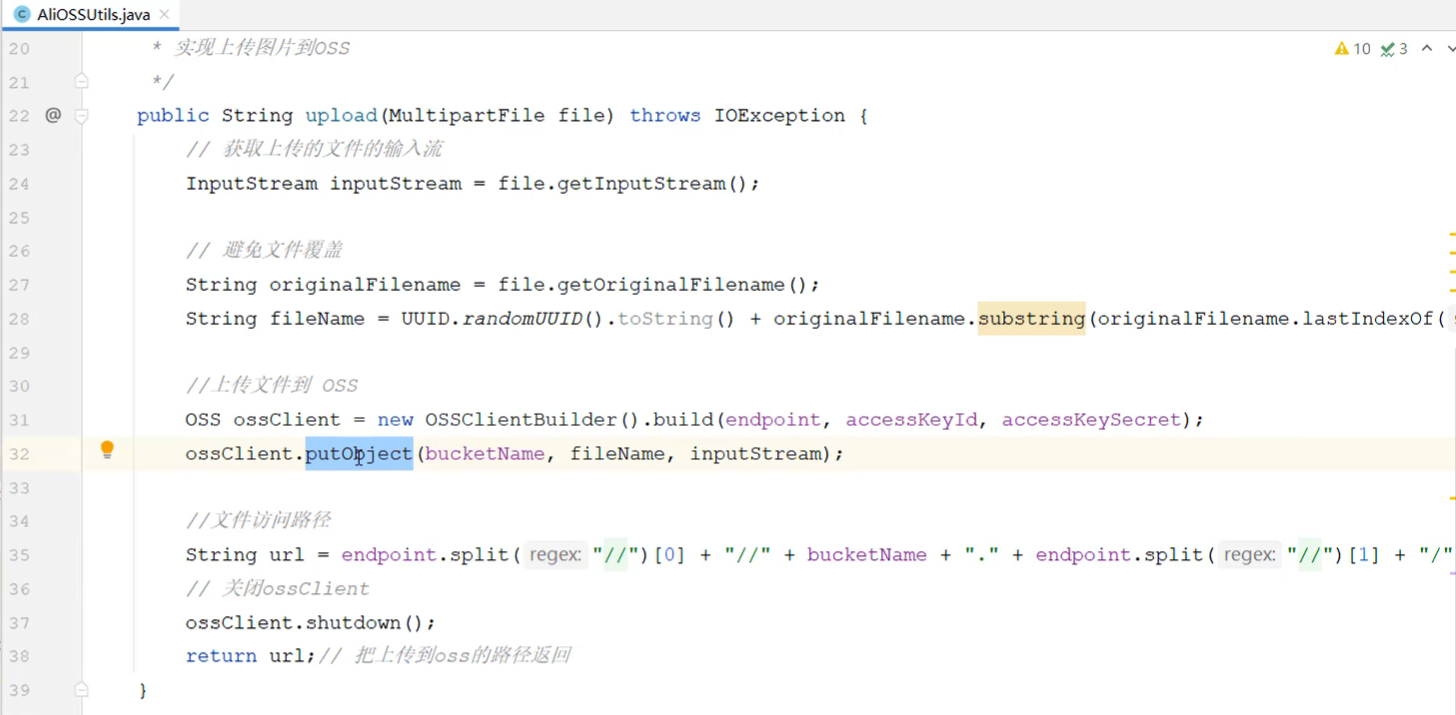
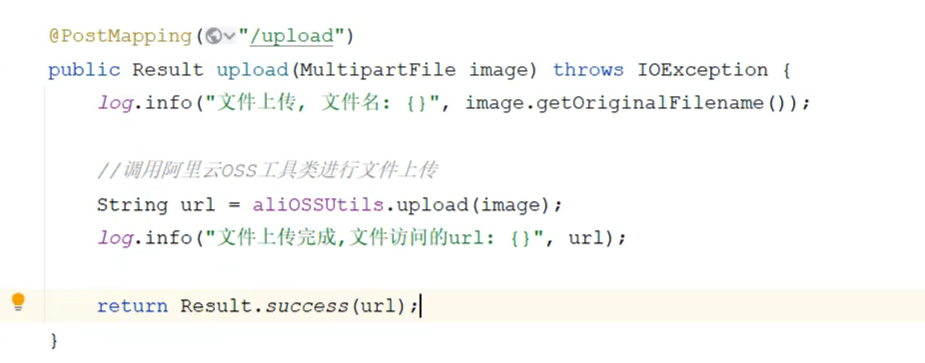
补充:HttpClient
